フィルターを管理する
フィルター ディレクトリでは、自分が作成したフィルターを参照および構成し、他のユーザーが共有したフィルターで作業を行うことができます。
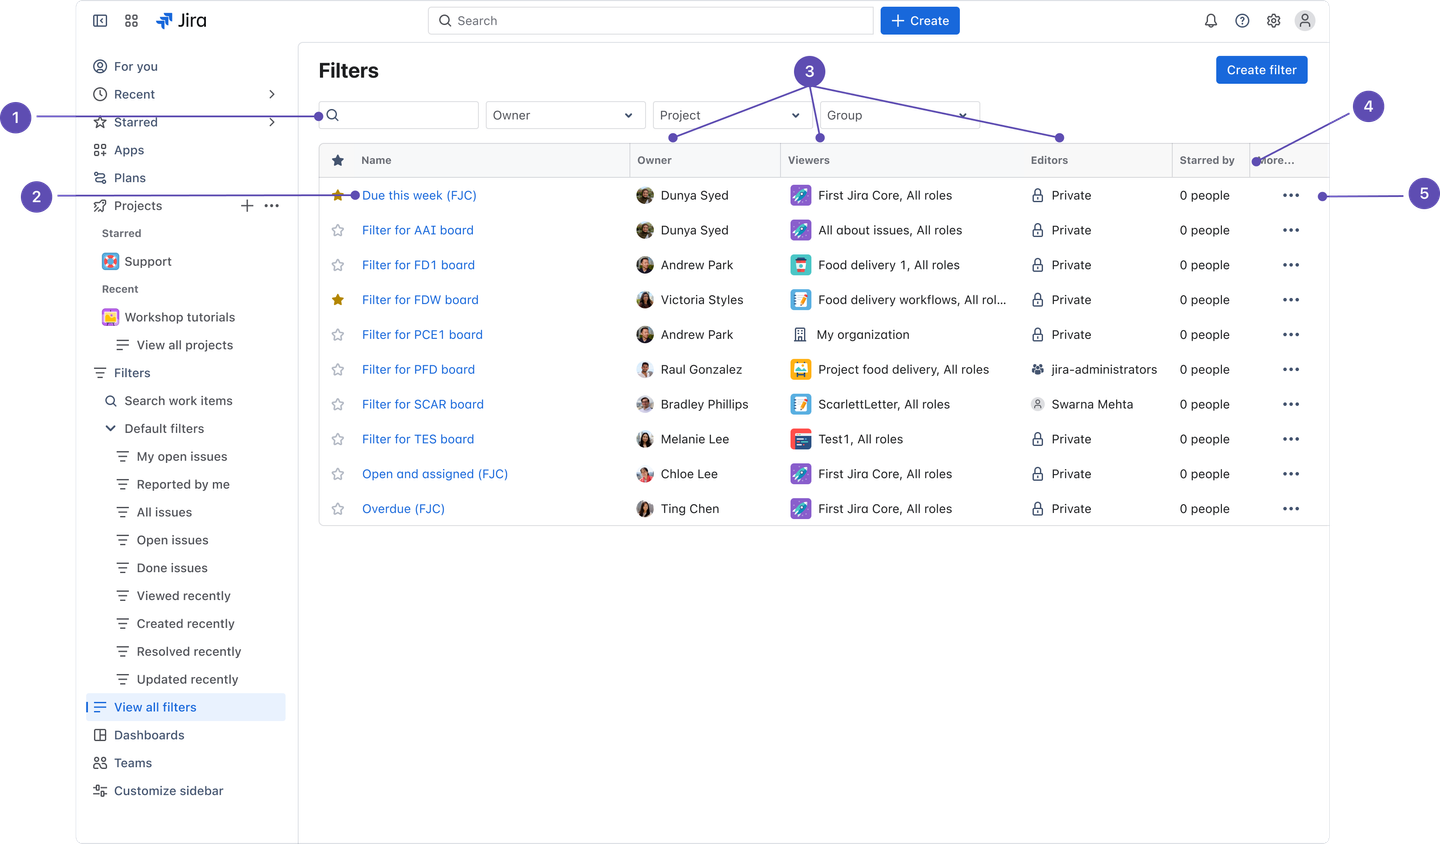
サイドバーから [フィルター] > [すべてのフィルターを表示] を選択すると、すべてのフィルターが表示されます。
[フィルター] ページでは、非公開フィルターと共有フィルターの両方を表示して構成できます。
フィルターを検索: フィルター名を入力してフィルターを検索するか、所有者、スペース、またはグループでフィルターを検索します。
名前: フィルター名を選択して開きます。ここからフィルターの検索条件の編集、既存の共有の追加または変更、購読の管理を実行できます。
所有者/閲覧者/編集者: フィルターの所有者、閲覧者、編集者が誰かを確認します。
人気度: フィルターにスターを付けた人数を確認します。
アクション: 通知登録の管理、フィルターのコピー、フィルターの編集、フィルターの所有権の変更、フィルターの削除を行います。
フィルターを検索する
自身が作成したフィルター、または他のユーザーによって共有されたフィルターを探して実行することができます。
サイドバーで [フィルター] を選択します。
検索ボックスにフィルター名を入力してフィルターを検索するか、所有者、スペース、またはグループでフィルターを検索します。
探しているフィルターが見つかったら、それを選択するだけでフィルターが実行されます。
または、サイドバーのフィルター メニューで、最近使用したフィルターやスター付きのフィルターを選択して実行することもできます。
[自分のオープンな作業項目]、[自分が報告した作業項目]、[最近表示した作業項目] などのシステム フィルターを実行するには、次の手順に従います。
上部のナビゲーション の検索バーを選択し、[すべての作業項目を表示] を選択します。
[その他のフィルター] の下にあるサイドバーでプリセット フィルターを選択して実行します。
フィルターを更新する
作成したフィルターの名前、説明、権限 (閲覧者と編集者) を更新したり、所有権を変更したりできます。通知登録を管理したり、他のユーザーが所有しているフィルターをコピーしたりすることもできます。
フィルターの所有権を変更できるのは Jira 管理者だけです。
フィルターの詳細を更新する方法は以下のとおりです。
サイドバーから [フィルター] > [すべてのフィルターを表示] の順に選択して、更新するフィルターを見つけます。
その他 (•••) を選択します。
必要に応じてフィルターの詳細を更新します。
[保存] を選択します。
更新するフィルターを選択して実行し、[詳細] を選択して名前、説明、権限、通知登録を変更することもできます。
フィルターの検索条件を更新する
フィルターの検索条件を変更して、変更した条件を後で再利用できます。
フィルターの検索条件を更新する方法は以下のとおりです。
更新するフィルターを見つけて選択します。
必要に応じて検索条件を更新し、条件が有効であることを確認するためにクエリを再実行します。フィルター名の横に [編集済み] と表示されます。
[保存] を選択すると、フィルターの現在の検索条件が更新された条件で上書きされます。
保存せずに変更内容を破棄する場合は、保存ボタンの横にあるドロップダウンを選択して [変更を破棄] を選択します。
検索条件を新しいフィルターとして保存する場合は、[保存] ボタンの横にあるドロップダウンを選択し、[名前を付けて保存] を選択します。
フィルターの所有者ではないユーザーがフィルターの検索条件を変更した場合は、自分を所有者とする新しいフィルターとして保存することしかできません。
フィルターの権限を更新する
自分が作成したフィルター、または編集権限があるフィルターは、ユーザー グループ、スペース、スペース ロールを介して他のユーザーと共有できます。こうしたフィルターをグローバルに共有することもできます。
すべての共有フィルターは「Jira の管理」グローバル権限を持つユーザーに表示されます。他のユーザーの共有フィルターの管理について詳しくは、こちらをご確認ください。
フィルターを閲覧または編集できるユーザーを確認してから、閲覧者と編集者を追加または変更できます。フィルターの権限を更新する方法は以下のとおりです。
サイドバーから [フィルター] > [すべてのフィルターを表示] の順に選択して、更新するフィルターを見つけます。
その他 (•••) を選択し、次に [編集] を選択します。
フィルターの閲覧者と編集者をドロップダウンから選択します。
[追加] を選択します。
[保存] を選択します。
フィルターの共有設定を削除するには、次の手順を実行します。
フィルターに移動し、[詳細] > [権限の編集] を選択します。
閲覧者/編集者を選択して [追加] を選択します。
フィルターを閲覧または編集できるユーザーについては、以下の表を参照してください。
閲覧者または編集者 | 説明 |
|---|---|
非公開 | フィルターは非公開であり、所有者と Jira 管理者のみが閲覧および編集できます。 |
ユーザー/グループ/スペース/ロール | フィルターはグループやスペースと共有されます。付与される権限 (閲覧者か編集者) に応じて、フィルターが共有されるユーザーはフィルターを閲覧または編集できます。 |
私の組織 | フィルターは Jira インスタンスのすべてのユーザーと共有されます。付与される権限 (閲覧者か編集者) に応じて、Jira インスタンスにログインしているすべてのユーザーがフィルターを閲覧または編集できます。 |
フィルターを購読する
フィルターの通知登録を行うことで、検索によって返されるすべての作業項目について、定期的に通知を受け取れます。特定の作業項目が変更された時に通知を受け取りたい場合は、作業項目のウォッチを行うことをおすすめします。
フィルターのメール サブスクリプションを作成する
検索結果のメール サブスクリプションを作成したい場合、その検索をフィルターとして保存する必要があります。自身や他のユーザーに対し、任意の頻度で配信できます。フィルターの最初の 200 件の結果だけが送信される点にご注意ください。
フィルターのメール購読を作成するには、次の手順に従います。
登録するフィルターを実行して、[詳細] (フィルター名の横) > [New subscriptions (新規サブスクリプション)] を選択します。
情報を入力して [購読] を選択します。
フィルターの購読を管理する
Jira が自分やグループに対してフィルター内の作業項目をメールで送信する頻度を設定します。
recipients
受信者として自分またはグループを指定できます。ただし、指定できるグループは、自分が所属しているグループに限られます。
注意:
受信者にグループを指定できます。ただし、指定できるのは自分がメンバーとして所属しているグループに限られます。
自身が "グループ フィルター サブスクリプションの管理" グローバル権限を持っている必要があります。
メールで送信されるフィルター結果は、受信者ごとに異なる点にご注意ください。たとえば、フィルターが
currentUser()関数を使用している場合、検索結果では受信者が現在のユーザーと見なされます。これは配信リスト (グループ用のメール エイリアス) には適用されません。多くのメンバーがいるグループと配信登録を共有する際、前述のように、個別のユーザーに対して検索が実行されるため、配信メールの生成に時間がかかる点にご注意ください。
サブスクリプション メールは、プレーン テキストでは表示が壊れる場合があるため、HTML 形式に設定することをおすすめします。個人のメール設定を HTML に更新するための手順については、「Jira 個人設定の管理」を参照してください。Jira 管理者の場合、既定のメール設定の設定方法について、「ユーザー既定設定の構成」 をご参照ください。
スケジュール
Jira が自分に対してフィルター内の作業項目をメールで送信する頻度を選択できます。スケジュールに [高度な設定] を選択している場合は、送信頻度を cron 式で構築します。
フィルター購読用の cron 式を構築する
スケジュールに [高度な設定] を選択している場合は、cron 式によってフィルターの購読を作成できます。cron 式によって、既定のスケジュールよりも細かく頻度を制御できます。たとえば、cron 式では毎月第 2 金曜日の午前 8:15 に通知を行うように定義できます。
cron 式は、スペースで区切られたフィールドの文字列です。cron 式の各フィールドを次の表に示します。この並び順で、左から右に指定する必要があります。
| 秒 | 分 | 時間 | 日 | 月 | 曜日 | 年 (任意) |
|---|---|---|---|---|---|---|---|
指定可能な値 |
|
|
|
|
|
|
|
許可される特殊文字 | , - * / | , - * / | , - * / | , - * / ?L W | , - * / | , - * / ?L # | , - * / |
cron 式では大文字/小文字が区別されません。
次のような例があります。
0 15 8 ? JAN MON 2014これを直訳すると、0 秒、15 分、8 時、日付は無指定、1 月、月曜日、2014 年となります。
通常の表記に置き換えると、2014 年 1 月の毎週月曜日の午前 8 時 15 分となります。? という文字は「特定の値を持たない」という意味です。この例では、月の日付に対して特定の値を設定していません。これは、曜日を設定してるため、日付を指定する必要がないからです。特殊文字の詳細は次のセクションをご確認ください。
特殊文字
特殊文字 | 用途 |
|---|---|
, | 値の一覧を指定します。たとえば、曜日フィールドでは、「MON,WED,FRI」は「毎週月、水、金曜日」を意味します。 |
- | 値の範囲を指定します。たとえば、曜日フィールドでは、「MON-FRI」は「毎週月、火、水、木、金曜日」を意味します。 |
* | とりうるすべての値を指定します。たとえば、時間フィールドでは、「*」は「その日の毎時」を意味します。 |
/ | 与えられた値に対する増分を指定します。例えば、[分] フィールドでは、"0/15" は "その 1 時間の間で、0 分から開始した場合の 15 分間隔" を意味します。 |
? | 特定の値を指定しません。これは、「曜日」または「日」の 2 つのフィールドのいずれかに値を指定し、もう 1 つには値を指定しない場合に便利です。 |
L | 最後の可能な値を指定します。これは、コンテキストに応じて異なる意味を持ちます。[曜日] フィールドでは、「L」単体は「各週の最後の日」(「毎土曜日」) を意味します。他の値のあとに使用すると「月の最後の xxx 曜日」 (たとえば「7L」は「その月の最後の土曜日」を意味します)。[月] フィールドでは、「L」単体は「月の最後の日」を、「LW」は「月の最後の平日」を意味します。 |
W | 月の特定の日に最も近い平日 (月曜日 〜 金曜日) を指定します。たとえば、"1W" は "その月の 1 日に最も近い平日" を意味します (1 日が土曜日の場合、メールは同月内の最も近い平日、すなわち 3 日の月曜日に送信されます)。"W" は、日の値として、範囲や一覧ではなく単一の日を指定している場合にのみ利用できます。 |
# | 特定の第 n 曜日を指定します。たとえば、"TUES#2" (または "3#2") は、"その月の第 2 火曜日" を意味します。 |
cron 式の例をいくつか示します。
cron 式 | 説明 |
|---|---|
| 毎日午後 8 時 15 分。 |
| 毎日午前 8 時 15 分。 |
| 毎日午後 2 時 00 分から午後 2 時 59 分までの 1 分間隔。 |
| 毎日午後 2 時 00 分から午後 2 時 55 分までの 5 分間隔。 |
| 毎日午後 2 時 00 分から午後 2 時 55 分までの 5 分間隔、および毎日午後 6 時 00 分から午後 6 時 55 分までの 5 分間隔。 |
| 毎日午後 2 時 00 分から午後 2 時 05 分までの 1 分間隔。 |
| 期間指定なしの (永久に続く) 10 分間隔。 |
| 毎週火曜日と木曜日の午前 7:30 |
| 3 月の毎週水曜日の午後 2 時10 分および午後 2 時 44 分。 |
| 毎週月、火、水、木、金曜日の午前 8 時 15 分。 |
| 毎月 15 日の午前 8 時 15 分。 |
| 毎月最終日の午前 8 時 15 分。 |
| 毎月最後の平日の午前 8 時 15 分。 |
| 毎月最後の金曜日の午前 8 時 15 分。 |
| 毎月第 2 金曜日の午前 8 時 15 分。 |
| 2007 年、2008 年、2009 年の毎月第 2 金曜日の午前 8 時 15 分。 |
| 毎月 1 日と 15 日の午前 1:00。 |
フィルターの RSS フィードを通知登録する
RSS フィードを購読するには:
右上の「その他のアクション」() を選択し、次に [エクスポート] を選択します。
[RSS のエクスポート] または [RSS のエクスポート (コメント付き)] をクリックします。表示されるページの URL は、フィード リーダーで使用できます。
返される作業項目の数を変更するには、URL にある
tempMaxパラメーターの値を変更します。RSS フィードで最新のコメントのみを受信したい場合、検索時に Date Updated フィールドを使用します。たとえば、先週作成されたコメントのみを受信するには、Date Updated フィールドを追加して updated within the last 1 week に設定します。
フィードで制限されたデータを表示するには、Jira にログインして API トークンを使用する必要が生じる場合があります。 API トークンの詳細についてご確認ください。
フィルターを削除する
自分が所有者であるカスタム フィルターは削除できますが、他のユーザーが所有しているフィルターやシステム フィルターは削除できません。
サイドバーから [フィルター] > [すべてのフィルターを表示] を選択します。
削除するフィルターを見つけます。
その他 (•••) > [削除] の順に選択します。
フィルターをコピーする
自分が作成したフィルターか、他の人が共有したフィルターをどれでもコピーできます。
サイドバーから [フィルター] > [すべてのフィルターを表示] を選択します。
コピーするフィルターを見つけます。
その他 (•••) > [フィルターをコピー] を選択します。
フィルターに新しい名前を付けます。
[保存] を選択します。
フィルターの検索条件を変更したあとでも、フィルターをコピーできます。フィルターの条件の更新に関する詳細をご確認ください。
フィルターの所有者ではないユーザーがフィルターの検索条件を変更した場合は、自分を所有者とする新しいフィルターとして保存することしかできません。
フィルターにスターを付ける
自分が作成したフィルター、または他のユーザーによって共有されたフィルターにスターを付けられます。フィルターにスターを付けると、そのフィルターがナビゲーションの [フィルター] メニューの一番上に表示されるため、フィルターをすばやく実行できます。
フィルターにスターを付けるには、次の手順に従います。
サイドバーから [フィルター] > [すべてのフィルターを表示] を選択します。
スターを付けるフィルターを見つけます。
お気に入りに追加するフィルター名の横にある星アイコンを選択します。
サイドバーから直接フィルターにスターを付けることもできます。
スターを付けるフィルターにカーソルを合わせます。
[スター付きに追加] を選択します。
フィルターを共有する
作成したフィルターは、ユーザー グループ、スペース、スペース ロールを介して他のユーザーと共有できます。こうしたフィルターをグローバルに共有することもできます。
すべての共有フィルターは「Jira の管理」グローバル権限を持つユーザーに表示されます。他のユーザーの共有フィルターの管理について詳しくは、こちらをご確認ください。
サイドバーから [フィルター] > [すべてのフィルターを表示] を選択します。
共有するフィルターを見つけて選択します。
ページ上部の [詳細] を選択します。
フィルターを共有したいグループ、スペース、またはスペース ロールを選択して [共有] セクションを更新し、[追加] をクリックします。
フィルターはメンバーであるグループまたはロールとのみ共有できます。[保存] を選択します。
フィルターの共有設定が表示されない場合は、Jira 管理者に共有オブジェクトの作成グローバル 権限をもらう必要があります。
フィルターの共有は、フィルターを実行してから [共有] をクリックする方法でも行えます。フィルターの URL をコピーしたり、別のユーザーやメール アドレスへ直接送信したりできます。
他のユーザーの共有フィルターを管理する
共有フィルターは、作成者が他のユーザーと共有したフィルターです。詳細は、上記の「フィルターを共有する」を参照してください。
ユーザーが共有フィルターを作成すると、そのユーザーが共有フィルターの最初の "所有者" となります。所有者は、共有フィルターを編集および修正できます。
Jira 管理者グローバル権限を持っている場合、他のユーザーが作成した共有フィルターを管理できます。手順については、「共有フィルターを管理する」を参照してください。
この内容はお役に立ちましたか?