Get started with Jira Service Management for admins
Your first stop for learning how to get started with Jira Service Management.
You’ll often be working on issues as part of a team, so it’s important to share what’s happening to keep your team up to date. You'll also need to keep up with the progress of issues you may not be directly working on. This is where watching, sharing, and comments come in.
Watching means you receive notifications when things happen on an issue. For example, when someone comments on, edits, or transitions the issue, you'll be notified.
To watch an issue:
Open the issue view of the request.
Click the watch icon () or press W on your keyboard.
If the watch icon is filled (), you’re watching the issue. If there’s one or more person watching the issue, the number next to the watch icon shows how many people are watching the issue.
You can tell your team you think an issue is important by voting for it. The more votes an issue has, the more relative importance it has to your team.
To watch an issue:
Open the issue view of the request.
Click the vote icon () in the top right.
You might want to let your teammates know what you’re working on. To share an issue, you can either copy and paste the link, or send them a message using email.
To share an issue by copying the link:
Open the issue view of the request.
Hover over the issue id, then click the copy icon ().
Paste the link to your teammate.
To share an issue by sending them an email:
Open the issue view of the request.
Click the share icon ().
Enter who you want to share the issue with and a message to send them.
Click Send.
Comments can range from simple text updates to let watchers know what's happening on the issue, to code snippets, images, tables, and more. The editor converts things like links, code, and markdown on-the-fly, so you can paste in your content and let the editor do the work.
Press M on your keyboard to jump straight into the comment field and start typing.
Common markdown formatting options:
## for H2 style (we support H2–H5)
**bold** for bold
*italic* for italic
``` for a code block
[this is link text](www.atlassian.com) for this is link text
* for bulleted lists
1. for numbered lists
If you need someone to know about a comment, you can mention them in it. Type @ followed by their name, then choose the right person from the list. The person you mention will be notified about your comment and can quickly jump to the issue to see what's happening.
Use Atlassian Intelligence to quickly catch up on an issue’s comments. Read a quick AI summary instead of going through all comments one by one.
To read a summary:
In the Activity section of the issue, show Comments.
Select Summarize.
The AI summary is only visible to you, and disappears when you navigate away from the issue.
In the Jira Service Management issue view, comments are split into internal and external comments, meaning you can choose whether you want to Add internal note or Reply to customer.
Reply to customer makes the comment visible to anyone who has permission to see the issue, plus the customer.
Internal notes don’t appear on the portal view of the issue, so your customer won’t be able to see them. They allow your team members to have private discussions about customer requests, and by default, anyone who is a member of your Service Desk Team (role) within your service project can view internal notes
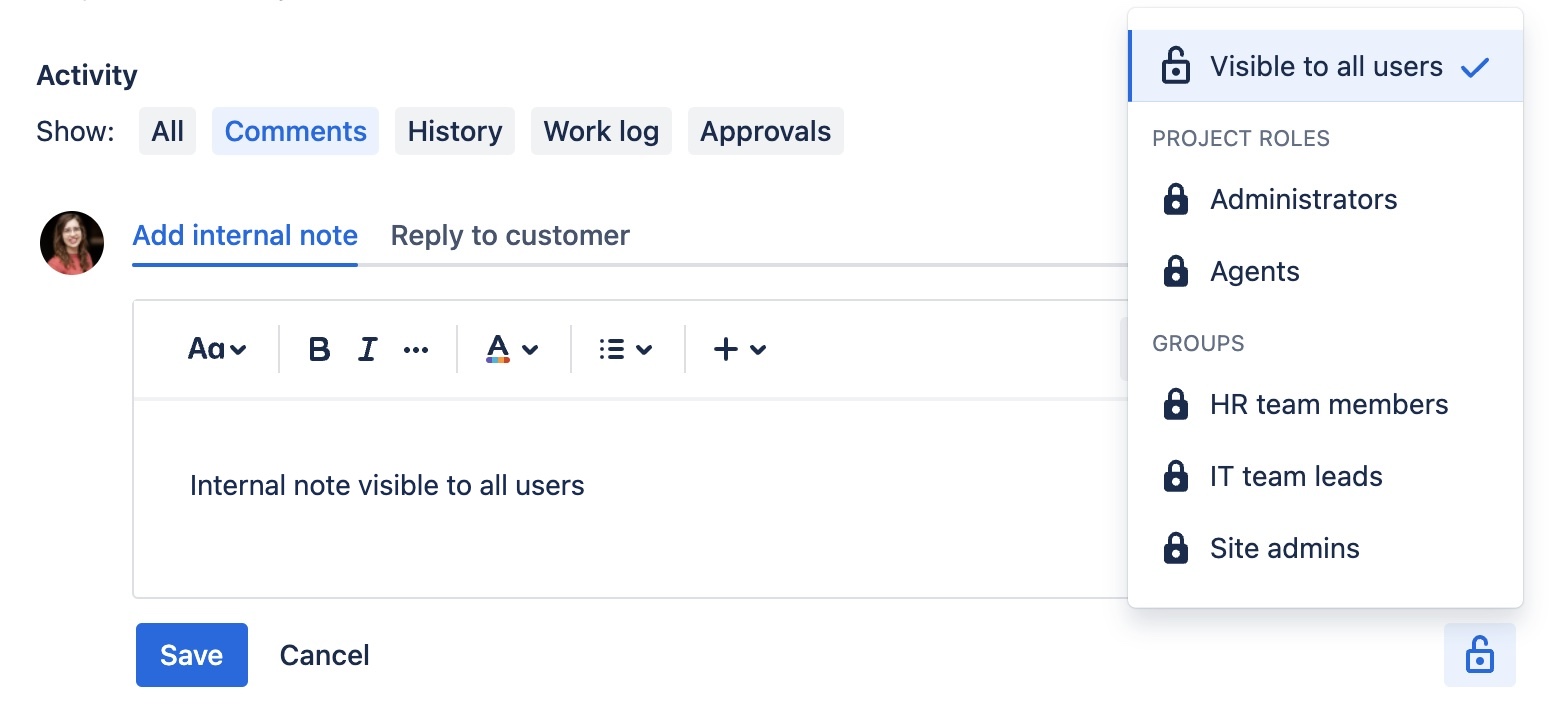
In the case of particularly sensitive topics these discussions may need to be confidential between only a few team members (such as those in your HR or Legal teams), so you can restrict the visibility of your comments to a certain Project role or Group.
Select an issue, and in the issue view, select Add internal note.
Select the open lock icon () below the comment (or if you’re using a screen reader, listen for the default setting 'Visible to all users').
Use the menu to select which Groups or Project roles you’d like to restrict this comment to.
Save your comment.
Only the comment creator and users added to the selected group or project role will see this comment once it’s saved, meaning you can continue to work knowing your confidential request information will stay private to you and your team.

Find our more about project roles in Jira Service Management, or learn how to create and manage your groups.
If you’re a Jira admin, you can also choose whether your team can restrict comments to both Groups and Project roles, or only restrict to Project roles. It’s important to remember that this setting will apply across every project on your site - not just to Jira Service Management.
Go to Global Settings (), then Settings, then General Configuration.
Select Edit Settings.
Find the Comment visibility setting in the Options section.
Select Project Roles only if your team only needs to restrict comments to project roles, or select Groups & Project Roles to allow your team members to restrict to either.
Was this helpful?