Manage filters
The Filters directory allows you to view and configure filters that you have created and work with filters other users have shared.
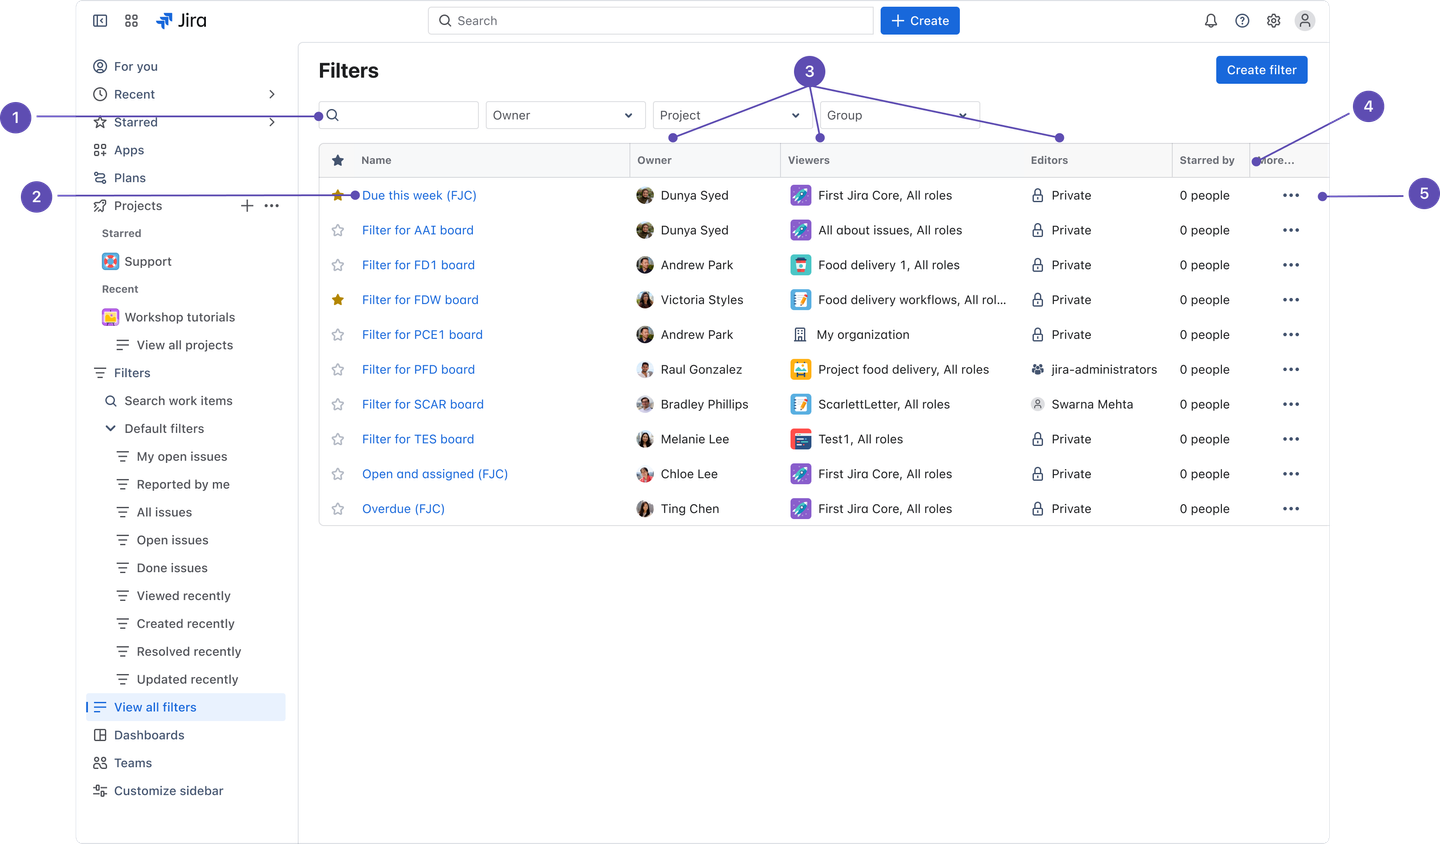
From the sidebar, select Filters and then select View all filters to see all filters.
On the Filters page, you can view and configure both private and shared filters:
Find your filter: Type to find the filter by name, or search for filters by owners, spaces, or groups.
Name: Select the filter name to open it. From here, you can edit the filter’s search criteria, add or change existing shares, and manage the subscriptions.
Owner/Viewers/Editors: See who the owners, viewers and editors of the filter are.
Popularity: See how many people have starred a filter.
Actions: Manage subscriptions, copy the filter, edit the filter, change the filter’s ownership, or delete the filter.
Search for a filter
You can find and run any filters that you have created or that have been shared by other users.
Select Filters in the sidebar.
Type in the search box to find the filter by name, or search for filters by owners, spaces, or groups.
Once you’ve found the filter you’re looking for, simply select it to run it.
Alternatively, you can select a recent or starred filter in the filters menu from the sidebar to run it.
To run a system filter, like My open work items, Reported by me, and Viewed recently:
Select the Search bar in the top navigation, then select View all work items.
Select a preset filter in the sidebar under More filters to run it.
Update a filter
You can update the name, description, permissions (viewers and editors), and change ownership of any filter you’ve created. You can also manage subscriptions and copy the filter that others own.
You’ll need to be a Jira admin to change the filter's ownership.
To update the filter's details:
From the sidebar, select Filters, and then select View all filters, and find the filter you wish to update.
Select more (•••).
Update the filter details as required.
Select Save.
Alternatively, you can select and run the filter you wish to update and select Details to change name, description, permissions and subscriptions.
Update a filter's search criteria
You can change the search criteria of a filter and reuse the changed criteria in the future.
To update a filter’s search criteria:
Find the filter you want to update and select it.
Update the search criteria as desired, and rerun the query to ensure the criteria is valid. You will see the word Edited displayed next to your filter name.
Select Save to overwrite the current search criteria of the filter with the updated criteria.
If you want discard your changes instead, select the dropdown next to the save button, and select Discard changes.
If you want to save the search criteria as a new filter, select the dropdown next to the Save button and select Save as.
If you’re not the owner of a filter, and you’ve made changes to the filter’s search criteria, you can only save it as a new filter with you as the owner.
Update permissions of a filter
You can share filters you've created or you have permission to edit with other users via user groups, spaces, and space roles. You can also share them globally.
Any filter that is shared is visible to users who have the Administer Jira global permission. Learn more about managing other users' shared filters.
You can check who can view or edit a filter, and then add or change viewers and editors. To update permissions of a filter:
From the sidebar, select Filters, and then select View all filters, and find the filter you wish to update.
Select more (•••), then select Edit.
Select the viewers and editors of the filter from the dropdown.
Select Add
Select Save.
To change your filter's sharing settings:
Go to your filter and select Details, then select Edit permissions
Select your viewer/editor and choose Add.
See the below table to see who can view or edit a filter.
Viewers or Editors | Description |
|---|---|
Private | The filter is private and can only be viewed or edited by the owner and Jira admins. |
Users/Group/Space/Roles | The filter is shared with a group or space. Depending on the permissions granted (viewers or editors), people the filter is shared with can view or edit the filter. |
My organization | The filter is shared with all users on the Jira instance. Depending on the permissions granted (viewers or editors), any logged-in user on the Jira instance can view or edit the filter. |
Subscribe to a filter
Subscribing to a filter provides you with a periodic notification for all work items returned by the search. If you want to be notified when a particular work item changes, you should watch the work item instead.
Create an email subscription for a filter
Your search must be saved as a filter if you want to create an email subscription for it. You can create a subscription of any frequency for yourself and/or other users. Note, only the first 200 results of a filter are sent.
To create an email subscription for a filter:
Run the filter that you want to subscribe to, then select Details (next to the filter name), then New subscriptions.
Fill in the information and select Subscribe.
Manage subscriptions of a filter
Set the frequency with which you want Jira to email you or a group of people the work items in a filter.
Recipients
You can select to specify yourself or a group as a recipient. However, you can only select a group that you are a member of.
Note:
You can choose to specify a group as a recipient, however you can only select a group that you are a member of:
You must have the 'Manage Group Filter Subscriptions' global permission.
Be aware that the emailed filter results will be specific to each recipient. For example, if the filter uses the
currentUser()function, the search results will be evaluated with the recipient as the current user. This does not apply to distribution lists (group email aliases).Be careful about sharing a subscription with a group with many members, as it can take a long time to generate the emails to be sent, since the search needs to be executed for each user (as per the previous point).
Subscription emails should be sent as HTML rather than plain text, as the email can appear broken in plain text. See manage your Jira personal settings for instructions on updating your own email preference to HTML. If you're a Jira admin, take a look at configuring the user default settings to find out how to set default email settings.
Schedule
You can select how often you would like Jira to send you emails for work items in a filter. If you’ve selected Advanced for your schedule, then construct a cron expression for your interval.
Construct a cron expression for a filter subscription
You can create a subscription to a filter using cron expressions if you’ve selected Advanced for your schedule. A cron expression gives you more control over the frequency, compared to the default schedules. For example, you could define a cron expression to notify you at 8:15 am on the second Friday of every month.
A cron expression is a string of fields separated by spaces. The following table displays the fields of a cron expression, in the order that they must be specified (from left to right).
| Second | Minute | Hour | Day-of-month | Month | Day-of-week | Year (optional) |
|---|---|---|---|---|---|---|---|
Allowed values |
|
|
|
|
|
|
|
Allowed special | , - * / | , - * / | , - * / | , - * / ? L W | , - * / | , - * / ? L # | , - * / |
Cron expressions are not case-sensitive.
Here is an example:
0 15 8 ? JAN MON 2014This literally translates to 0 seconds, 15 minutes, 8 hours, any day of the month, January, Monday, 2014.
In plain English, this represents 8:15 am on every Monday during January 2014. Note, the ? character means "no particular value". In this example, we've set the Day-of-month to no particular value. We don't need to specify it, as we've specified a Day-of-week value. Read more about special characters in the next section.
Special characters
Special character | Usage |
|---|---|
, | Specifies a list of values. For example, in the Day-of-week field, 'MON,WED,FRI' means 'every Monday, Wednesday, and Friday'. |
- | Specifies a range of values. For example, in the Day-of-week field, 'MON-FRI' means 'every Monday, Tuesday, Wednesday, Thursday and Friday'. |
* | Specifies all possible values. For example, in the Hour field, '*' means 'every hour of the day'. |
/ | Specifies increments to the given value. For example, in the Minute field, '0/15' means 'every 15 minutes during the hour, starting at minute zero'. |
? | Specifies no particular value. This is useful when you need to specify a value for one of the two fields Day-of-month or Day-of-week, but not the other. |
L | Specifies the last possible value; this has different meanings depending on context. In the Day-of-week field, 'L' on its own means 'the last day of every week' (i.e. 'every Saturday'), or if used after another value, means 'the last xxx day of the month' (e.g. '7L' will mean 'the last Saturday of the month'). In the Day-of-month field, 'L' on its own means 'the last day of the month', or 'LW' means 'the last weekday of the month'. |
W | Specifies the weekday (Monday-Friday) nearest the given day of the month. For example, '1W' means 'the nearest weekday to the 1st of the month' (note that if the 1st is a Saturday, the email will be sent on the nearest weekday within the same month, i.e. on Monday 3rd). 'W' can only be used when the day-of-month is a single day, not a range or list of days. |
# | Specifies the nth occurrence of a given day of the week. For example, 'TUES#2' (or '3#2') means 'the second Tuesday of the month'. |
Here are some examples of cron expressions:
Cron expression | Description |
|---|---|
| Every day at 8:15 pm. |
| Every day at 8:15 am. |
| Every minute starting at 2:00 pm and ending at 2:59 pm, every day. |
| Every 5 minutes starting at 2:00 pm and ending at 2:55 pm, every day. |
| Every 5 minutes starting at 2:00 pm and ending at 2:55 pm, AND every 5 minutes starting at 6:00 pm and ending at 6:55 pm, every day. |
| Every minute starting at 2:00 pm and ending at 2:05 pm, every day. |
| Every 10 minutes, forever. |
| 7:30 am every Tuesday and Thursday |
| 2:10 pm and 2:44 pm every Wednesday in the month of March. |
| 8:15 am every Monday, Tuesday, Wednesday, Thursday, and Friday. |
| 8:15 am on the 15th day of every month. |
| 8:15 am on the last day of every month. |
| 8:15 am on the last weekday of every month. |
| 8:15 am on the last Friday of every month. |
| 8:15 am on the second Friday of every month. |
| 8:15 am on the second Friday of every month during the years 2007, 2008, and 2009. |
| 1:00 am on the 1st and 15th day of every month. |
Subscribe to a filter’s RSS feed
To subscribe to a filter's RSS feed:
Select more actions () at the top-right, then select Export.
Select either Export RSS or Export RSS (with comments). The URL of the page that shows can be used in your feed reader.
You can change the number of work items returned by changing the value of the
tempMaxparameter in the URL.If you only want to receive current comments in an RSS feed, use the Date Updated field when doing a search. For example, to only receive comments created in the last week, add the Date Updated field and set it to updated within the last 1 week.
To view restricted data in your feed, you may need to log in to Jira and use API tokens. Learn more about API tokens.
Delete a filter
You can delete custom filters that you're the owner of, but you can't delete filters owned by other users or system filters.
From the sidebar, select Filters, and then select View all filters.
Find the filter you wish to delete.
Select more (•••), then Delete.
Copy a filter
You can copy any filter that was either created by you or shared with you.
From the sidebar, select Filters, and then select View all filters.
Find the filter you want to copy.
Select more (•••), then Copy filter.
Give the filter a new name.
Select Save.
You can copy a filter after you’ve made changes to the filter’s search criteria as well. Learn more about updating the filter’s criteria.
If you’re not the owner of a filter, and you’ve made changes to the filter’s search criteria, you can only save it as a new filter with you as the owner.
Star a filter
You can star filters that you've created or that have been shared by others. When you star a filter, it appears at the top of the Filters menu in the navigation so you can run it quickly.
To star a filter:
From the sidebar, select Filters, and then select View all filters.
Find the filter you wish to star.
Select the star icon next to the filter name to add it to your favorites.
You can also star a filter directly from the sidebar:
Hover your cursor over the filter you want to star.
Select Add to starred.
Share a filter
You can share filters you've created with other users via user groups, spaces, and space roles. You can also share them globally.
Any filter that is shared is visible to users who have the Administer Jira global permission. Learn more about managing other users' shared filters.
From the sidebar, select Filters, and then select View all filters.
Find the filter you want to share and select it.
Choose Details at the top of the page
Update the Shares section by selecting the group, space, or space role that you want to share the filter with and clicking Add.
You can only share filters with groups or roles of which you're a member.Select Save.
If you can't see the filter's sharing configuration, you'll need your Jira administrator to give you the Create Shared Object global permission.
You can also share your filter by running it, then clicking Share. You can copy the URL of the filter or send it directly to another person or email address.
Manage other users' shared filters
A shared filter is a filter whose creator has shared that filter with other users. Refer to sharing a filter above for details.
When a shared filter is created by a user, that user initially 'owns' the shared filter. Being the owner, they can edit and modify the shared filter.
If you have the Jira Administrators global permission, you can manage shared filters that were created by other users. For instructions, see managing shared filters.
Was this helpful?