Get started with Jira Service Management for admins
Your first stop for learning how to get started with Jira Service Management.
Jira Service Management provides a powerful bidirectional integration with Zendesk. When a new ticket is created in Zendesk, a corresponding alert is automatically created in Jira Service Management, containing rich information about the ticket. Jira Service Management provides rich notifications with on-call rotation, scheduling, and alert escalations to ensure the best ticket management. As you execute actions on the alerts, such as acknowledge, comment, or close, the Zendesk ticket is also automatically updated with comments about these alert actions.
When a ticket is created in Zendesk, it creates an alert in Jira Service Management.
When a ticket is solved or closed in Zendesk, it closes the alert in Jira Service Management.
When a comment is added to the ticket in Zendesk, it adds a note to the alert in Jira Service Management.
If Send Alert Updates Back to Zendesk is enabled, actions for Zendesk are executed in Zendesk when the chosen action is executed in Jira Service Management for alerts that are created by the Zendesk integration.
If Create Zendesk Tickets for Jira Service Management Alerts is enabled, actions for Zendesk are executed in Zendesk when the chosen action is executed in Jira Service Management for alerts that have a source other than the Zendesk integration.
The action mapping feature is explained in detail in the Map alert actions section on this page.
To add a Zendesk integration in Jira Service Management, complete the following steps:
Go to your team’s operations page.
On the left navigation panel, select Integrations and then Add integration.
Run a search and select “Zendesk”.
On the next screen, enter a name for the integration.
Optional: Select a team in Assignee team if you want a specific team to receive alerts from the integration.
Select Continue.
The integration is saved at this point.
Expand the Steps to configure the integration section and copy the integration URL generated for your account (that contains the endpoint URL and API key).
You will use this URL and key while configuring the integration in Zendesk later.
Select Turn on integration.
The rules you create for the integration will work only if you turn on the integration.
To configure the integration in Zendesk, complete the following steps:
1. In Zendesk, go to the Admin page.
2. Select Apps and Integrations > Webhooks.
3. Select Create Webhook.
4. Select Trigger or automation.
5. Paste the URL copied previously into Endpoint URL.
6. Select POST for Request method.
7. Select Create Webhook.
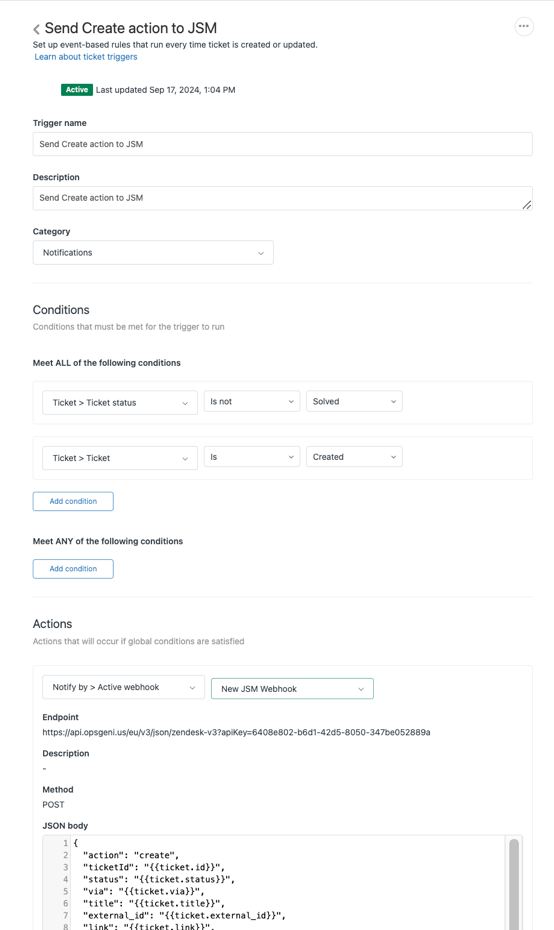
8. From the admin panel, select Object and rules > Triggers.
9. Select Add Trigger.
10. Create the triggers as needed. Find out how to set triggers.

In Jira Service Management, you can define mappings between Jira Service Management actions and Zendesk actions. The following values must be set up to configure actions:
API Token: The API token created in your Zendesk account
Subdomain: The subdomain of the Zendesk account (e.g. 'atlas7486' for atlas7486.zendesk.com)
Email: The email used to log into your Zendesk account
Use this section to map Jira Service Management actions to Zendesk actions when the source of the alert is Zendesk (that is when the alert is created by the Zendesk integration).
Map Jira Service Management actions to Zendesk actions. For example, add an internal note to Zendesk ticket, when the alert is acknowledged. To do this, go to the Send Alert Updates Back to Zendesk section and define "If alert is acknowledged in Jira Service Management, add it as an internal note to ticket in Zendesk".
Use this section to map Jira Service Management actions to Zendesk actions when the source of the alert is NOT Zendesk (that is when the alert is created by another integration).
Go to the Create Zendesk Tickets for Jira Service Management Alerts section. Map one Jira Service Management action to "create a ticket" Zendesk action. The Jira Service Management action doesn't have to be "alert is created"; it can be other actions as well.
JSON
1
2
3
4
5
6
7
8
9
10
11
12
13
14
15
16
17
18
19
{
  "action": "create",
  "ticketId": "92",
  "status": "Open",
  "via": "Web Form",
  "title": "Ticket Subject",
  "external_id": "",
  "link": "https://atlas7486.zendesk.com/agent/tickets/92",
  "priority": "High",
  "due_date": "September 11, 2024",
  "ticket_type": "Task",
  "assignee_name": "Dan Morgan",
  "organization_name": "atlas",
  "group_name": "Support",
  "account": "atlas",
  "requester_name": "Dan Morgan",
  "description": "Ticket Description",
  "latest_comment": "Public Message Example"
}
Was this helpful?