列の設定
このページは 企業管理 スペース 用です
スペースがチーム管理対象であるか、企業管理対象であるかを確認するには、ヘッダーまたはサイドバーのスペース名の横にある [その他のアクション] (•••) を選択します。開いたメニューの下部に、スペースの詳細が表示されます。
スクラム ボードのアクティブ スプリント ビューとカンバン ボードの縦の列は、ボードのスペースのワークフローを表します。
突き詰めると、列は作業項目の現在のステータスを示しています。たとえば、スクラム ボードの既定の列は [作業前]、[進行中]、[完了] です。カンバン ボードの既定の列は [バックログ]、[開発用に選択]、[進行中]、[完了] です。
チームのワークフローが成熟するにつれて、チームの作業プロセスにさらに多くのステータスを導入する場合があります。チームの作業を整理して議論しやすいように、1 つの列に複数のステータスを割り当てて、ボード全体でカードを移動する際にチームが使用する列の数を減らせます。
必要に応じて、これらの列の追加、削除、名前変更、移動を行えます。どのステータスを特定の列にマッピングするか、さらに各列に制約を適用するかどうかも選択できます。
はじめる前に
ボードおよびその設定を構成するには、次のいずれかである必要があります。
ボードの場所のスペース管理者
ボード自体のボード管理者
列を編集する
ボードの列を編集するには、次の手順に従います。
サイドバーに表示されるボード名の横で [その他の操作] (•••) > [ボード設定] の順に選択します。
[レイアウト] を選択して、サイドバーのメニューの残りの部分を展開します。
[列] を選択します。
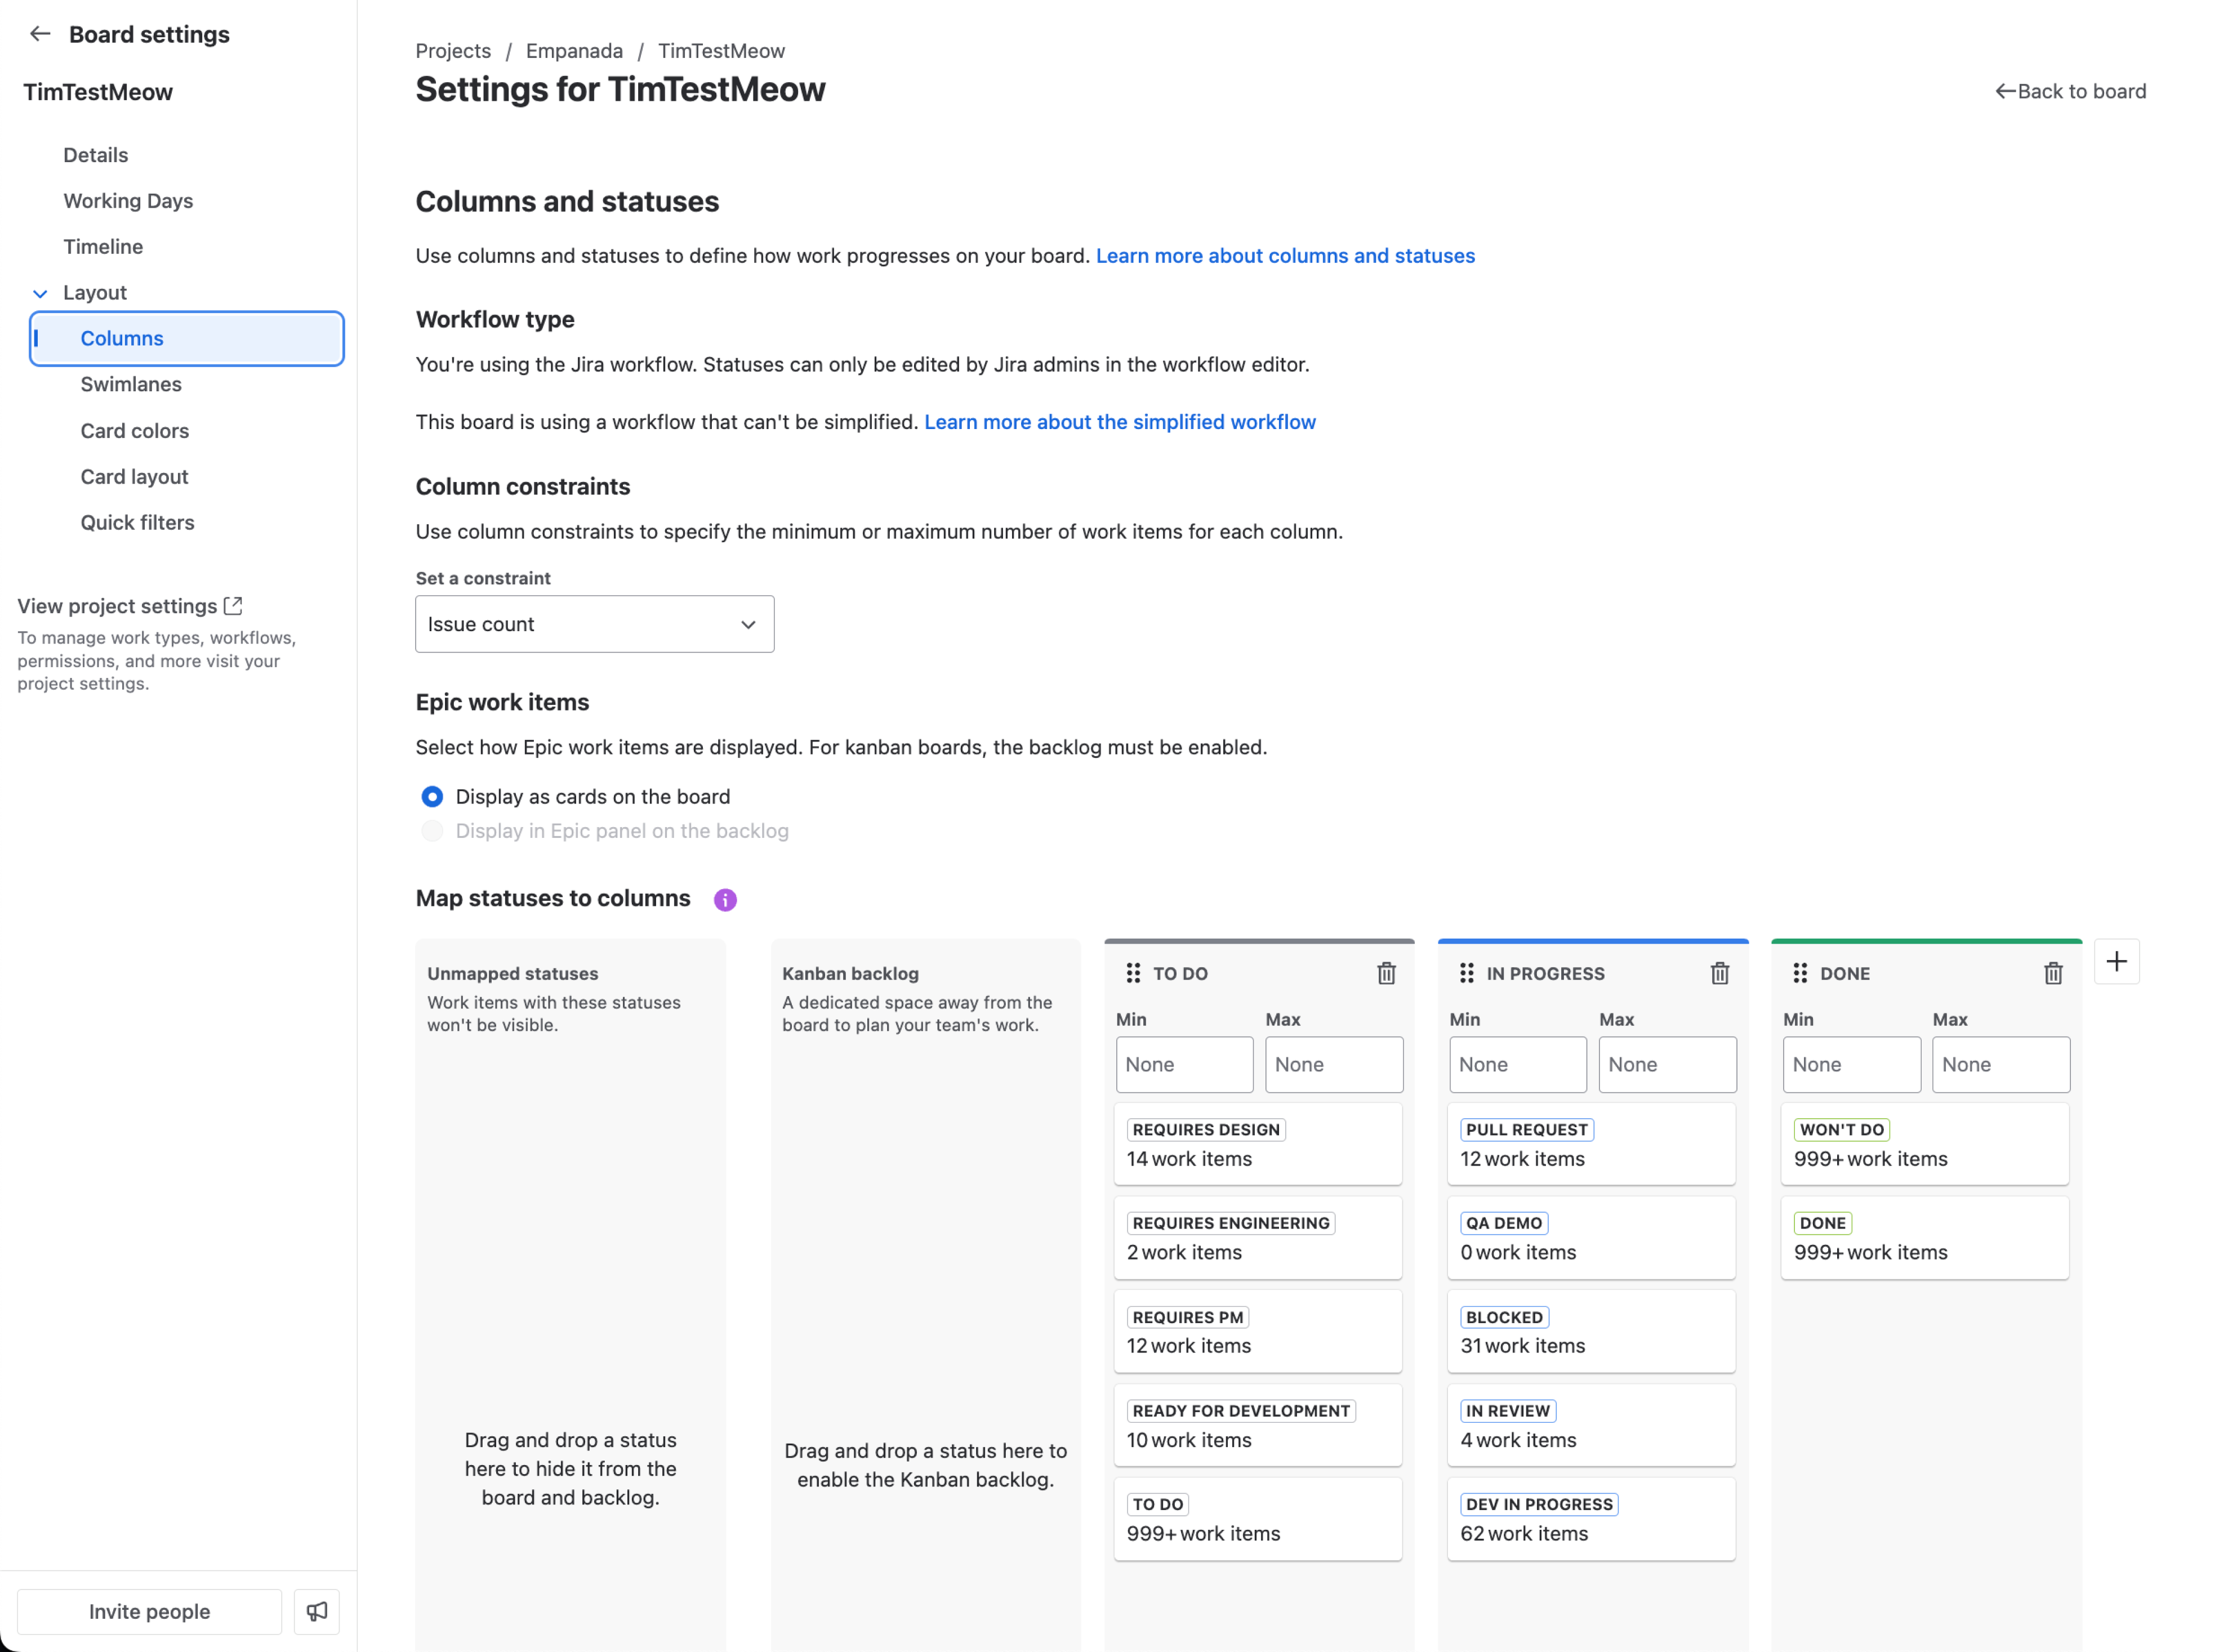
[ステータスを列にマッピング] で、次の表に記載された説明に従って列を編集できます。
新規列の追加 | 列の右側にある [追加] (+) アイコンを選択します。新しい列の名前を入力し、そのカテゴリを選択して、[列を追加] を選択します。 簡易ワークフローを使用している場合は、新しい列に合わせて、新しいステータスが自動的に作成されます。簡易ワークフローの詳細をご確認ください。 |
|---|---|
列の名前の変更 | 編集する列の名前を選択し、既存の名前を変更して Enter を押します。 |
列の削除 | 列の一番上にある [削除] () を選択します。 削除された列にマッピングされた Jira ワークフローのすべてのステータスは、[マッピングされていないステータス] パネルに戻ります。Jira ワークフローとは |
列の移動 | 列名の上にカーソルを重ねて、新しい位置まで列を左または右にドラッグします。列をドロップして新しい位置に配置します。 |

上のスクリーンショットが示すように、各列にはグレー、青、緑のバーが表示されます。
一番左の 1 列は常にグレーで表示されます。これは項目が「新規」ステータスであることを示します。
一番右の 1 列は常に緑で表示されます。これは項目が「成功」ステータスであることを示します。
中央の列(または、列を追加した場合は複数の列)は常に青で表示されます。これは項目が「進行中」であることを示します。
これらの色は、Jira アプリ用ガジェットなど、Jira のさまざまな場所で表示されます。
ステータスを列にマッピングする
次の表に示すように、既定ではボードの列は既定の Jira ステータスにマッピングされています。これは必要に応じて変更できます。たとえば、カスタマイズした Jira ステータスを追加して使用している場合、このステータスをボード内の適切な列にマッピングできます。
ボードのスペースが既定の Jira ワークフローを使用している場合
既定の列 | 既定でマッピングされたステータス |
|---|---|
作業前 | オープン、再オープン |
進行中 | 進行中 |
完了 | 解決済み、クローズ |
ボードのスペースで簡易ワークフローを使用している場合
既定の列 | 既定でマッピングされたステータス |
|---|---|
作業前 | 作業前 |
進行中 | 進行中 |
完了 | 完了 |
どのステータスを特定の列にマップするかを編集する
サイドバーに表示されるボード名の横で [その他の操作] (•••) > [ボード設定] の順に選択します。
[レイアウト] を選択して、サイドバーのメニューの残りの部分を展開します。
[列] を選択します。
[ステータスを列にマッピングする] では、次の表に記載された説明に従って、どのステータスを特定の列にマッピングするかを編集できます。
ステータスを列にマッピングする | ステータスを [マッピングされていないステータス] パネルから該当する列にドラッグします。 |
|---|---|
ステータスと列のマッピングを削除する | ステータスを現在の列から [マッピングされていないステータス] パネルにドラッグ アンド ドロップします。 |
ステータスがどの列にマッピングされるかを変更する | ステータスを元の列から新しい列にドラッグ アンド ドロップします。 |
Jira では、ボードの右端の列にある作業項目のみが完了とみなされます。[完了]、[ブロック済み]、[Canceled (キャンセル済み)] など、完了した作業を表すステータスがある場合は、ボード設定でそれらが右端の列にマッピングされていることを確認してください。これらのステータスが正しくマッピングされていない場合、「未完了」の作業アイテムが原因でスプリントを完了できない可能性があります。または特定のステータス(Blocked や Canceled など)のアイテムは完了として表示されない場合があり、今後のスプリントに繰り越される可能性があります。
注: 一部のステータス (特にカスタム ステータス) は、作業項目で使用されているワークフローでそれらのステータスが利用されていない場合、ボード上の作業項目には利用できないことがあります。Jira ワークフローとは
企業管理対象スペースで、ワークフローのステータスとトランジションを表示できます。作業項目を表示する際にステータス ドロップダウンを選択し、[ワークフローを表示] を選択します。
新しいステータスを追加する
ボードで簡易ワークフローを使用している場合
サイドバーに表示されるボード名の横で [その他の操作] (•••) > [ボード設定] の順に選択します。
[レイアウト] を選択して、サイドバーのメニューの残りの部分を展開します。
[列] を選択します。
[マッピングされていないステータス] パネルで、[ステータスを追加] を選択します。
新しいステータスの名前を入力し、そのカテゴリを選んで [ステータスを追加] を選択します。
注意: [ステータスを追加] ボタンは、ご自身がこのボードのスペースで Jira スペース管理者の権限を持つ場合にのみ利用できます。適切な権限を持たない場合や、スペースの簡易ワークフローの使用が中止された場合は、[ステータスを追加] ボタンが表示されなくなります。
ステータスを削除する
次の場合にのみ、ステータスを削除できます:
このボードのスペースのスペース管理者である場合、および
現在そのステータスの作業項目はありません。
他のワークフローがこのステータスを使用中の場合は、ステータスは現在のワークフローから削除されますが、削除はされません。
ボードで簡易ワークフローを使用している場合
サイドバーに表示されるボード名の横で [その他の操作] (•••) > [ボード設定] の順に選択します。
[レイアウト] を選択して、サイドバーのメニューの残りの部分を展開します。
[列] を選択します。
関連するステータスを [マッピングしていないステータス] パネルにドラッグ アンド ドロップします。
そのステータスの作業項目がない場合は、ステータス カードの [削除] () を選択して削除できます。
ボードが簡易ワークフローを使用していない場合、Jira 管理者のみがワークフロー エディターでステータスを削除できます。Jira ワークフローとは
列制約を設定する
ワークフローの段階ごとの制約の設定は、カンバンにとって大変重要です。設定することで、作業が継続的にパイプラインを流れるようになります。スクラムでは使いやすく、難所を早期に発見し、スプリントのスコープを調整することもできます。 すべての列、または指定した列だけに、制約を指定できます。
制約は、列に最小または最大数の作業項目が表示されると、視覚的なインジケータをトリガーします。ボードを見ると、すぐに気づくはずです
ボード ビューで列の制約を超えると、列のヘッダーの色が次のように変わります。
赤の列ヘッダー - 作業項目が最大数を超えています
黄色の列ヘッダー - 作業項目の最小数を満たしていません
列の制約の値は、制約を設定した各列の上部に表示されます。これらの値は、列に表示される作業項目の数には影響しません。
列の制約は、クイック フィルターで非表示になっているかどうかに関係なく、列内の作業項目の合計数に適用されます。クイック フィルターを設定する
ボードの列に制約を設定するには:
サイドバーに表示されるボード名の横で [その他の操作] (•••) > [ボード設定] の順に選択します。
[レイアウト] を選択して、サイドバーのメニューの残りの部分を展開します。
[列] を選択します。
以下の表の説明のとおりに、制約を編集します。
列の制約を有効にする | [列制約] で [作業項目数] または [作業項目数 (サブタスク除く)] のいずれかを選択します。 列の制約を有効にすると、各列に作業項目数が表示されます。サブタスクを除外したい場合は(スクラム チームの場合、これをおすすめします)、個人のタスク数ではなく、チームのストーリー数に対して制約を設定できます。 |
|---|---|
列の最小数または最大数に対する制約を設定する | 列の名前の下に、最小値または最大値を入力できます。 制約を削除するには、既存の値をクリアします。 |
すべての列の制約を削除する | [列制約] で [なし] を選択します。 |
ボード上で列を直接設定する
あなたがスペース管理者かボード管理者で、ボードで簡素化されたワークフローを使用している場合は、ボード上で列を直接設定できます。
列を作成するには、すべての列の右側にある + アイコンを選択します。
列の名前を変更するには、列の名前を選択して直接編集します。
列を移動するには、列の上部を選択し、新しい場所にドロップします。
列に制限を設定するには、列の名前を右クリックするかカーソルを合わせて [その他の操作] () > [列の制限を設定] の順に選択します。
列を削除するには、列の名前を右クリックするかカーソルを合わせて [その他の操作] () > [削除] の順に選択します。
カンバン バックログを有効化する
カンバンバックログを有効にするには、Jira 管理者またはそのボードのボード管理者でなければなりません。
バッグログにある作業項目が少数である場合は、カンバン ボードの最初の列でバックログを管理すると作業が容易です。バックログが増加するに伴い、これらの作業項目の表示やスクロールの効率性が下がる場合があります。
カンバン バックログを有効にすると、チームの作業項目の作成/ランク付けを実行できる専用スペースで、より大きなバックログを利用できるようになります。さらに、カンバン ボードで進行中の作業からチームの注意を逸らすことなく、バックログでストーリー開発の計画を行えます。
カンバンバックログを有効化する方法
サイドバーに表示されるボード名の横で [その他の操作] (•••) > [ボード設定] の順に選択します。
[レイアウト] を選択して、サイドバーのメニューの残りの部分を展開します。
[列] を選択します。
[ステータスを列にマッピング] に [カンバン バックログ] パネルが表示されます。バックログを有効にするには、既存のステータスをパネルにドラッグ アンド ドロップします。代わりに新しいステータスを作成するには、[ステータスを追加] を選択して、パネルにドラッグ アンド ドロップします。
カンバン バックログが有効になっている場合は、より大きな作業をボードとバックログに表示する方法を選択できます (この作業タイプは既定でエピックと呼ばれます)。カードとして表示するか、バックログのエピック パネルに表示することができます。「カンバン スペースでエピックを管理する」をご覧ください。
ボードやバックログに作業項目が表示されない問題のトラブルシューティング
一部の作業項目がボードやバックログに表示されないのは、多くの場合、ボードのフィルター設定やバックログの設定に問題があることが原因です。一般的には、次のような症状が見られます。
新しく作成した作業項目がバックログに表示されない。
特定のステータスや作業タイプがボード ビューに表示されない。
JQL の検索結果と、ボードやバックログに表示される内容が一致しない。
表示されない作業項目への対応策
ボード フィルターを確認する
サイドバーに表示されるボード名の横で [その他の操作] (•••) > [ボード設定] の順に選択します。
[詳細] を選択して、フィルター クエリを確認します。
フィルターに、ボードとバックログに表示したいすべての作業タイプとステータスが含まれていることを確認してください。
ステータスと列のマッピングを確認する
サイドバーに表示されるボード名の横で [その他の操作] (•••) > [ボード設定] の順に選択します。
[レイアウト] を選択して、サイドバーのメニューの残りの部分を展開します。
[列] を選択します。
ボードに表示したいすべてのステータスが、いずれかの列にマッピングされていることを確認します。
バックログ機能を有効にする
サイドバーにあるスペース名の横で、その他のアクション(•••)を選択し、スペース設定を選択します。
[機能] を選択します。
[バックログ] 機能が有効になっていることを確認してください。
バックログのステータス マッピングを確認する
サイドバーに表示されるボード名の横で [その他の操作] (•••) > [ボード設定] の順に選択します。
[レイアウト] を選択して、サイドバーのメニューの残りの部分を展開します。
[列] を選択します。
バックログ用のステータスが、利用可能な場合は [バックログ] 列にマッピングされていることを確認します。
お困りですか? 必要な回答がドキュメントで見つからなかった場合、他のリソースもご利用いただけます。Jira Cloud のヘルプを活用する
この内容はお役に立ちましたか?