Update a work item's details
Jira の作業項目のフィールドには、組み込みのフィールドとカスタム フィールド (自身で作成したもの) があり、どちらにも多くの情報を保存できます。担当者、ラベル、優先度、期限などは、作業項目の解決に向けて、作業項目をいつどのように進めるかを決定するための重要な要因です。これらの作業項目の詳細は、作業項目をあとから分類したり検索したりするのに役立ちます。
基本的な詳細情報の更新
作業項目の詳細を更新するのは簡単です。作業項目を開いて、更新するフィールドを選択するだけです。フィールドでクリックまたはタップすると入力内容が保存されるため (Escape を押して変更を破棄した場合を除く)、作業項目の詳細を編集するたびに保存を行う必要はありません。
作業項目の更新の一部を Rovo がユーザーに代わって実行できます。たとえば、割り当てられたすべての作業を未着手から進行中に更新したり、コメントを追加したり、要約、説明、担当者などを更新したりするように Rovo に依頼できます。この機能をお試しいただくには、Rovo チャットを開いて /update-work-items と入力します。一部のフィールドはまだサポートされていない可能性があります。
Loom ミーティングに基づき AI が提案した更新を取得する
フィールドを自分で更新することや、Rovo チャットで /update-work-items を使用することに加えて、Jira では Loom ミーティングに基づいて作業項目の更新が提案されます。Loom ミーティングを Jira スペースに接続すると、Rovo がミーティングのトランスクリプトを分析して、次のような提案された変更内容を準備します。
作業項目の再割り当て
優先度やステータスの変更
説明の更新
コメントの追加
提案された更新は、Loom ミーティングを録画したユーザーまたは所有者にのみ表示されます。接続された Jira ボードに Rovo ナッジが表示されます。提案を確認して、承諾または却下を選択しましょう。
説明とコンテキスト フィールド
Jira の作業項目には、主に 2 つのセクション (説明フィールドとコンテキスト フィールド) があります。
説明フィールド
These are multiline rich text fields that help you describe the work item in detail. You can add text, code, images, tables, and more to these fields. The description fields section usually appears in the left, larger section of the work item, or at the top in a single column layout. Fields like the built-in Description and Environment fields can appear in this section, along with other multiline custom fields you add to your work items.
コンテキスト フィールド
これらのフィールドは、作業項目の並べ替えや分類に役立つ情報を追加するために使用し、作業項目の右側 (単一行レイアウトの場合は説明フィールドの下) に表示されます。このセクションには、[担当者]、[報告者]、[ラベル] などのフィールドが表示されます。
空の場合は "詳細を表示する" で非表示にする
一部のフィールドは他のフィールドよりも重要であるため、一部のフィールドを他のフィールドよりも頻繁に更新する場合があります。作業項目のレイアウトを設定すると、重要なフィールドを常に表示して、その他のフィールドを必要となるまで非表示のままにすることができます。作業項目のフィールド レイアウトを設定する場合、[空の場合は非表示] セクションに入力したフィールドは、値を追加するまで作業項目に表示されません。作業項目を表示するときにこれらのフィールドを表示および編集するには、作業項目の右下にある [追加の x 件のフィールドを表示] をクリックします。
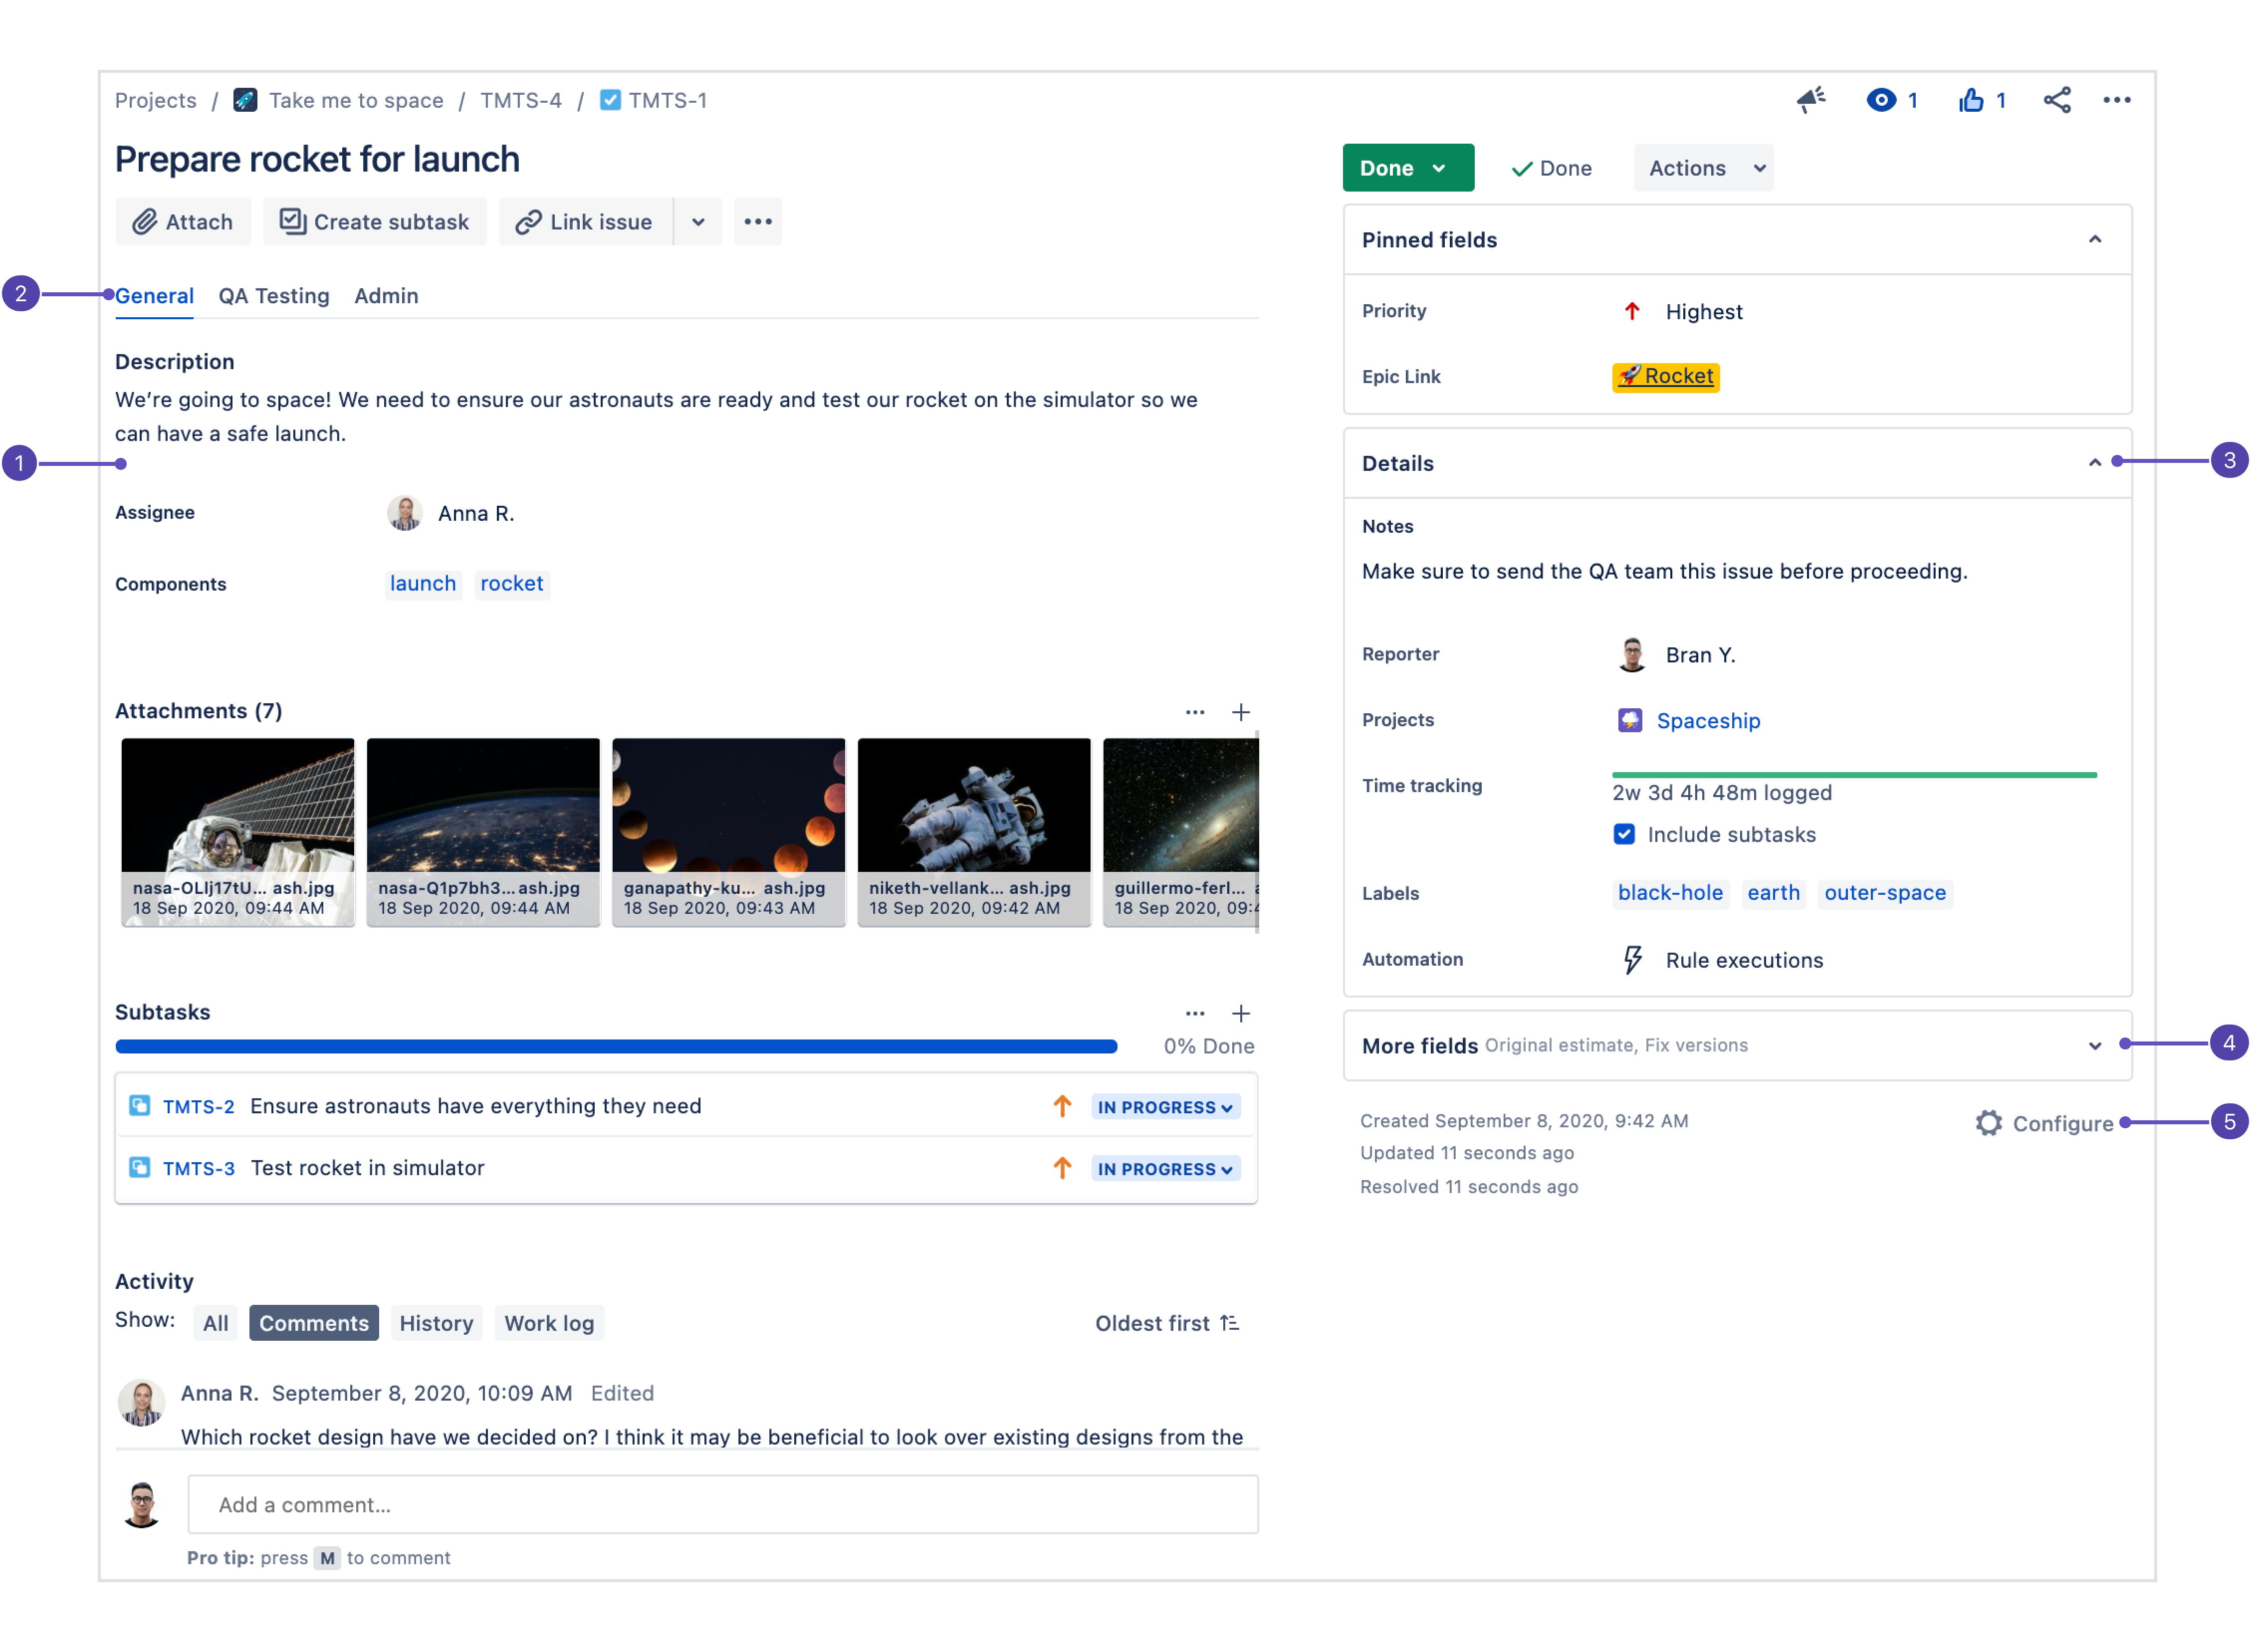
説明フィールド: このセクションは作業項目を開いたときに最初に表示される場所であるため、ここに最も重要なフィールドを配置する必要があります。
フィールド タブ: 作業項目レイアウトの画面に複数のタブがある場合は、ここに表示されます。
コンテキスト フィールド: 設定の [空の場合は非表示] 行よりも上のフィールドは、[詳細] グループのここに表示されます。各ユーザーは使いやすいように、最も重要なコンテキスト フィールドを [ピン留めされているフィールド] グループにピン留めできます。
その他のフィールド: [空の場合は非表示] の下にあるフィールドに値がない場合は、このグループに配置されます。値がある場合は [詳細] グループに表示されます。
Configure work item layout: Select Configure to change the position and visibility of fields in the work item.
Add or change the parent work item
To add a parent work item to your work item:
子作業項目を開きます。
左上隅の [親を追加] を選択します。スペースで使用できる作業タイプによっては、[エピックを追加] など、表示が異なる場合もあります。
Select a parent work item.
To change the parent work item of your work item:
子作業項目を開きます。
Select the work type icon in the top-left corner next to the work item key of the parent work item.
子作業項目の新しい親作業項目を選択します。
In the timeline and list views, you can also change a work item’s parent by dragging and dropping it underneath a new parent work item.
作業タイプを変更する
If you create a work item but realize later that it's the wrong type (a bug instead of a task, for example), choose the work type symbol at the top-left of the work item and select a new work type. You can use the same process to convert a work item to a subtask.
時間の記録と追跡
Jira 管理者は Jira サイト全体での時間管理を有効または無効にできます。さらに、時間を記録する権限を持つユーザーも制御できます。スペースに時間管理フィールドが表示されない場合は、Jira 管理者にお問い合わせください。時間管理の設定に関する詳細をご確認ください。
Jira にはタイム トラッキング機能が搭載されており、管理者やチームは作業項目にかかった時間を記録したり、その情報をレポートやプラン作成に使用したりできます。
時間を記録するには、次の手順を実行します。
[その他の操作] (•••) を選択してから [作業を記録] を選択します (または [タイム トラッキング] フィールドを選択します)。
消費時間を入力し、作業の開始時間を選択したら、必要に応じてその他のフィールドに入力します。
[保存] を選択します。
時間管理パネル: その時点で記録された時間と、残り時間を表示します。パネル内の任意の場所を選択して、時間を記録します。
作業項目で時間を記録する方法の詳細をご確認ください。ご自身やチームがタイム トラッキングを常に使用している場合は、タイム トラッキングを常に表示するように作業項目のレイアウトを設定できます。
このアクションは、Jira のコマンド パレットを介してキーボードで実行できます。Jira 内で、command + K キー (Mac の場合) または Ctrl + K キー (Windows の場合) を使用してコマンド パレットを開きます。Jira のコマンド パレットの詳細をご確認ください。
グランスのアプリ コンテンツとフィールド タブ
グランスでは、外部ソースの情報の表示や、追加機能の提供を行う Atlassian Marketplace のアプリのコンテンツを表示します。フィールド タブは、その他の作業項目の詳細とともにグランスとして表示されます。
グランスとは
グランスとは、作業項目に関するコンテキスト情報とともに表示されるパネルです (フルページ ビューで作業項目を表示する際は右側に表示されます)。グランスを折りたたむと、作業項目を最初に開いたときのように、アプリのフィールドや要約の情報が一覧表示され、内容を一目で確認できます。
グランスをクリックすると、コンテンツが展開され、作業項目の詳細セクションの内容が表示されます。フィールド タブの場合、これによりグランス内でフィールドの値を表示して編集できます。アプリの場合、展開時にアプリを操作できます。
以下はフィールド タブの表示の例です。
フィールド タブの名前
タブ内のフィールド
展開すると、グランスは以下のように表示されます。
アプリのグランスは「作業項目の詳細」セクションの [さらに表示] の上に表示されます。フィールド タブのグランスは、[さらに表示] リンクの上または下に表示されます。ご自身がスペース管理者であり、フィールド タブの位置を変更したい場合は、作業項目を開いて [その他の操作 (•••)] > [設定] の順に選択します。作業項目のフィールド レイアウトに関する詳細は、「作業項目でフィールド レイアウトを設定する」をご覧ください。
ラベルで作業項目を分類する
ラベルは、作業項目を分類したり検索したりするのに役立ちます。作業項目の表示時に、作業項目の詳細の [ラベル] フィールドをクリックするか、L キーを押して入力を開始してラベルを追加します。既存のラベルがある場合は、それらが入力時に候補として表示されます。
ラベルをクリックして、そのラベルに関連付けられたすべての作業項目のリストを表示できます。
またラベル ガジェットをダッシュボードに追加することで、あなたやチームに関連するラベルが付いた作業項目を素早く検索できます。
この内容はお役に立ちましたか?