Post Confluence-wide announcements in a banner
An announcement banner provides a way for Confluence product administrators to quickly communicate important information to everyone in Confluence.
The custom message gets pinned to the very top of the Confluence instance — a prominent place to announce things like:
Time-sensitive alerts
Software updates
Planned maintenance
etc
When creating or editing a banner, Confluence administrators can control the message, color, Start and End dates, whether the banner is limited to internal licensed users (private) or also visible to external audiences (public) — and whether or not viewers can dismiss it.
The Banners feature is located in Confluence administration.
Banners aren’t available as a space-level feature.
Manage banners
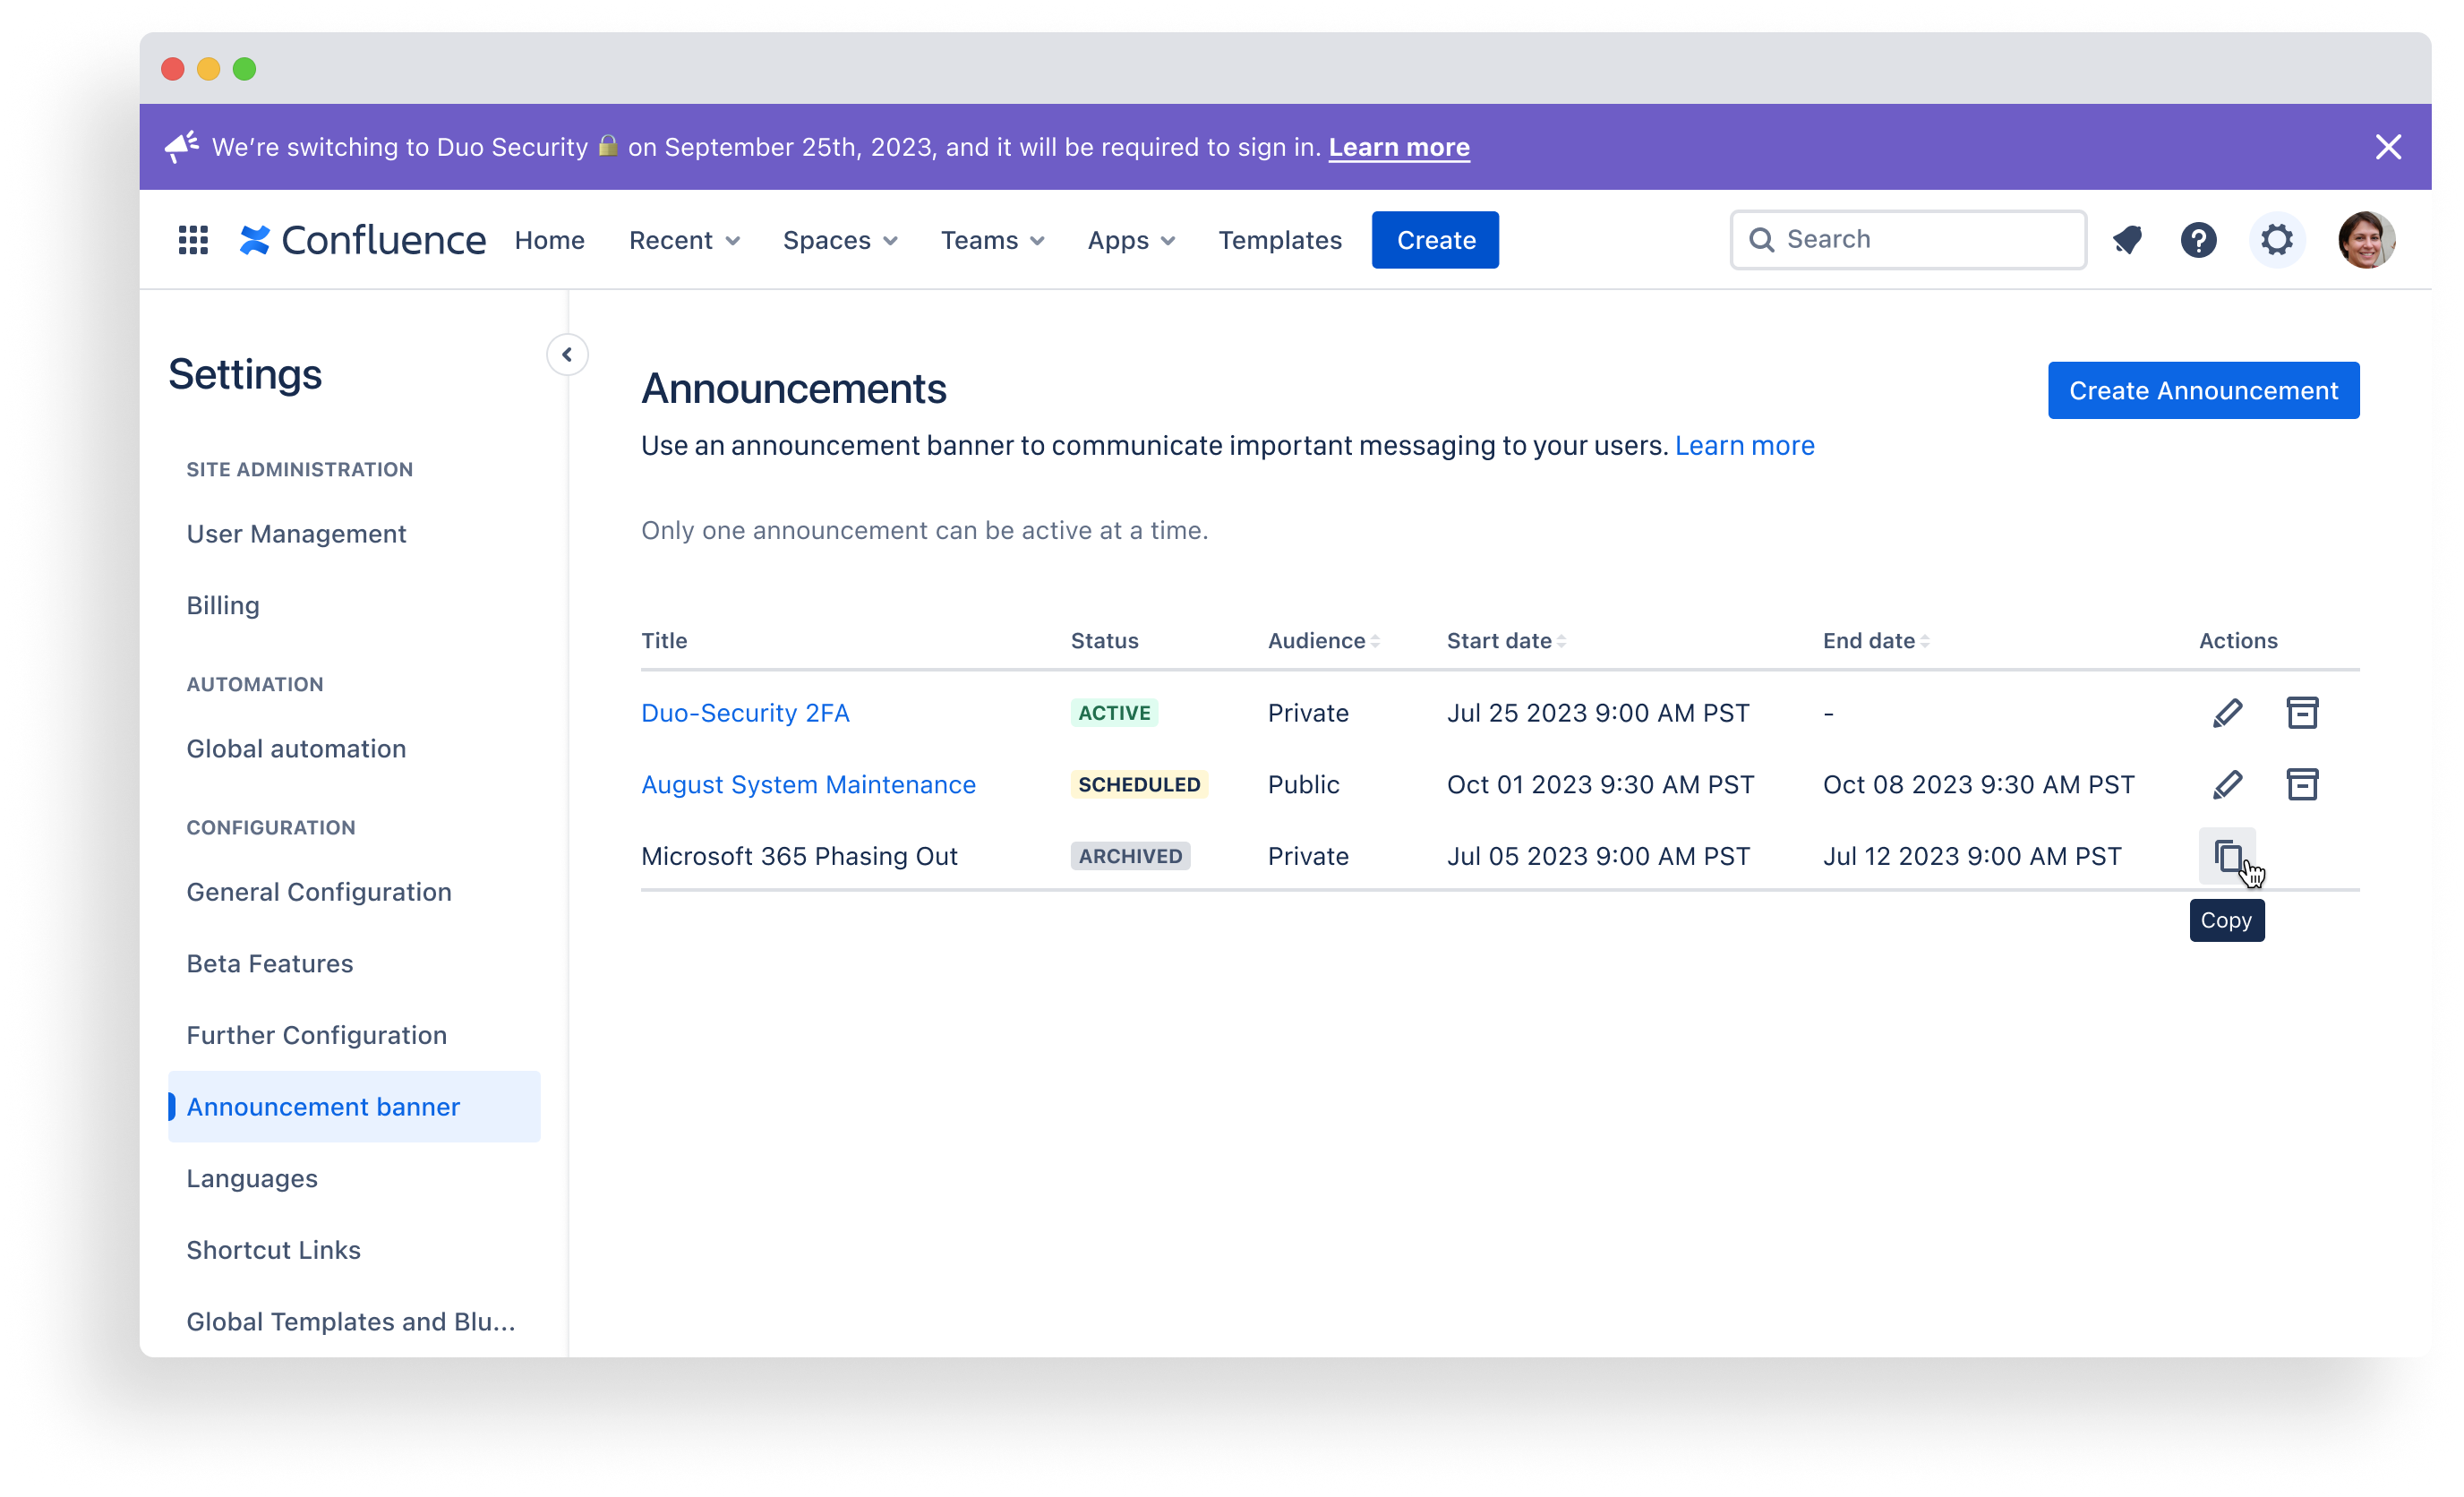
The landing screen contains the announcements table. This table maintains a record of all the announcement banners ever created.
It shows each banner’s title, publication state (Status), whether it is (or was) visible to a public or private audience, and the dates that it ran (or will run). An Actions column provides options for managing the banners, by either editing, archiving, or copying them.
Banner status
Each banner exists in an Active, Scheduled, or Archived state.
Only one banner can be Active at a time. Banners with a past End date show as Archived. Banners with a future Start date show as Scheduled.
If a banner is shown as Active, it is currently visible to viewers.
Banner actions
Active and Scheduled banners can be edited or archived by clicking the appropriate icon in the table.
Archived banners can be copied into a new banner, making it easy to repurpose prior messaging.
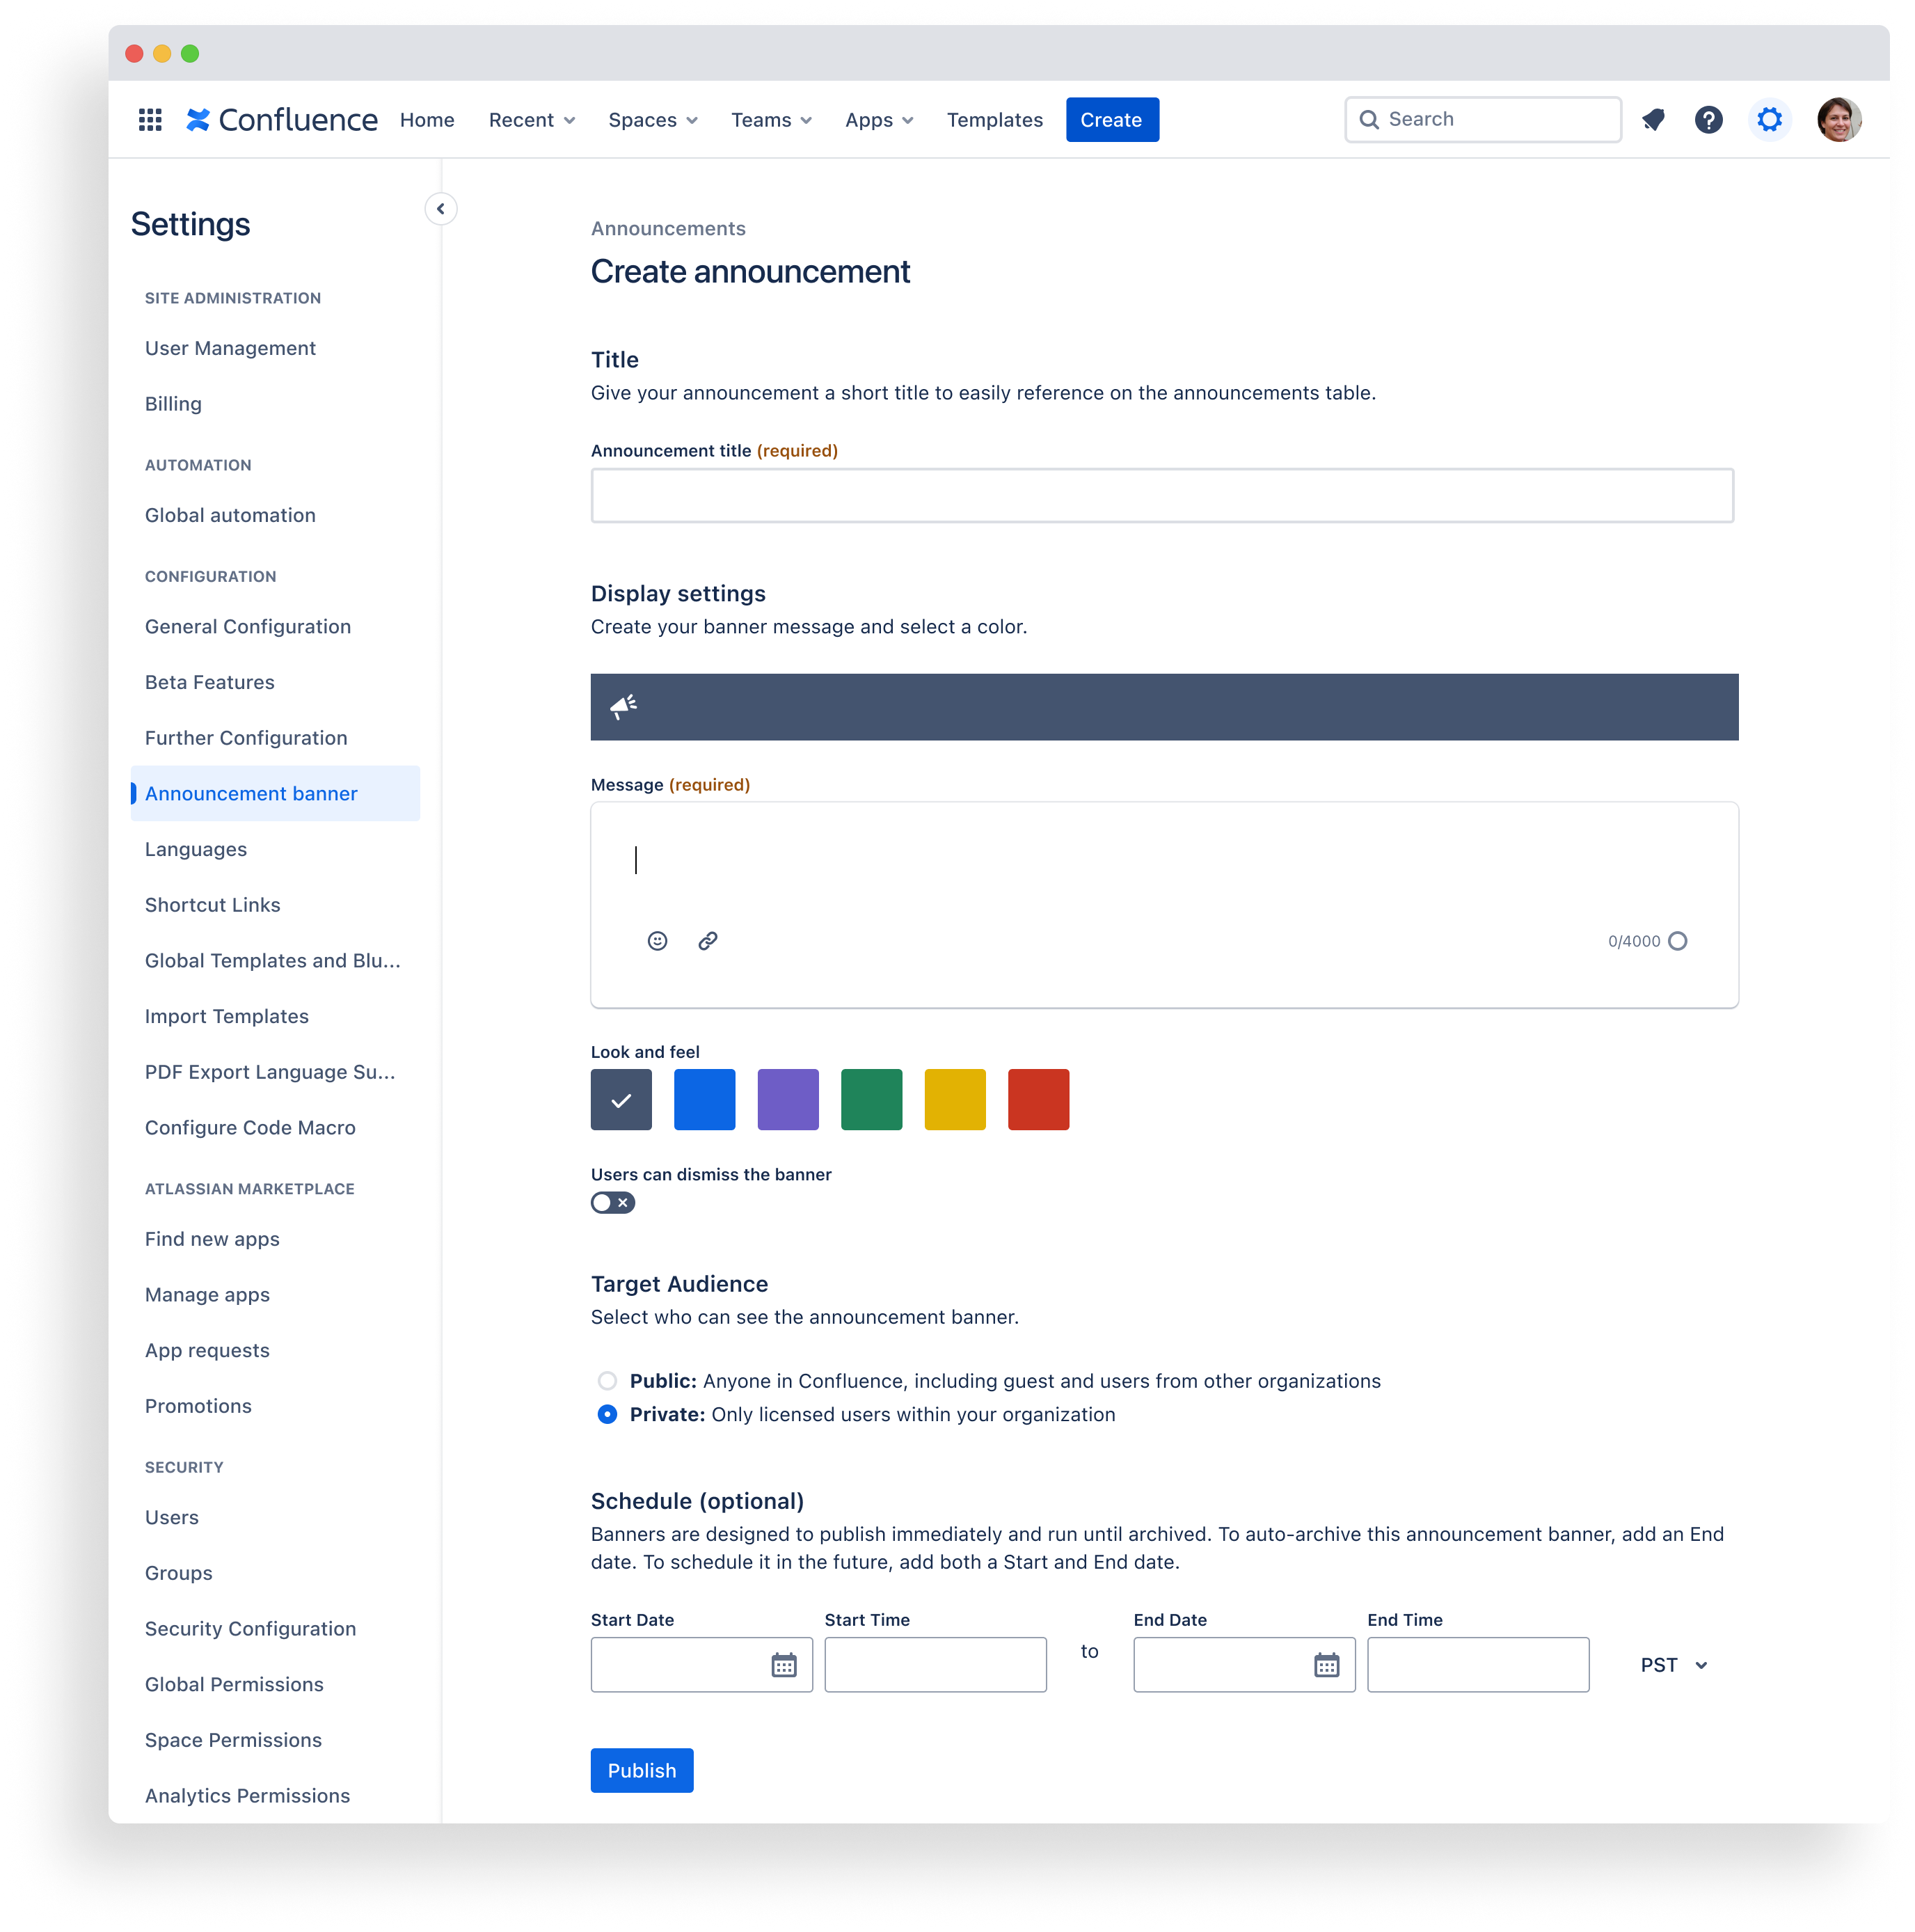
Create announcement banners
Announcement banners can contain a custom message of up to 4,000 characters. The look and feel of a banner is customizable via color selection. Other configuration, like Audience and Scheduling, impacts who sees the banner and when.
Configuration options
Color
Colors can communicate different message tones. For example:
Gray – General (default)
Blue – Informational
Purple – Note
Green – Success
Yellow – Warning
Red – Emergency
Toggle (OFF – Static, ON – Dismissable)
This controls whether viewers can close the banner or not. The toggle is OFF (static) by default.
Target audience
Public: This allows anyone who can view Confluence to see the banner — guest users, anonymous access, etc. — in addition to internal licensed users
Private (default): This limits banner visibility to internal licensed users, only
Schedule
Scheduling specific Start and End dates and times will automatically control when a particular banner is Active and visible — but it’s not required
Note: Banner scheduling is only available on Premium or Enterprise plans.
Banners are designed to Start as soon as they’re published, and to run indefinitely or until archived.
Although only one banner can be Active at a time, scheduling additional banners can be useful for setting up a queue of banners to run in succession.
Publication options
Publish without a schedule
This activates the banner immediately, and leaves it on indefinitely
The banner remains visible unless a Confluence administrator archives it, or unless a scheduled banner replaces it
Schedule an End date, but no Start date
This activates the banner immediately, but determines when it should “turn off”
When the End date arrives, the banner automatically moves to an Archived (inactive) state
Schedule future Start and End dates
This delays activation of the banner until a future date and time
When the Start date arrives, the banner automatically moves to an Active state — and bumps any existing Active banner to an Archived (inactive) state
When the End date arrives, the banner automatically moves to an Archived (inactive) state
Scheduled banners always require an End date.
Banner scheduling is only available on Premium or Enterprise plans.
To publish a new banner:
Verify that you are logged in as a Confluence administrator.
Select the wheel icon () in the top-right corner to open Confluence administration.
Find Admin tools in the left-hand navigation.
Select Banners.
Select the Create announcement button.
Enter a title for your banner.
Configure the required display settings which include:
Message (up to 4,000 characters)
Color
User toggle on/off (to dismiss the banner)
Target audience (public or private)
(optional) Enter an End date (if you want the banner to auto-archive).
Select Publish.
Hyperlinks can be used in the message. Bulleted lists, line breaks, and code blocks can not.
To schedule a new banner:
Scheduling follows the same process as publishing a new banner, but requires Start and End dates.
This feature is only available on Premium or Enterprise plans.
Follow steps 1 – 7, above.
Enter future Start and End dates.
Select Publish.
To re-publish an Archived banner:
(Navigate to Banners)
In the announcements table, locate the title of the Archived banner you want to re-publish
Click the copy icon in the Actions column
This will open a new Create announcement configuration screen, with the copied information pre-populated
(Optional) Adjust the title, display settings, audience, and/or schedule as needed
Select Publish
The copied banner will appear in the announcements table as a new banner in a new row because it will, at a minimum, have a unique Start and End date. This serves to preserve a record of each time the banner ran.
Edit announcement banners
Active and Scheduled banners can be edited. Changes will be reflected in the Confluence audit log.
Archived banners can’t be edited since they capture a moment in time.
To edit an Active or Scheduled banner:
Verify that you are logged in as a Confluence administrator
Select the wheel icon () in the top-right corner to open Confluence administration.
Find Admin tools in the left-hand navigation.
Select Banners.
In the announcements table, locate the title of the banner you want to edit.
Click the edit icon in the Actions column.
This will reopen the configuration screen as Edit announcement
Adjust the title, display settings, audience, and/or schedule as needed.
Select Update.
If you edit an active banner that a user has already dismissed, it will show again for all users, even those who already dismissed it.
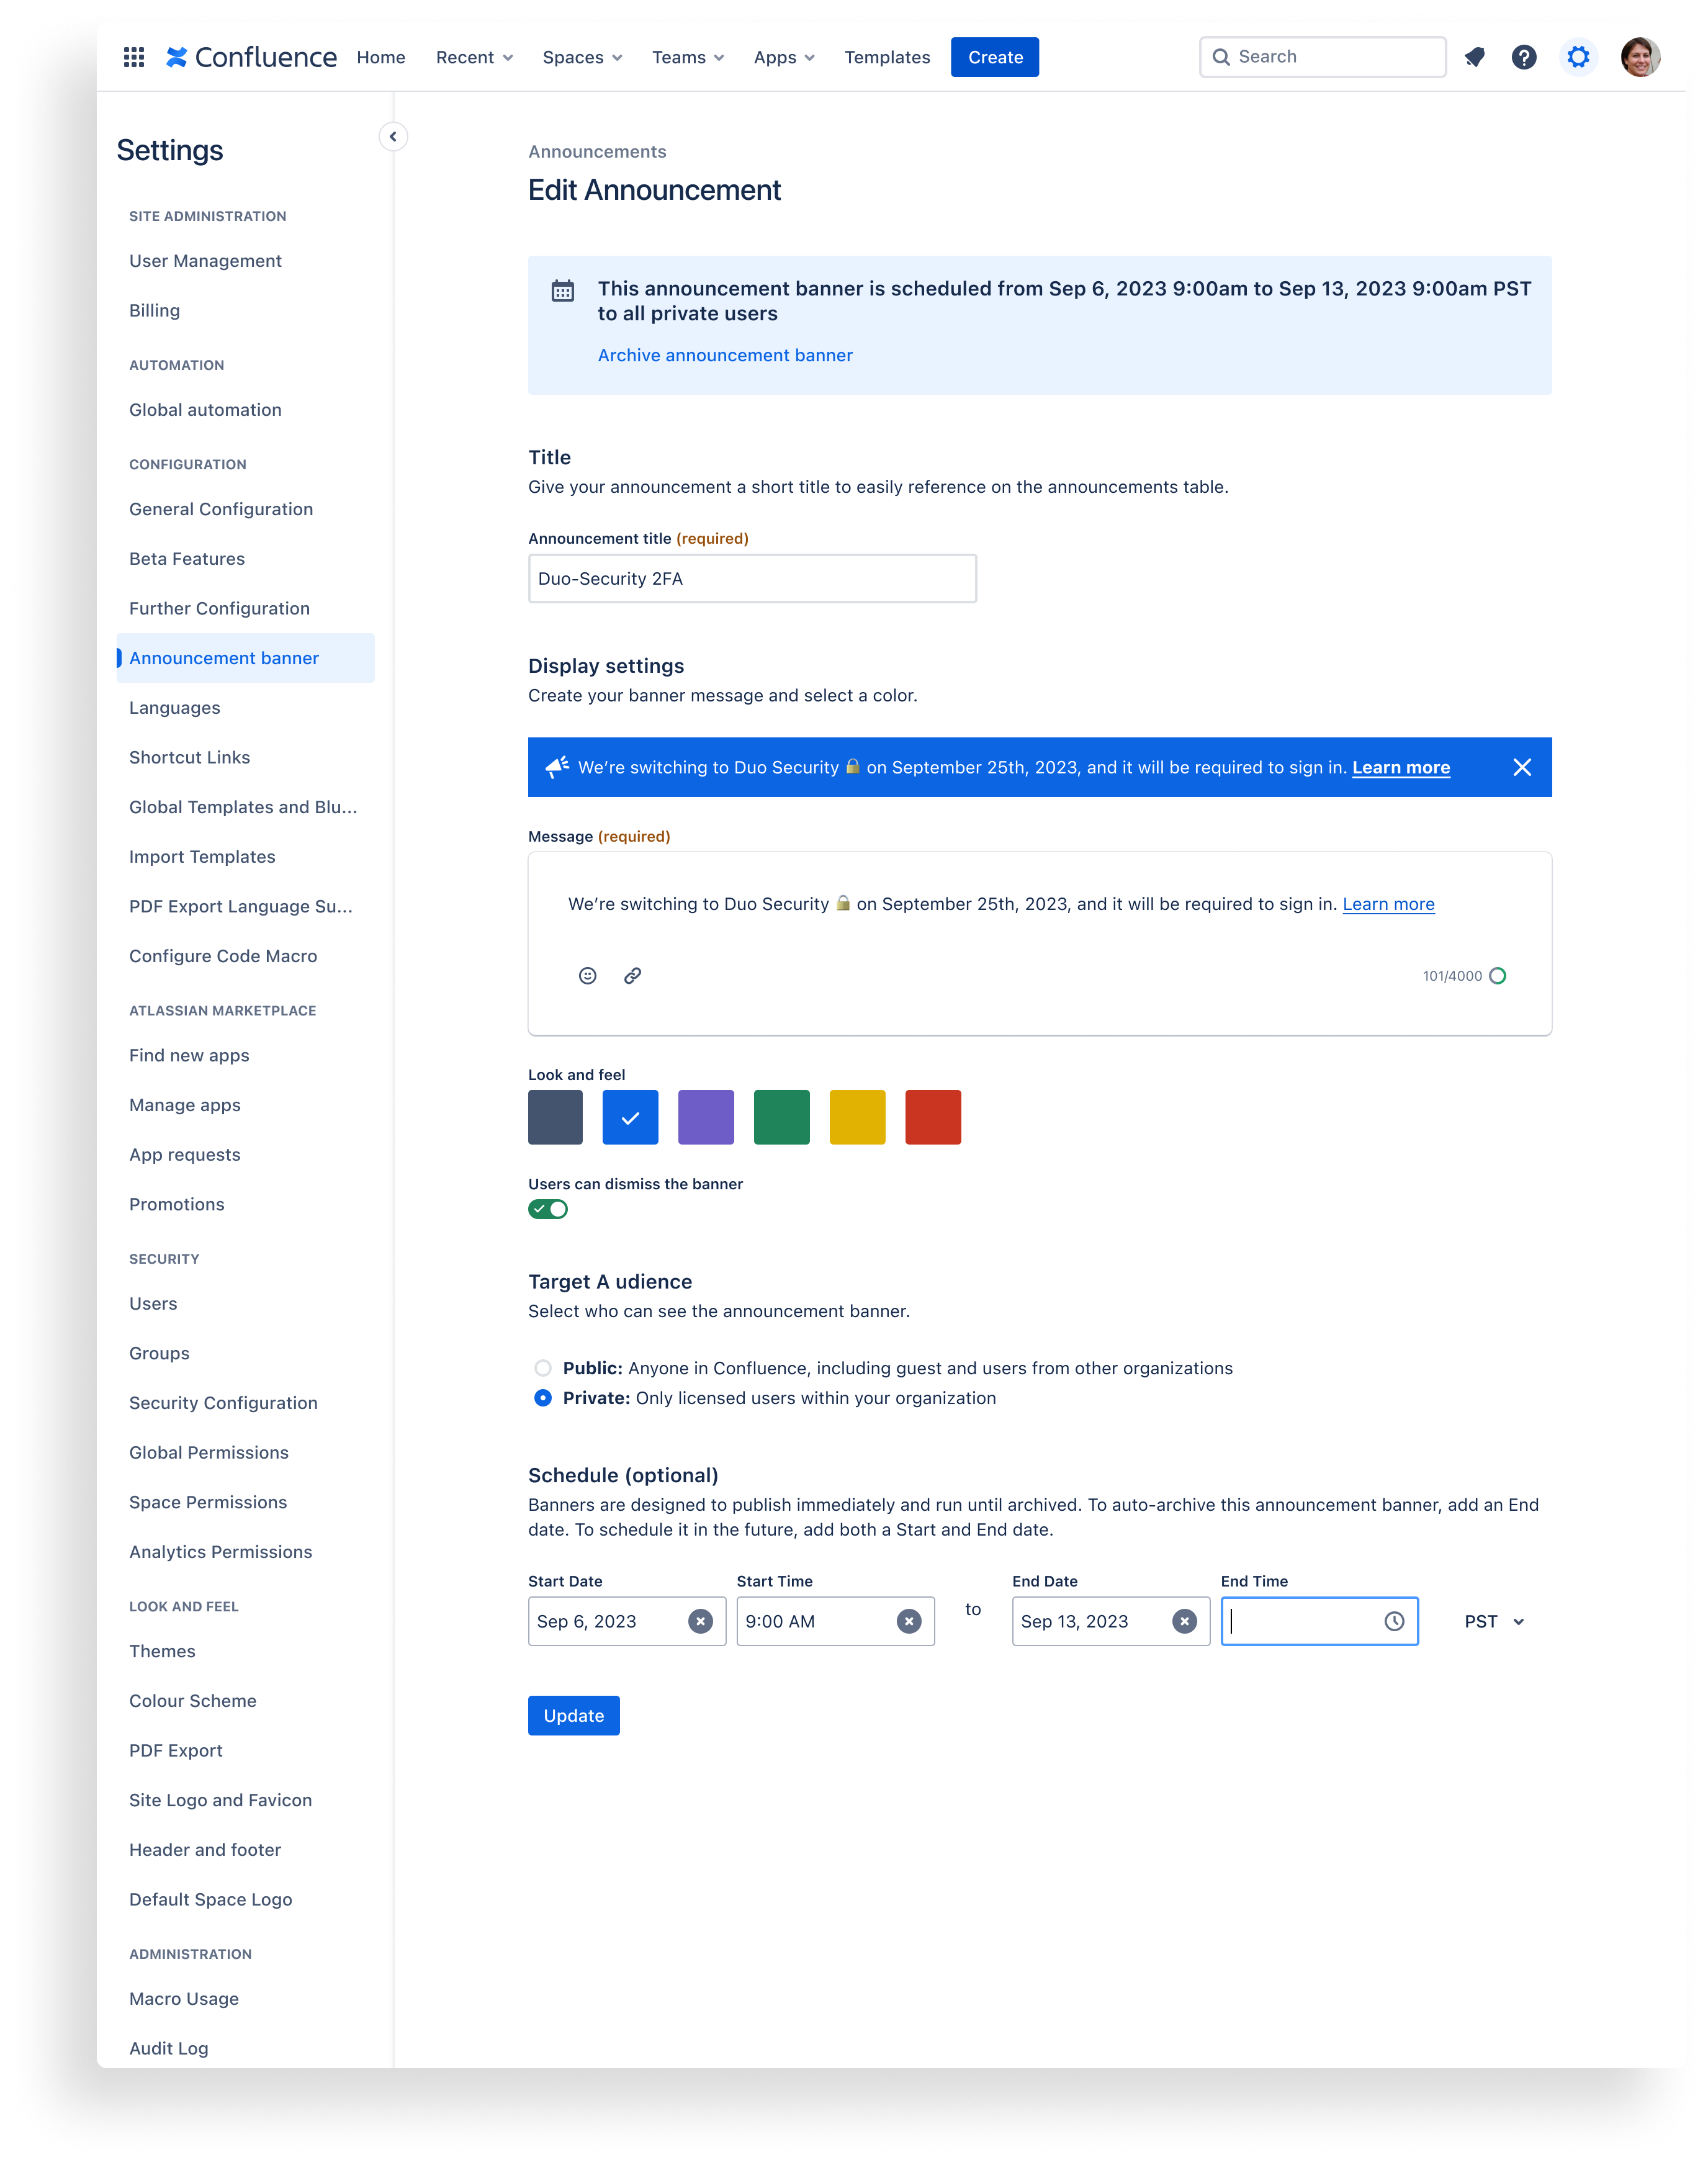
Archive announcement banners
Archiving a banner is essentially turning it “off” or inactivating it. Both Active and Scheduled banners can be archived. Unlike archiving pages or whiteboards, archived banners do not move to the Confluence archive. They remain in the announcements table, but their Status transitions to an Archived state. Changes will be reflected in the Confluence audit log.
There are four ways to archive a banner:
Auto-archive a banner by scheduling an End date.
Auto-archive a banner by scheduling a new banner to replace it.
Manually archive a banner by selecting its archive icon in the announcements table.
Manually archive a banner by selecting the link at the top of a banner’s Edit announcement screen.
Was this helpful?