Create, update, and manage written content
In Confluence, you can write pages, live docs, and blog posts, edit them as your work evolves, and share them with teammates. Pages are best for structured content that you publish and update over time with version history; live docs enable real-time, publish-free collaboration where changes are instantly visible; and blog posts let you publish timely news and updates. You can invite others to edit, leave feedback, and share links so your work reaches the right audience.
Confluence is a collaborative workspace for every team. Embed rich content like calendars, activity streams, Smart Links, and roadmaps to turn ideas into living plans. Track work across projects and sprints, and build an easily searchable knowledge base that connects people, decisions, and context.
Does your toolbar look different?
Your toolbar or editing controls may appear differently from usual, or from how they appear in this documentation. We’re rolling out features that are subject to change.
Creating content
There are a few ways to create written content in Confluence.
The Create button located at the top right of the screen. Select it to open a drop-down menu.
To start with a prompt, select Create with Rovo. Rovo fills your screen and lets you add a short description, links, or any other relevant info. Then it will start an AI-generated draft for you.
Select live doc to create and collaborate on written content in real time without the need to publish or leverage higher levels of version control.
Choose Page to start in draft mode. You can start with a blank page or select a template from the panel on the right so you don't have to start from scratch. For more information about using templates, see Format content with a template.
Create content in your space with + button next to the Content section in the space sidebar.

You can also create a page in a folder or under another page using the contextual create button that appears when hovering over the page title in the sidebar.

Move a content item
Adding content contextually puts it where you want it to live from the start. Made a mistake or changed your mind? Use the drag and drop feature in the content tree to drag the page where you want it or use drag and drop to reorder the pages.
Can't create a page or blog?
To create a page or blog post, you need the Add content permissions for that space.
Collaborative editing
You and up to 29 teammates can edit a page together in real time in Confluence. Changes save and sync automatically so that everyone editing sees the same thing.

Avatars — People who are currently editing have colored avatars, while people who made edits and left the page appear in greyscale.
Invite to edit —Select the plus sign to invite others to edit your page with you from inside the editor. Either copy and send them the page link, or send them a Confluence notification, which will reach them via email and workbox.
Inline comments can be added while editing a page. Only those in your editing session can see, reply to, and resolve the comments. Once the page has been published, any unresolved comments can be seen by page viewers.
Drafts
Confluence autosaves as you go whenever you're using the editor. This makes it easy to create a page and start writing; when you're ready to stop but not quite sure if you're going to do anything with it, you can just select Close draft in the editor without publishing. This creates a draft, an unpublished page or blog post that you can get back to at any time from a few different locations. Note that only pages and blog posts have drafts—live docs do not.
Pages support drafts and version history; live docs don’t have drafts and show changes instantly to collaborators.
When should you use a page (with drafts) instead of a live doc? Choose a page when you need structured, reviewable content that benefits from publishing and version history—for example: policy docs, specs that require approvals, release notes, onboarding guides, knowledge base articles, and any work that needs

Find drafts:
Under More actions (•••) in the sidebar, select Drafts (shows all drafts you’ve worked on across all spaces).
In the content tree where the draft was started
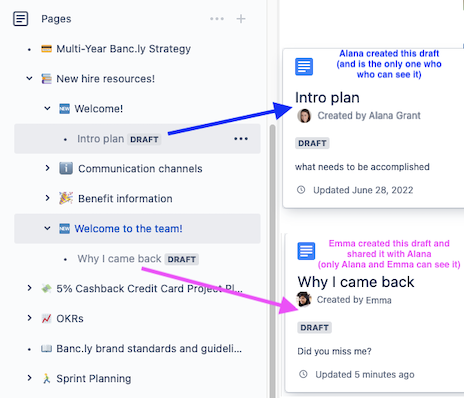
Who can see your draft?
Only you! No one can find or view your drafts unless you take specific actions to collaborate with them.
Here’s how it works:
If you create a draft, only you will be able to find and edit the draft you created.
If you explicitly share a draft (invite via notification) AND the collaborator clicks on the link to open it in the editor, the collaborator will be able to find and view your draft.
If you implicitly share a draft with others (via share the link or browser URL) AND the collaborator clicks on the link to open it in the editor, the collaborator will be able to find and view your draft.
If you add a collaborator as an editor to a restricted draft (via perms), the collaborator will not be able to find and view your draft.
If you shared your draft with someone and don't want them to be able to access it anymore, you can change the draft's permissions by restricting the page. You can change the draft's permissions by selecting the lock icon next to Publish...
Delete a draft
To delete a draft while editing, select More actions () and Delete unpublished page. Deleting a draft is permanent and can't be undone.

Delete draft— Permanently deletes your draft.
Close draft — Closes the editor, saving your draft.
You can also delete a draft from the page or blog tree by selecting More actions () and Delete.

Naming content in Confluence
To help your users find what they're looking for, give your content relevant, easy to search for names. Here are a few other things you should also keep in mind:
Avoid using special characters in names, as they may not be found using Confluence search and can cause some Confluence functions to behave unexpectedly.
Add an emoji to suggest the context or relate something about the content.
Unnamed drafts are called Untitled. Make sure you give content items a working name so you can tell your drafts apart.
If you’re stuck, you can ask Rovo to suggest a title.
Publish and update
When you or your team are ready to make your draft page or blog post visible and accessible to other users in a Confluence space, it is time to publish. Publishing a page or blog post makes it available for viewing, commenting, and editing by other users who have permission to do so, and often also those who have access to the space it resides within. Once a page or blog post is published, it can be found through search or by browsing the content tree.
To publish a page or blog post for the first time, from draft mode, select Publish… from the top right corner of the editor toolbar.
A modal will appear where you can select and confirm a number of publish settings before publishing, including:
Location
Confirm or select where your page or blog will go in the content tree once it is published.Access
Confirm or select who will be able to view or edit your page or blog once it is published.Version comments
Version comments allow you to summarize the work you’ve done or changes you’ve made for any given first-time publish or subsequent update of a page or blog post. This description will be recorded in the page or blog’s history and will be sent to watchers via notification email if you choose to notify them.
Schedule publish
Sometimes a page or blog needs to published at the right moment to coincide with a project start, a product release, or a company announcement. Rather than relying on a calendar reminder or a sticky note, you can schedule the date and time your page or blog post will publish.
No notifications are sent to those you’ve mentioned or those watching the page, blog, or the space until the content is actually published.
To make it really clear that the page or blog is set to be published at a certain day and time, the Publish… button will change to Scheduled. A PUBLISH SCHEDULED indicator will be displayed at the top of the page and next to the page title in your list of Recent pages.
No worries if you have to make edits to a page or blog that is scheduled to publish later. The most recent version will be published when the scheduled publish time arrives.
You can also go in and make adjustments to your publish schedule anytime by selecting the Scheduled button at the top right of the scheduled page.
To schedule your publish:
Select the Schedule publish dropdown from the modal.
Select the date and time of your scheduled publish.
Select OK.
Once you’ve confirmed all other publish settings, select Schedule to confirm the scheduled publish.
Publish as page or blog post
Before publishing your draft, you can choose whether to publish it as as a blog post rather than having to copy the page content into a blog. Publishing as a blog post can happen the first time you publish or the tenth time.
To publish your draft as either a page or blog post:
Select the More actions menu () , then More options.
Select the Publish as dropdown from the modal.
Select either Page or Blog based on your preference.
Once you’ve confirmed all other publish settings, select Publish to publish your page or blog post.
Update
Once a page or blog is initially published, all subsequent published changes to it are referred to as updates.
To update a published page or blog with new edits based on the settings you selected or confirmed when publishing, select Update from the top right corner of the editor.
To review and/or adjust the settings of your update, select the down carat () next to Update , then Adjust update settings.
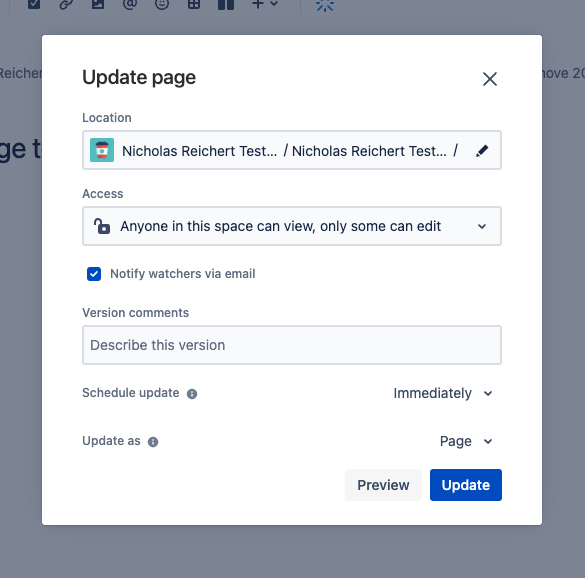
A window will appear where you can:
Adjust your page’s location
Adjust your page’s access
Notify people watching with a notification email about this update that includes any version comments you may have added
Add version comments to your update
Schedule your update for later
Turn your page into a blog post
Confluence creates a new version of your work each time you edit and update. This means that you can go back and see your page history, and, if necessary, revert back to a previous version of your work.
Publishing or updating closes the editor and takes you back to viewing the page. Once a page is published for the first time, you can find it in the content tree, under its parent page if it has one. If you publish a blog post, it will live in the blog section of your own space, which is organized chronologically. It's easy to move and reorganize pages, so you don't have to worry if you've published to the wrong place.
More actions
From the More actions menu () in the toolbar, you can also take various actions while editing.
For a page in a draft state:
Preview: See what the published page will look like.
Find and replace: Search for text and replace it.
Move: Change the location of a page within a space, or from one space to another.
Templates and import: Open a sidebar on the right of your screen where you can access a selection of templates, and/or convert an external document into a Confluence page.
Convert to live doc: Convert your draft to a live doc that can be edited and collaborated on seamlessly without having to publish or update changes.
Delete draft: Delete your unpublished draft.
Preview — See what the published page will look like.

For a page that’s been published before:
Star - Find this page more easily later from the Starred section of the sidebar.
Watch settings: Select if you’d like to be notified about changes to this content, its nested items, or all content in the space.
Preview: See what the published page will look like.
Find and replace: Search for text and replace it.
View changes: See the changes to the page between the previously published version and now. This will also let you see a summary of the changes which have happened during a collaborative editing session.
Revert to previous version: Lets you close the page and discard any changes that were made since the last published version.
Move: Change the location of a page within a space, or from one space to another.
Convert to live doc: Convert your draft to a live doc that can be edited and collaborated on seamlessly without having to publish or update changes.
Archive and delete: Archive or delete your page. Available actions depend on your permissions for this page.

You can also open the Publish or Update modal anytime using a keyboard shortcut!
Mac — command + Shift + Enter
Windows — Ctrl + Shift + Enter
Page versions and history
Version control is useful when you've got numerous people working on the same page. You can see how the page has changed over time, with each successive publish. You can also revert back to an old version if you decide you don't like some of the recent changes.
To delete a version of a page:
Go to the page and select > Version history
Select Delete next to the version you want to delete
Once you've deleted a version, the other versions will be re-numbered. For example, if you delete version 2, version 3 becomes the new version 2.
Deleting a page version is permanent. It won't be moved to the trash, so you can't restore a deleted version.
To restore a version of a page:
Go to the page and select > Version history
Select Restore this version beside the version you want to restore (or at the top of the page if you've opened the version)
Change the default change comment if necessary, and select OK
All page history is retained, so if you decide to restore an old version, it won't delete any of the versions that came after it. Instead, Confluence creates a copy of that old version as the latest version.
Comparing versions
Want to see what's changed between versions? Use the comparison view to help you figure it out.
Go to the page and select > Version history
Select the versions you want to compare by selecting the check boxes beside them
Select Compare selected versions
You'll see the page comparison view showing the differences between the selected versions. To make the changes more distinguishable, all large sections of unchanged text are hidden and reduced to an ellipsis ().
Editing and unpublished changes
If you want to edit a published page, you can select edit, or just type E to open the editor. As with a draft, autosave retains these changes, and you can get back to them by editing the page again.
Anyone else who edits that page also sees your unpublished changes. If you're concerned about this, add editing restrictions to the page until you're ready to update with those changes.
While a page has unpublished edits, Confluence displays an unpublished changes badge next to the page title, to remind you to publish. This only displays for people who've made unpublished changes, so you needn't worry about the badge distracting your viewers.
We recommend updating frequently; each time you update, Confluence creates a new version of your page or blog, which not only means that it's easier to track changes over time, but it's also easy to revert back to a previous version if you ever need.
View unpublished changes
Want to know what's changed since a page was last updated? Select > View changes.
Delete unpublished changes
If you're working on a page with unpublished changes and decide you no longer need them, you can discard them by selecting > Revert to previous version.
After giving you a chance to see what was changed, reverting immediately deletes those changes and restores the previous version. Those changes are gone for good and can't be recovered.
Was this helpful?