Opsgenie を Zendesk と統合する
Opsgenie が Zendesk ユーザーに提供するもの
Opsgenie は Zendesk との強力な双方向インテグレーションを提供します。Zendesk で新しいチケットが作成されると、チケットに関する詳しい情報を含む、対応する Opsgenie アラート/インシデントが自動的に作成されます。Opsgenie は、オンコールローテーション、スケジューリングなどの機能、アラートエスカレーションを含む高度な通知を提供し、Zendesk の顧客に最適なチケット管理を実現します。ユーザーがアラート/インシデントに対して承認、コメント、クローズなどのアクションを実行すると、Zendesk のチケットも、これらのアラートアクションに関するコメントで自動的にアップデートされます。
統合の機能性
Opsgenie では、Zendesk インテグレーションに対して 4 つの異なるフローが提供されます。
Zendesk チケットに対する Opsgenie でのアラートの作成
Opsgenie アラートに対する Zendesk でのチケットの作成
Zendesk チケットに対する Opsgenie でのインシデントの作成
Opsgenie インシデントに対する Zendesk でのチケットの作成
インシデントを作成する場合
Please make sure a Service has already been defined.
Zendesk チケットに対する Opsgenie でのアラート/インシデントの作成
Zendesk でチケットが作成されると、Opsgenie でアラート/インシデントが作成されます。
Zendesk から Opsgenie へのアップデートが有効になっている場合は、Zendesk インテグレーションによって作成されたアラート/インシデントに対して、選択したアクションが Zendesk で実行されると、Zendesk チケットのアクションが Opsgenie で実行されます。
Opsgenie から Zendesk へのアップデートが有効になっている場合は、Zendesk インテグレーションによって作成されたアラート/インシデントに対して、選択したアクションが Opsgenie で実行されると、Zendesk チケットのアクションが Zendesk で実行されます。
Opsgenie アラート/インシデントに対する Zendesk でのチケットの作成
API Token should also be entered into the Opsgenie configuration for the action mappings to work. For more information, refer to Zendesk support.
アラート/インシデントが Opsgenie で作成されると、Zendesk でチケットが作成されます。
Zendesk から Opsgenie へのアップデートが有効になっている場合は、Zendesk インテグレーション以外のソースを持つアラート/インシデントに対して、選択したアクションが Zendesk で実行されると、Opsgenie でアクションが実行されます。
Opsgenie から Zendesk への更新が有効になっている場合は、Zendesk インテグレーション以外のソースを持つアラート/インシデントに対して、選択したアクションが Opsgenie で実行されると、Zendesk でアクションが実行されます。
Opsgenie で Zendesk インテグレーションを追加する
この統合は、Opsgenie の Standard プランと Enterprise プラン、および Jira Service Management の Premium プランと Enterprise プランでのみ利用できます。
統合をチーム ダッシュボードから追加すると、そのチーム統合の所有者になります。Opsgenie では、この統合を通じて受信したアラートはそのチームのみに割り当てられます。このセクションの残りの手順に従って、統合を設定してください。
[設定] > [統合] の順に移動します。Zendesk を検索して [追加] を選択します。
4 つのインテグレーション フローから使用するフローを 1 つ選択します。
[応答者] フィールドを使用して、Zendesk アラートの通知先を指定します。入力し始めると、オートコンプリートの候補が表示されます。
統合 API キーをコピーします。
Select Save Integration (If Opsgenie is not creating tickets in Zendesk, make sure UPDATE Opsgenie -> Zendesk toggle button is unchecked. If Opsgenie should create tickets, add in Zendesk API Key https://support.zendesk.com/hc/en-us/articles/226022787-Generating-a-new-API-token-)
Zendesk での設定
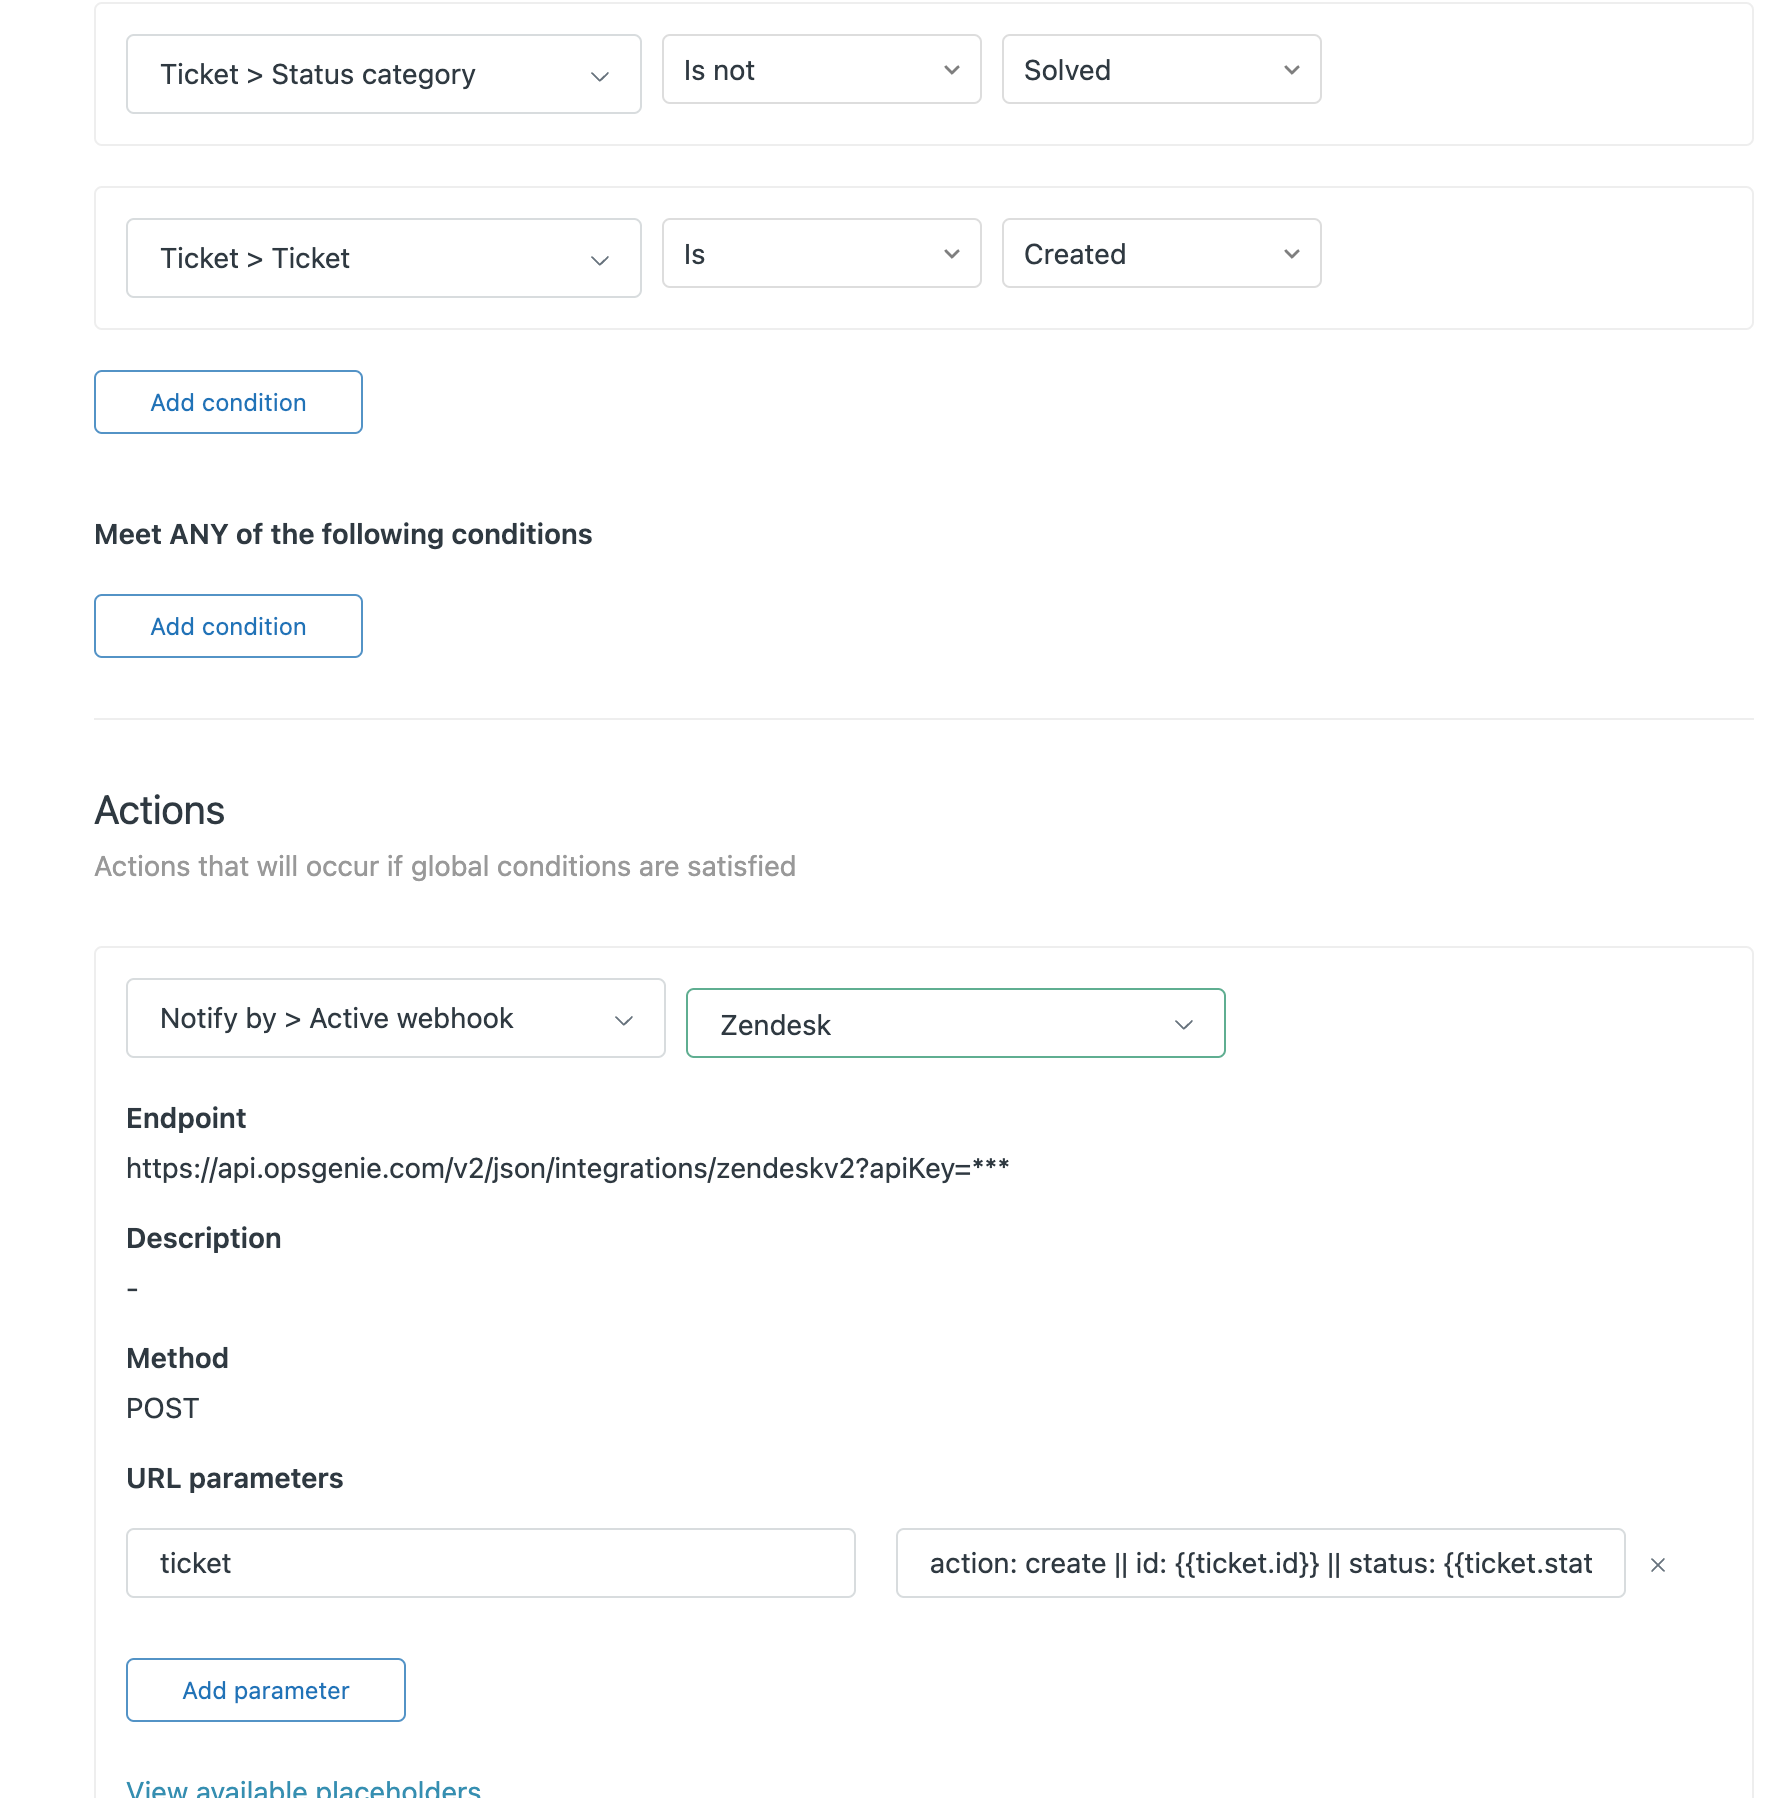
Webhook とトリガーを自動的に追加するには、統合を保存した後に、統合の設定ページに表示されるボタンを使用します。まず、[Create Target (ターゲットの作成)] をクリックして Webhook を作成する必要があります。名前を指定しない場合、統合の名前の下に Webhook が作成されます。作成、クローズ、メモの追加アクションのトリガーを作成するには、前のステップで作成した Webhook 名を指定し、[Create Trigger (トリガーの作成)] ボタンをクリックする必要があります。これにより、上記のすべてのアクションが自動的に作成されます。
1. Zendesk で、「Admin (管理)」ページにアクセスします。
2. [Settings (設定)] で、[Apps and integrations (アプリと統合)] > [Webhook] の順に選択します。
3. [Create Webhook (Webhook を作成)] をクリックします。
4. [Trigger or automation (トリガーまたは自動化)] を選択します。
5. 使用するドメインに応じて、エンドポイント URL に以下のとおり入力します。
米国ドメイン: https://api.opsgenie.com/v2/json/integrations/zendeskv2?apiKey= 以前 [URL] に。
EU ドメイン: https://api.eu.opsgenie.com/v2/json/integrations/zendeskv2?apiKey= 以前 [URL] に。
6. [リクエスト メソッド] として "POST" を選択し、[リクエスト フォーマット] として "From encoded" を選択します。
7. その他の必須情報を記入します。
8. [Create webhook (Webhook の作成)] を選択して、[Submit (送信)] をクリックします。
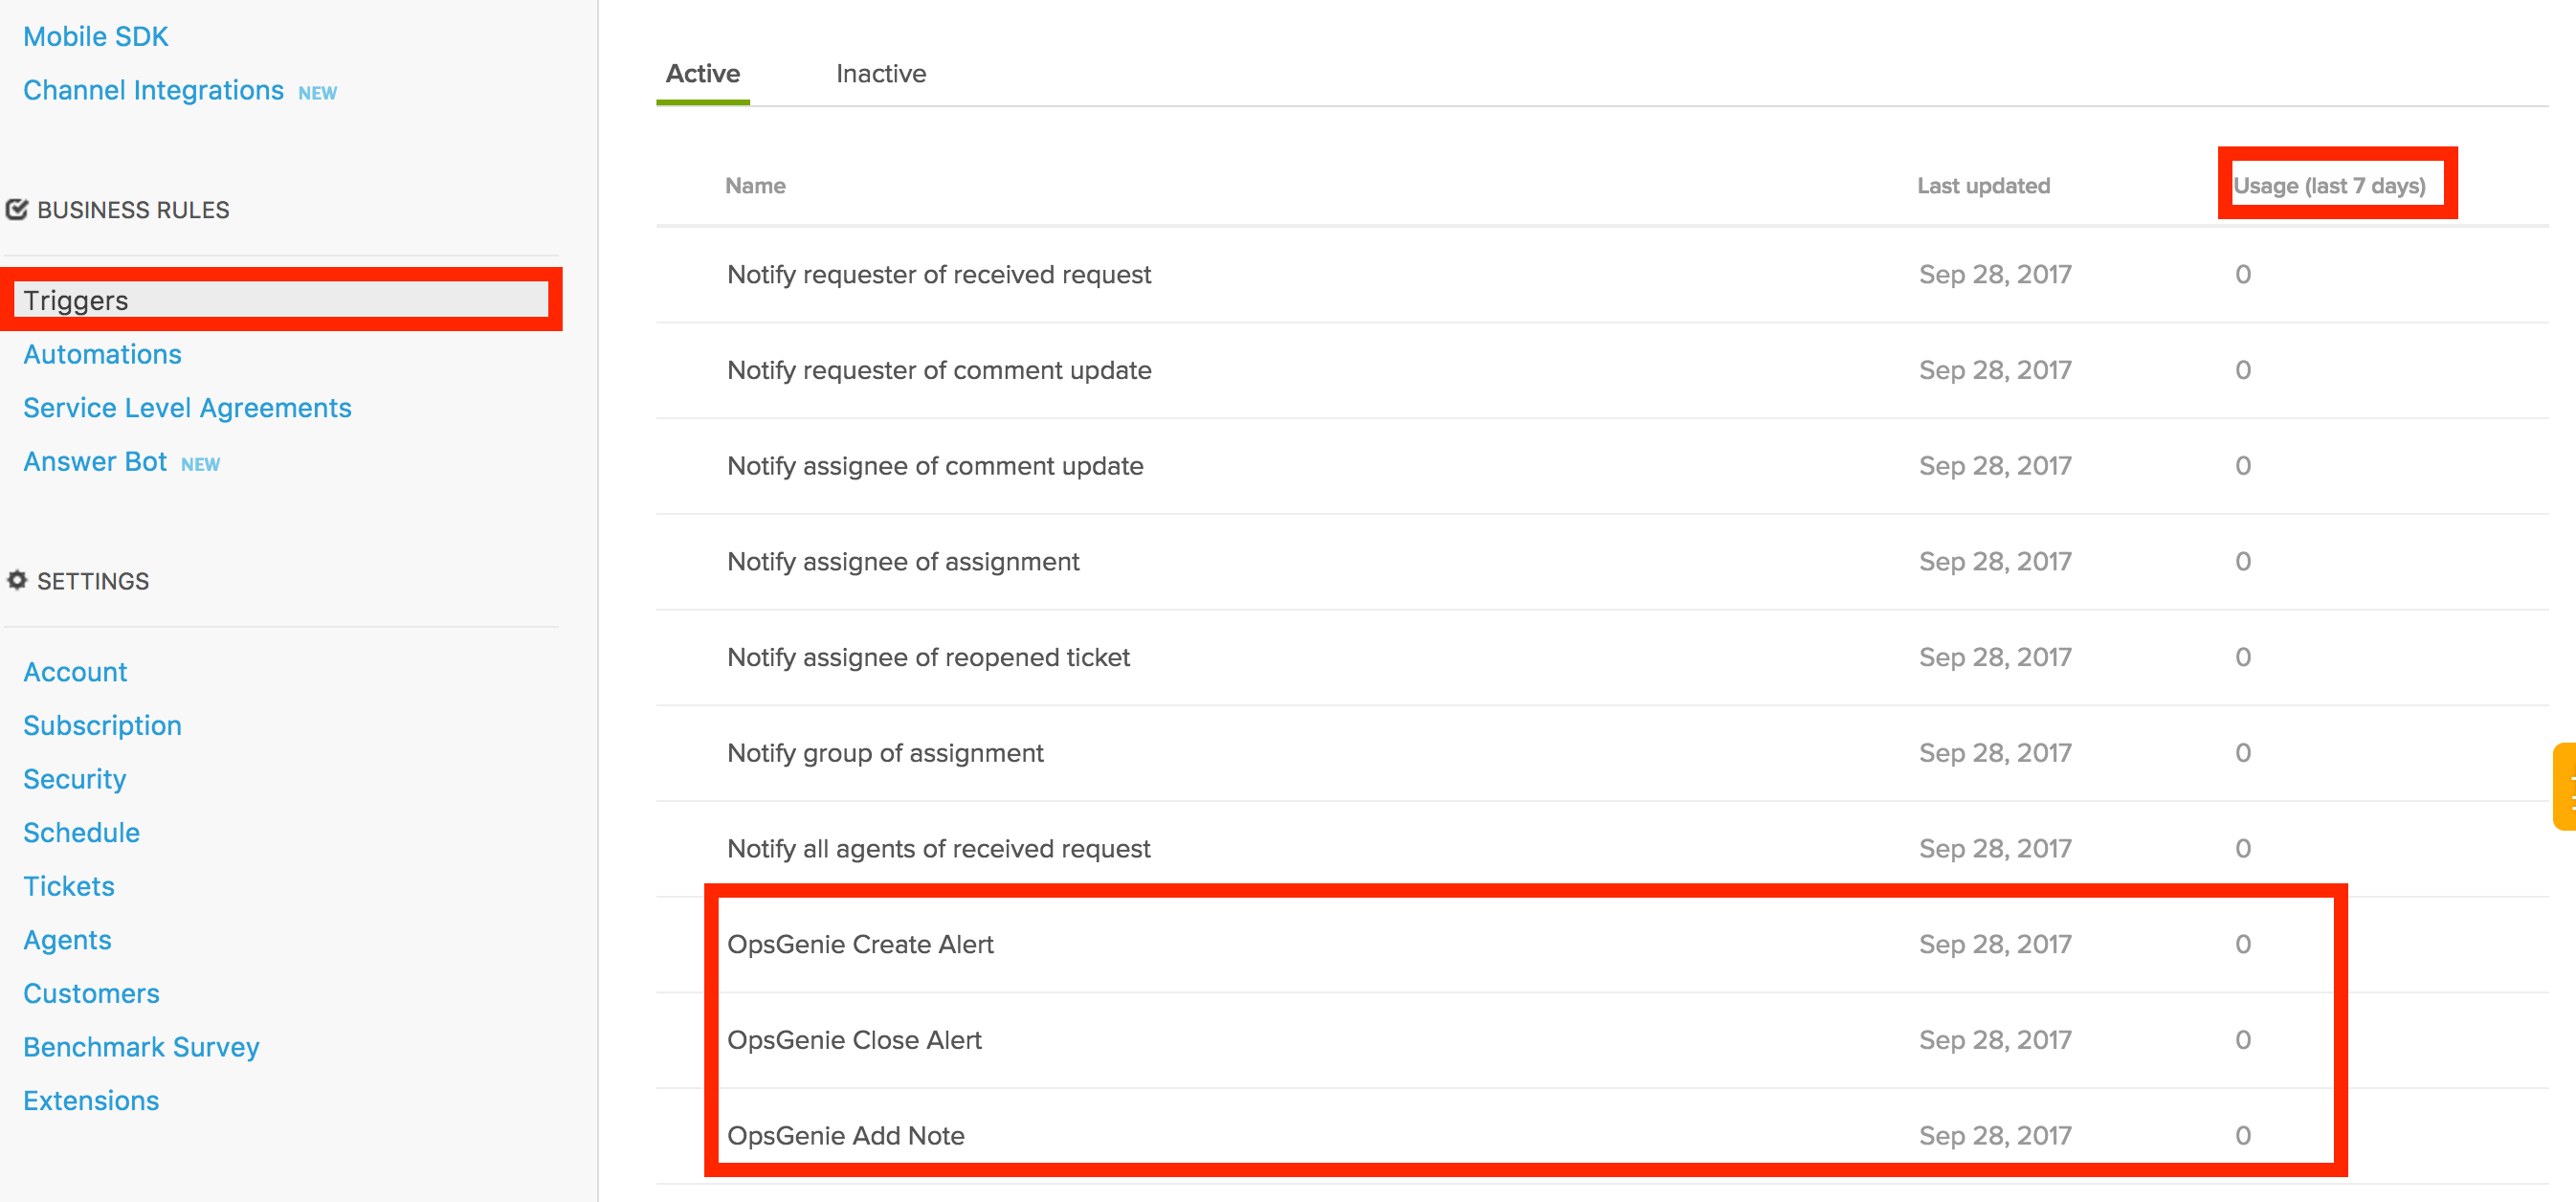
9. 管理パネルで、[Business Rules (ビジネスルール)] の下の [Triggers (トリガー)] を選択します。
10. Create the triggers following this instructions file.

アラートのプロパティは、Zendesk インテグレーションの [詳細設定] ページから設定します。
設定完了です! Zendesk アラートを Opsgenie で管理して、そのアラート機能を活用しましょう。
アクション マッピング機能
Opsgenie では、Opsgenie と Zendesk の各アクション間のアクション マッピングを定義できます。
Zendesk から Opsgenie に更新する場合:
Zendesk から Opsgenie へのアクション マッピングは、すべての統合フローで利用できます。このアクション マッピングによって、さまざまな Zendesk アクションをさまざまな Opsgenie アクションにマッピングすることができます。たとえば、Zendesk のチケットにパブリックの返信が追加されると Opsgenie アラート/インシデントにメモが追加される、といったマッピングが可能です。これを行うには、「Zendesk のチケットにパブリックの返信が追加されたら Opsgenie のアラートにメモが追加される」というマッピングを [更新] セクションの [Zendesk -> Opsgenie] で定義します。

Opsgenie から Zendesk へのアップデート
Opsgenie から Zendesk へのアクション マッピングは、すべての統合フローにて利用できます。このアクション マッピングを使用して、さまざまな Opsgenie アクションをさまざまな Zendesk アクションにすることができます。たとえば、関連するインシデントが Opsgenie で解決されると、 Zendesk チケットに内部メモが追加される、といったマッピングが可能です。これを行うには「Opsgenie でインシデントが解決された場合は、Zendesk で内部メモがチケットに追加される」を定義します。「Opsgenie -> Zendesk」更新セクションのマッピング。

「アラートにタグが追加される」アクションと「アラートでカスタム アクションが実行される」アクションは、他のアクションと異なります。これらのアクションのいずれかを選択すると、このマッピングが機能するタグまたはカスタム アクションを入力するための追加のフィールドが表示されます。
タグをカンマで区切って、複数のタグを入力します。複数のタグを入力した場合、マッピングは、指定されたタグが 1 つ以上アラートにある場合に機能します。タグのフィールドを空のままにすると、どのタグでもマッピングが機能します。
1 つの Opsgenie アクションが複数の Zendesk アクションにマッピングされている場合、「アラートにタグが追加される」アクションと「アラートでカスタム アクションが実行される」アクションを除いて、エラーが発生します。マッピングは、特定のタグとカスタム アクション名によって異なるため、これらのアクションに対して複数のマッピングを保存します。
API Token should also be entered into the Opsgenie configuration for the action mappings to work. For more information, refer to Zendesk support.
トラブルシューティング
Zendesk のアラートが Opsgenie で作成されない場合は、Zendesk が Opsgenie のエンドポイントにアクセスできることを確認してください。そのためには、[設定] > [アプリと統合] > [Webhook] で作成した Webhook から、[Test webhook (Webhook をテストする)] オプションを使用します。
[Test webhook (Webhook をテストする)] オプションをクリックした後も Opsgenie アカウントにテスト アラートが表示されない場合は、Webhook が正常に追加されなかったことを意味します。ドキュメントの Webhook 追加に関するセクションに戻り、手順を確認してください。
Opsgenie でテスト アラートが作成される場合、[Test webhook (Webhook をテストする)] が正しく設定されていることを意味します。まず、[ログ] ページをチェックして、Opsgenie が統合を受信したかどうか、およびエラーが発生したかどうかを確認します。[ログ] にリクエストもエラーも表示されない場合は、チケットの作成/アップデート時に Zendesk トリガーが使用されているかどうかを確認します。この情報は、[Business Rules (ビジネス ルール)] > [Triggers (トリガー)] ページで確認します。その使用数が 0 の場合、トリガー ルールが使用されず、その設定に何か問題があることを意味します。

この内容はお役に立ちましたか?