Opsgenie を Amazon EventBridge と統合する
この統合は、Opsgenie の Standard プランと Enterprise プラン、および Jira Service Management の Premium プランと Enterprise プランでのみ利用できます。
ルーティング ルールを設定して、データを送信する場所を決定して、すべてのデータ ソースにリアルタイムで反応するアプリケーション アーキテクチャを構築できます。Amazon EventBridge では、イベントの取り込みと配信、セキュリティ、承認、エラー処理を代行するため、イベント駆動型アプリケーションを簡単に構築できます。
Opsgenie が Amazon EventBridge ユーザーに提供するもの
Opsgenie の Amazon EventBridge インテグレーションを使用して、Opsgenie アラート イベントを Amazon EventBridge に転送します。Opsgenie で統合を作成すると、aws.partner/opsgenie.com/{{integrationId}} という名前のイベント ソースが自動で作成されます。
統合の機能性
イベント ソースに添付されたルールに応じて、アラートイベントは SNS、SQS、Lambda、Kinesis、CloudWatch、SSM などのさまざまな AWS サービスに転送できます。
Amazon EventBridge インテグレーションを Opsgenie に追加する
この統合は、Opsgenie の Free プランと Essential プランではご利用いただけません。
Jira Service Management の Premium プランで Opsgenie を使用している場合は、この統合を設定できます。
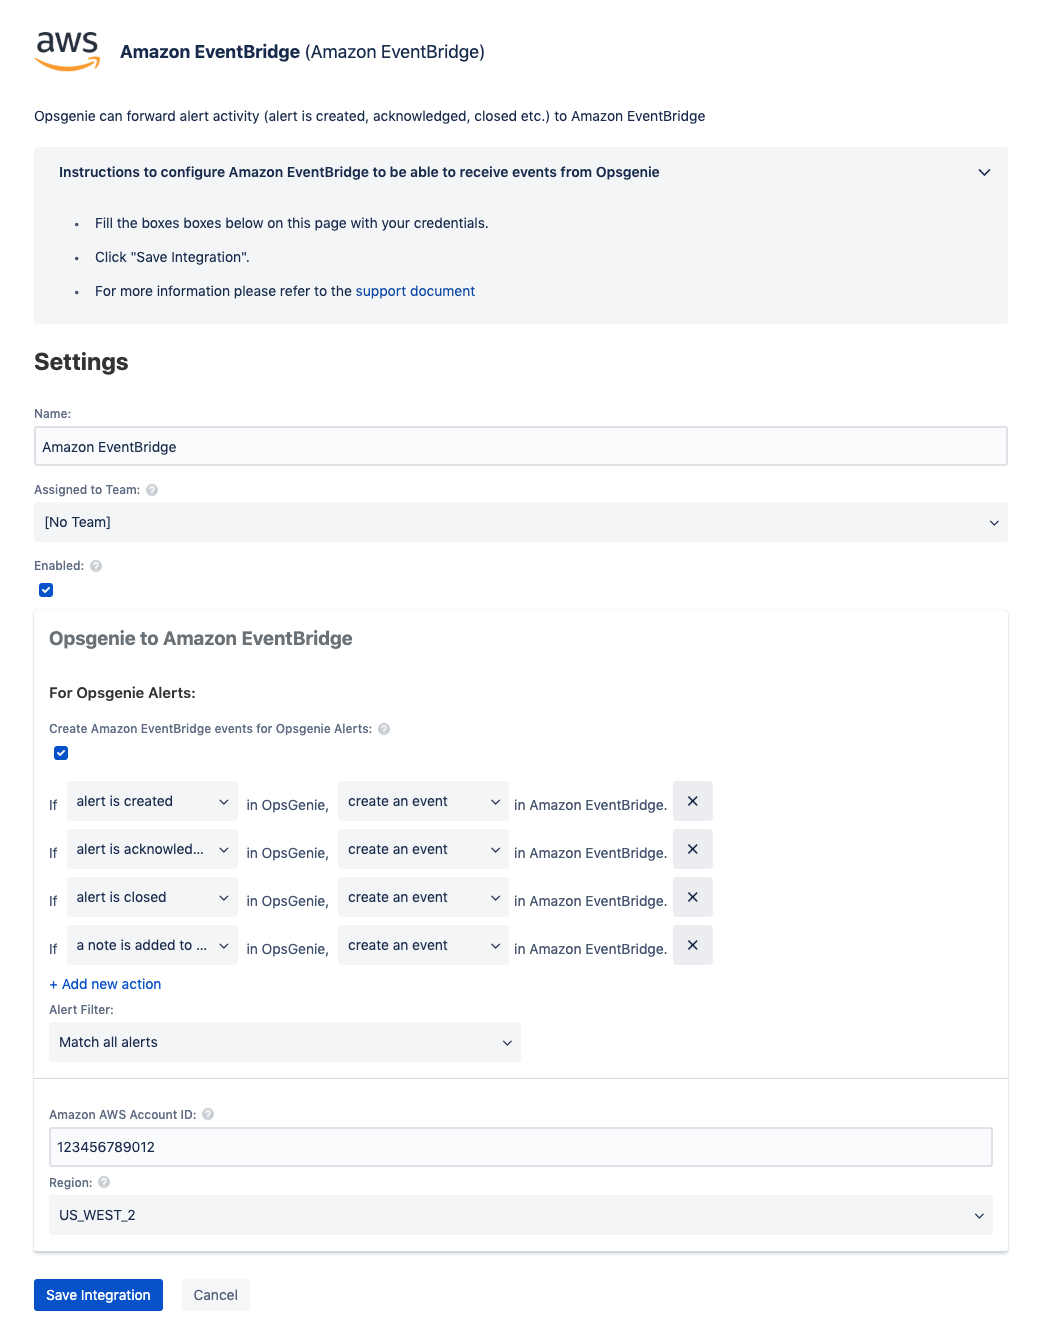
1. [設定] > [統合] の順に移動します。「Amazon EventBridge」を検索して、[追加] を選択します。
2. Opsgenie がパートナー イベント ソースにイベントを発行できるようにするには、Amazon から提供されたアカウント ID をコピーします。
3. 取得したアカウント ID を統合設定ページに貼り付けて、パートナー イベント ソースを作成する AWS リージョンを選択します。
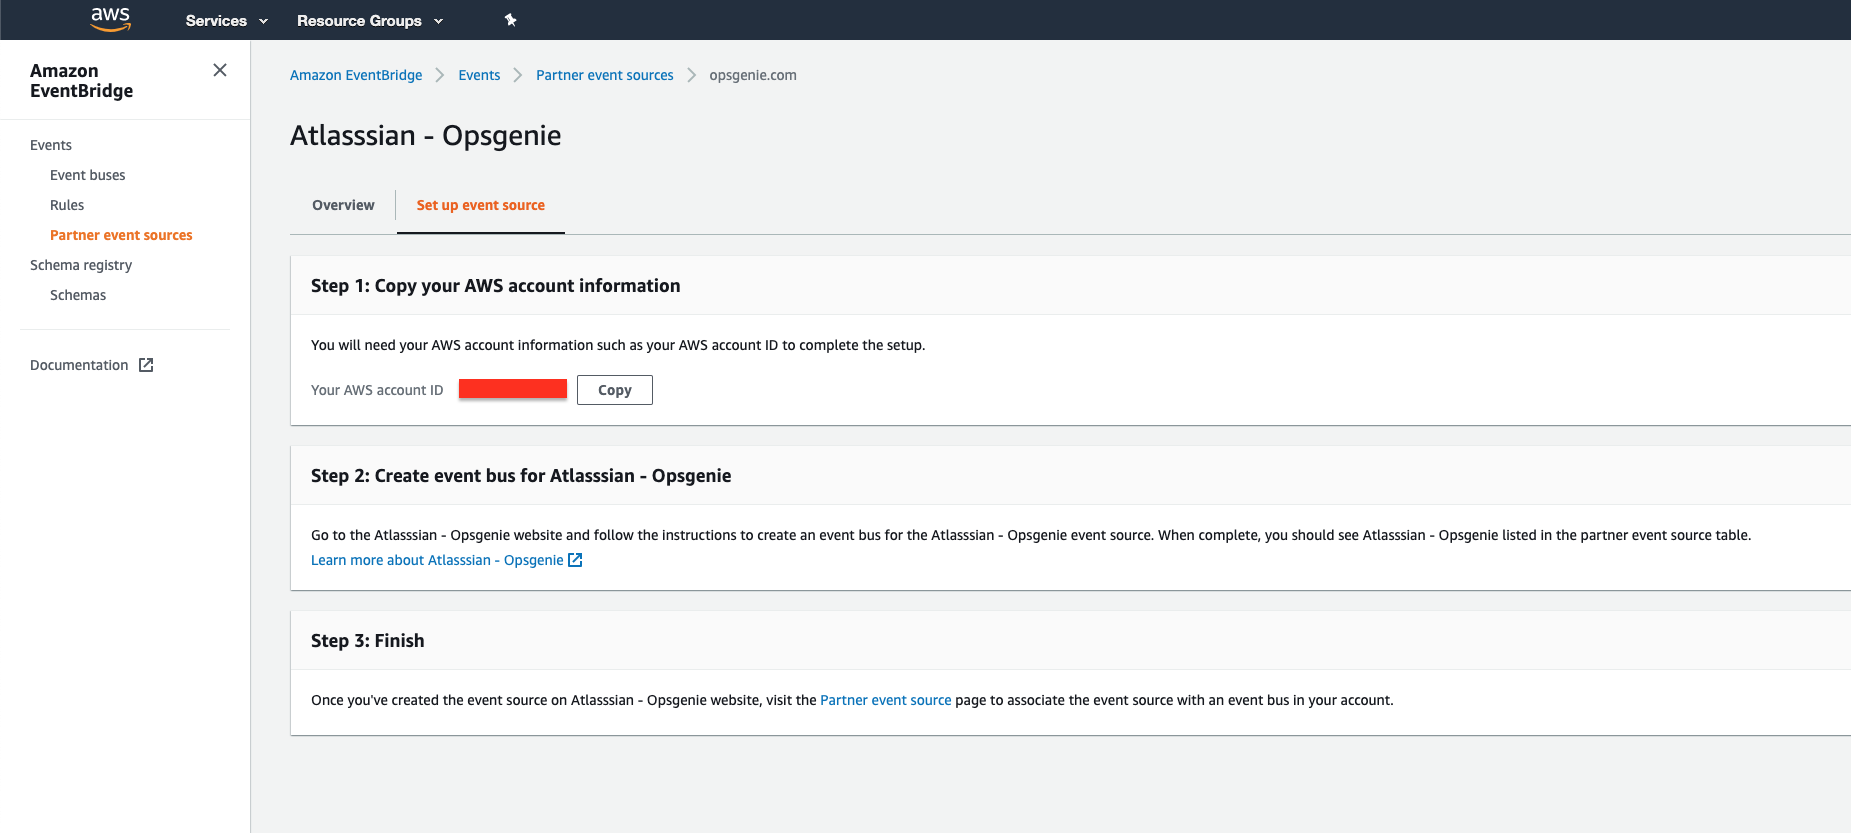
4. [Save Integration (インテグレーションを保存)] をクリックします。
Amazon EventBridge での設定
Opsgenie を通じて統合を作成すると、Amazon EventBridge でパートナー イベント ソースが作成されます。
Go to AWS EventBridge partner event sources page and pick the newly created event source with the name aws.partner/opsgenie.com/{{integrationId}} , then click Associate with event bus and follow through setup dialog. After this step Opsgenie partner event source setup is done.
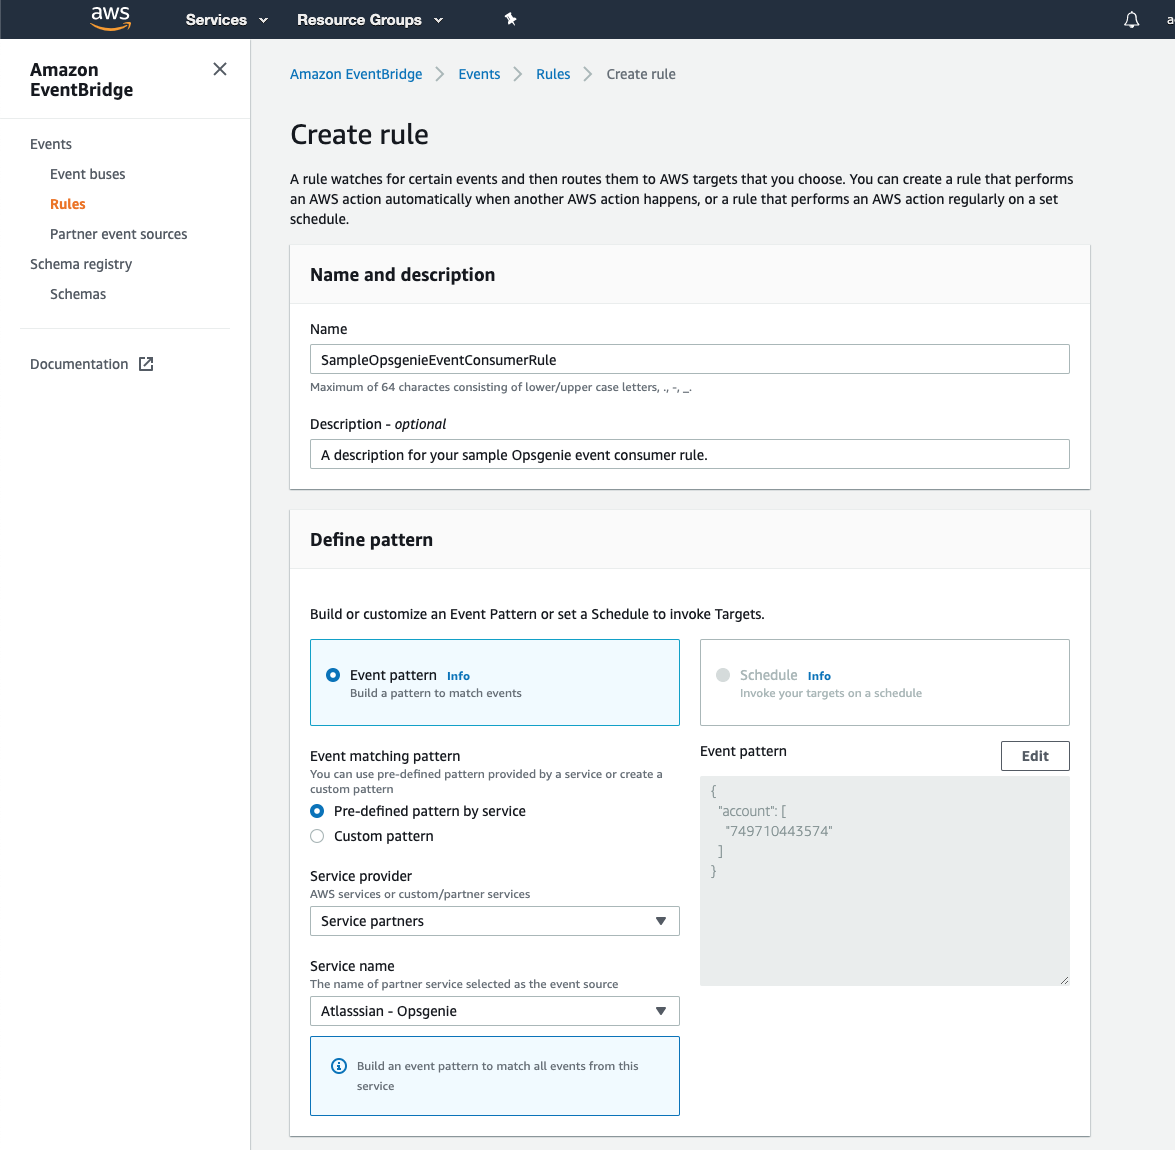
To consume events in the Opsgenie partner event source, go to AWS EventBridge rule creation page , fill in your rule Opsgenie and description (optional). To listen to Opsgenie events, select Event pattern option in Define pattern section and select Pre-defined pattern by service option in Event matching pattern section, then select Service partners option in Service provider section and find the Atlassian - Opsgenie option in Service name section.
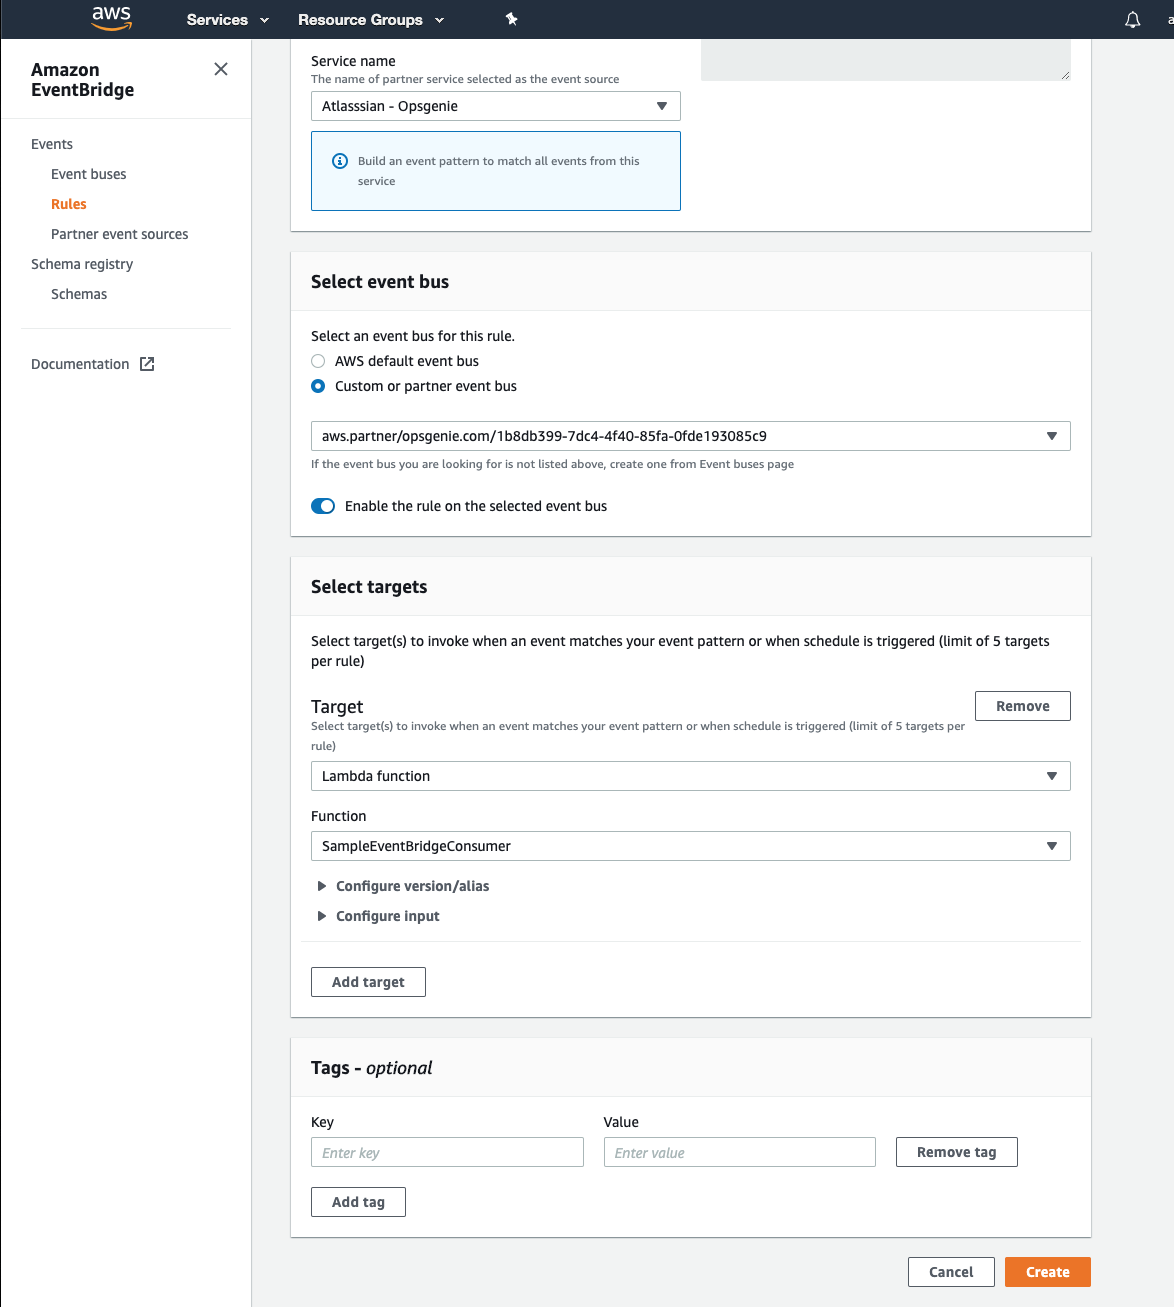
3. [Select event bus (イベント バスの選択)] セクションで、[Custom or partner event bus (カスタムまたはパートナー イベント バス)] オプション、新規作成した Opsgenie イベント ソースの順に選択します。[Select targets (ターゲットの選択)] セクションで、Opsgenie イベント ペイロードをルーティングするターゲットを構成します。この例では、ペイロードを AWS Lambda 関数にルーティングします。必要に応じて、ルールにタグを追加して [作成] をクリックします。
Amazon EventBridge イベント バスに送信されたイベント ペイロードの例
JSON
{
    "version": "0",
    "id": "c5f44bbb-34de-133d-eaff-5f52ff5ad720",
    "detail-type": "Create",
    "source": "aws.partner/opsgenie.com/1b8db399-7dc4-4f40-85fa-0fde193085c9",
    "account": "123456789012",
    "time": "2019-12-04T13:05:06Z",
    "region": "us-west-2",
    "resources": [],
    "detail": {
        "alertId": "66d9ff87-b253-442c-9d4d-5c2c539f9a31-1575464706692",
        "message": "Sample alert message!",
        "tags": [
            "tag1",
            "tag2"
        ],
        "tinyId": "318",
        "source": "sample.email@gmail.com",
        "entity": "entity1",
        "alias": "alias1",
        "createdAt": 1575464706692,
        "updatedAt": 1575464707610000000,
        "username": "sample.email@gmail.com",
        "userId": "d047b539-a9a8-4475-91f2-30b7fb25a474",
        "userFullName": "John Doe",
        "description": "Sample alert description.",
        "team": "Engineering Team A",
        "responders": [
            {
                "id": "df01caee-345c-4f85-a94f-5b1a4cdfc7f8",
                "type": "team",
                "name": "Engineering Team A"
            }
        ],
        "oldTeams": [],
        "teams": [
            "df01caee-345c-4f85-a94f-5b1a4cdfc7f8"
        ],
        "teamsForVisibility": [
            "df01caee-345c-4f85-a94f-5b1a4cdfc7f8"
        ],
        "actions": [
            "action1",
            "action2"
        ],
        "tag": [
            "tag1",
            "tag2"
        ],
        "details": {
            "property1": "value1"
        },
        "priority": "P3",
        "status": "open",
        "acknowledged": false
    }
}
この内容はお役に立ちましたか?