Connect OneDrive to Rovo
Note: The OneDrive connector is now the SharePoint and OneDrive connector. Use this unified connector to ingest assets from both sources. Connect SharePoint to Rovo | Atlassian Support.
We’re migrating existing OneDrive connector customers to the SharePoint connector. You don’t need to do anything, and we’ll handle the migration for you. This change won't affect which content is ingested, and we'll continue to honor your file permissions. If you need to change your settings, you can do so in the SharePoint connector.
Get answers from your documents and bring your files alongside the rest of your company knowledge.
What is indexed?
The OneDrive connector indexes these objects:
Word Documents (.doc, .docx)
Excel Spreadsheets (.xls, .xlsx)
PowerPoint Presentations (.ppt, .pptx)
PDFs (maximum 10 MB)
For each object, it indexes these attributes:
Name
URL
Created date
Last updated date
Creator
Collaborators
Document body
Before you begin
You need Microsoft Entra global admin permissions to connect OneDrive to Rovo.
Rovo will always respect permissions. Users will only ever see files that they already have access to.
Connecting to OneDrive
To get to the setup screen for OneDrive in Atlassian Admin:
Go to admin.atlassian.com. Select your organization if you have more than one.
Select Apps > AI settings > Rovo.
Under Sites, next to the site you want to connect, select Add connector.
Select Microsoft OneDrive and press Next.
Azure portal
Log in to your Azure portal and navigate to Microsoft Entra ID.
2. In the side navigation, under Manage, select App registrations > New registration.
If you’ve set up other Entra app registrations for Rovo connectors (such as SharePoint or Teams), we strongly recommend setting up a new registration for each connector to avoid issues with rate limiting.
3. On the Register an application page in the Azure portal, name the connection to Rovo (for example, “OneDrive Atlassian Rovo”), select Accounts in this organizational directory only, and then select Register.
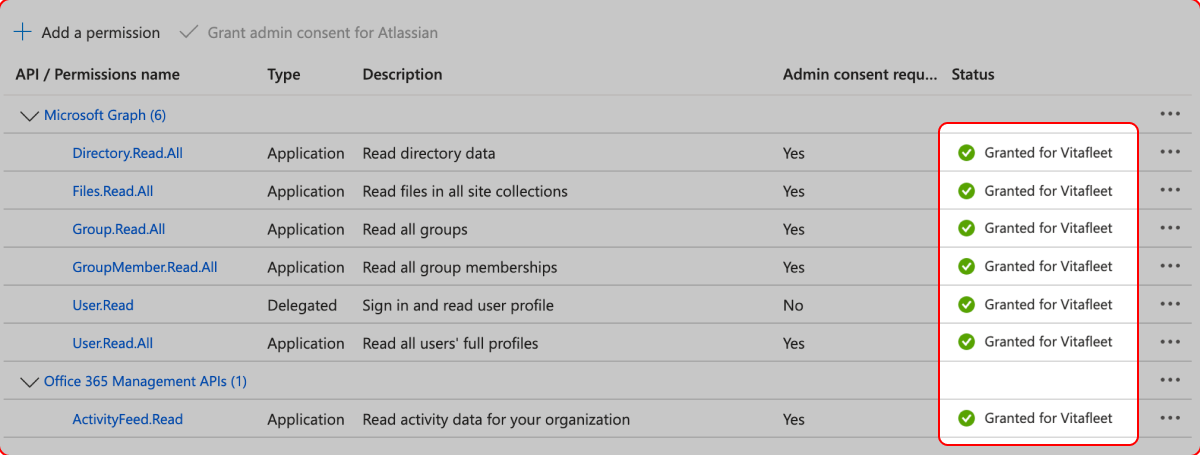
4. In the side navigation, under Manage, select API permissions, select Add a permission on the API permissions page, then Microsoft Graph.
5. Select Application permissions and select expand all.
6. Copy these permissions one by one, and paste them into the search line. Click the checkbox. Repeat for all permissions.
Directory.Read.All
Files.Read.All
Group.Read.All
GroupMember.Read.All
User.Read.All
7. Select Add permissions.
8. There’s one more permission to add, but it’s in a different API. Select Add a permission again, then this time Office 365 Management APIs.
9. Select Application permissions, and look for ActivityFeed.Read. Select the checkbox, and select Add permissions.
10. Select Grant admin consent for <workspaceName>.
11. Once this is done, back on the Manage > API permissions screen, in the Status column of the table, you should see green ticks and Granted for <workspace> (except the permission User.Read, which doesn't require Admin consent).
12. Navigate to Manage > Certificates & secrets, and select Create app secret and fill in the form.
13. Once you’ve created a secret, copy the Value field (not the Secret ID, note the screenshot below). You’ll need this soon.
14. Go to Overview and copy the following details back into the admin.atlassian.com connector setup screen:
Your application ID
The directory ID
15. Enter the Client secret value you copied earlier as Client secret.
16. Finally, review the disclaimer, and select Save.
Next steps
After you’ve finished Connecting OneDrive:
Documents will start to show in Search incrementally over the next few hours.
Your team members will see OneDrive show up as a filter option in Search. If they haven’t connected to OneDrive from their Atlassian account, they may be asked to connect before they can see results. This is required so Rovo can make sure your teammates only see results they usually have access to.
Depending on the number of documents in OneDrive, it may take some time for all your OneDrive content to be indexed and appear in Search.
Was this helpful?