Connect Airtable to Rovo
Bring your data and tables and make them searchable alongside your company knowledge.
What is indexed?
The Airtable connector indexes these objects:
Tables
For each object, it indexes these attributes:
Name
URL
Created date
Last updated date
Creator
Collaborators
Before you begin
You must be on an Airtable Enterprise Scale plan with administrator permissions to connect to Rovo.
Rovo will always respect permissions. Users will only ever see tables that they already have access to.
Connecting to Airtable
Before you setup the Atlassian Admin integration, you must create a service account to connect to in Airtable. To setup the account:
Go to Airtable Admin, and on the Users screen, select the Service accounts tab.
Select Create service account and fill in a name ('Service Account Rovo integration') and an email address that you have access to. This email address can’t be the same as your Admin account.
Select the Workspaces you’d like Rovo to have access to, and once selected, change the dropdown from Creator to Read only. You can add more Workspaces on the next screen if you need to.
Select Create.
You’ll be taken to your Service Account screen. Next to the Service Acct label, select the three dots menu (•••), and select Grant Admin Access.
If you need Rovo to access additional workspaces, you can also add more from the Workspaces tab.
Next, to setup the integration from Atlassian Admin:
7. Go to admin.atlassian.com. Select your organization if you have more than one.
8. Select Apps > AI settings > Rovo.
9. Under Sites, next to the site you want to connect, select Add connector.
10. Select Airtable and press Next.
11. Enter a name for your Airtable connection.
12. Review the disclaimer, and select Authorize Airtable.
13. A new tab will open to step you through Airtable authorization. Under ‘Authorize as…’, you need to select the name of the Service account you created in Airtable in Step 2 ('Service Account Rovo integration' or what you chose as the name).
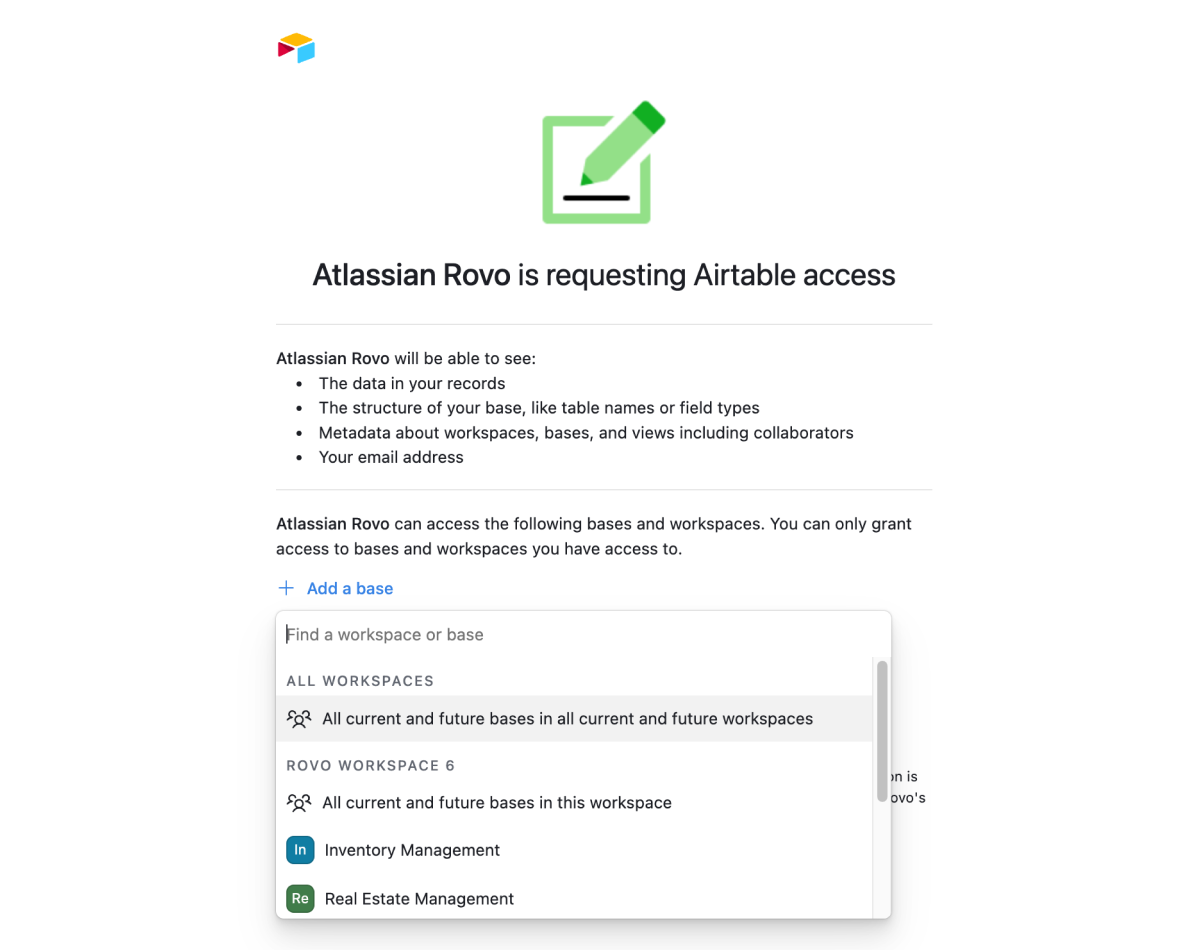
14. After selecting the account, you will be again asked to select the workspaces or bases that you would like Rovo to be able to read from.
You can either:
(Recommended) Select Add a base > All current and future bases in all current and future workspaces.
Select “Add a base” and choose the same workspaces and bases from Step 3 and 6.
What’s the difference?
Both of these options end in the same immediate result, as this step of the Rovo integration cannot grant more access than the Service account has been given in Step 3 and 6. The advantage of selecting the whole organization is you can add additional Workspaces (as you did in Step 6) in future without having to remove and re-add the whole integration.
15. Select Grant access.
Next steps
After you’ve finished connecting Airtable:
Tables will start to show in Search incrementally over the next few hours.
Depending on the number of tables in Airtable, it may take some time for all your tables to be indexed and appear in Search.
Your team members will see Airtable show up as a filter option in Search. If they haven’t connected to Airtable from their Atlassian account, they may be asked to connect before they can see results. This is required so Rovo can make sure your teammates only see files that they already have access to.
Your teammates need to select Workspace and Bases (again)
As your teammates connect to Airtable, they will be asked to confirm which organization, workspaces, or bases they would like to grant access to their Atlassian account.

Similarly to Step 14 above, we strongly recommend telling your team to select Add a base > All current and future bases in all current and future workspaces. Once again, Rovo cannot access more than what is setup against the Service account in Step 3 above, so selecting this option allows you to add additional data to Rovo in future without having to disconnect and reconnect accounts.
Alternatively, get your teammates to select the same workspaces and bases from Step 14 above.
Was this helpful?