アプリのインストールとアプリへのアクセスの管理
管理者として、[接続アプリ] ページから、Marketplace アプリと非公開アプリの両方をインストールして管理できます。また、アプリ アクセスも管理できます。これには、権限の付与や、アプリを使用できる場所を制御するポリシーの設定が含まれます。新しい設定にアクセスするのに必要な権限については、ドキュメントを確認してください。
この操作を実行できるユーザー |
Marketplace アプリのインストール
Marketplace アプリをインストールするには、次の手順を実行します。
marketplace.atlassian.com に移動します。
選択したアプリで、[今すぐ入手] ボタン (無料アプリの場合) または [無料で試す] ボタン (有料アプリの場合) をクリックします。
ポップアップ画面で、アプリをインストールするサイトを選択し、複数のエディションが利用可能な場合はエディションを選択して、アプリが複数の Atlassian アプリと互換性がある場合は、アプリを接続する Atlassian アプリを選択します。
[レビュー] を選択します。
アプリの詳細を確認し、[無料トライアルを開始] を選択します。
確認メッセージに、アプリが追加されたことが示されます。
個々のアプリは、独自のセットアップと構成の要件を持つ可能性があります。このような場合は、アプリの [概要] タブの [リソース] 小見出しの下にある [ドキュメント] リンクをご確認ください。
Marketplace とカスタム アプリが動作するには、ユーザーまたはネットワーク管理者が特定のドメインを許可リストに追加する必要がある場合があります。特に *.cdn.prod.atlassian-dev.net を許可するようにしてください。
Marketplace を探索する際、アトラシアンでの安全運用や Cloud Fortified などのプログラムの対象となるアプリが見つかる場合があります。これらのアプリには対応するバッジが表示されます。
複数エディションがある Marketplace アプリ
一部のアプリでは Standard エディションと Advanced エディションが提供されています。これらのエディション間の価格と機能の違いは、Marketplace のリストの [価格] タブで比較できます。
![Marketplace の [価格] タブでの価格と機能の比較](http://images.ctfassets.net/zsv3d0ugroxu/5DHuR2UsjJcsBCFDjsLIIY/cf156ff74371b0b03526f49fc53e104d/Pricing.png)
注意: エディションによってサポート レベルが異なる場合があります。Marketplace のリストの [サポート] タブで確認できます。
アプリで複数のアプリ エディションが提供されている場合は、[接続済みアプリ] 画面でエディションのアップグレードやダウングレードができます。
アプリ エディションをアップグレードする
注意:
アップグレードは即座に反映されます。
Advanced エディションでは 30 日間のトライアルを提供しています。
Standard 有料エディションをご利用中に Advanced のトライアルを開始した場合、Advanced トライアル期間中も Standard の料金が発生します。
年間請求サイクルをご利用の場合は、Customer Advocate にお問い合わせいただき、アップグレードを行う必要があります。
Advanced エディションにアップグレードするには、次の手順に従います。
admin.atlassian.com に移動します。複数の組織がある場合は、対象の組織を選択します。
グローバル ナビゲーションで [アプリ] を選択します。
[アプリを管理] を選択すると、[Connected Apps (接続アプリ)] に移動します。
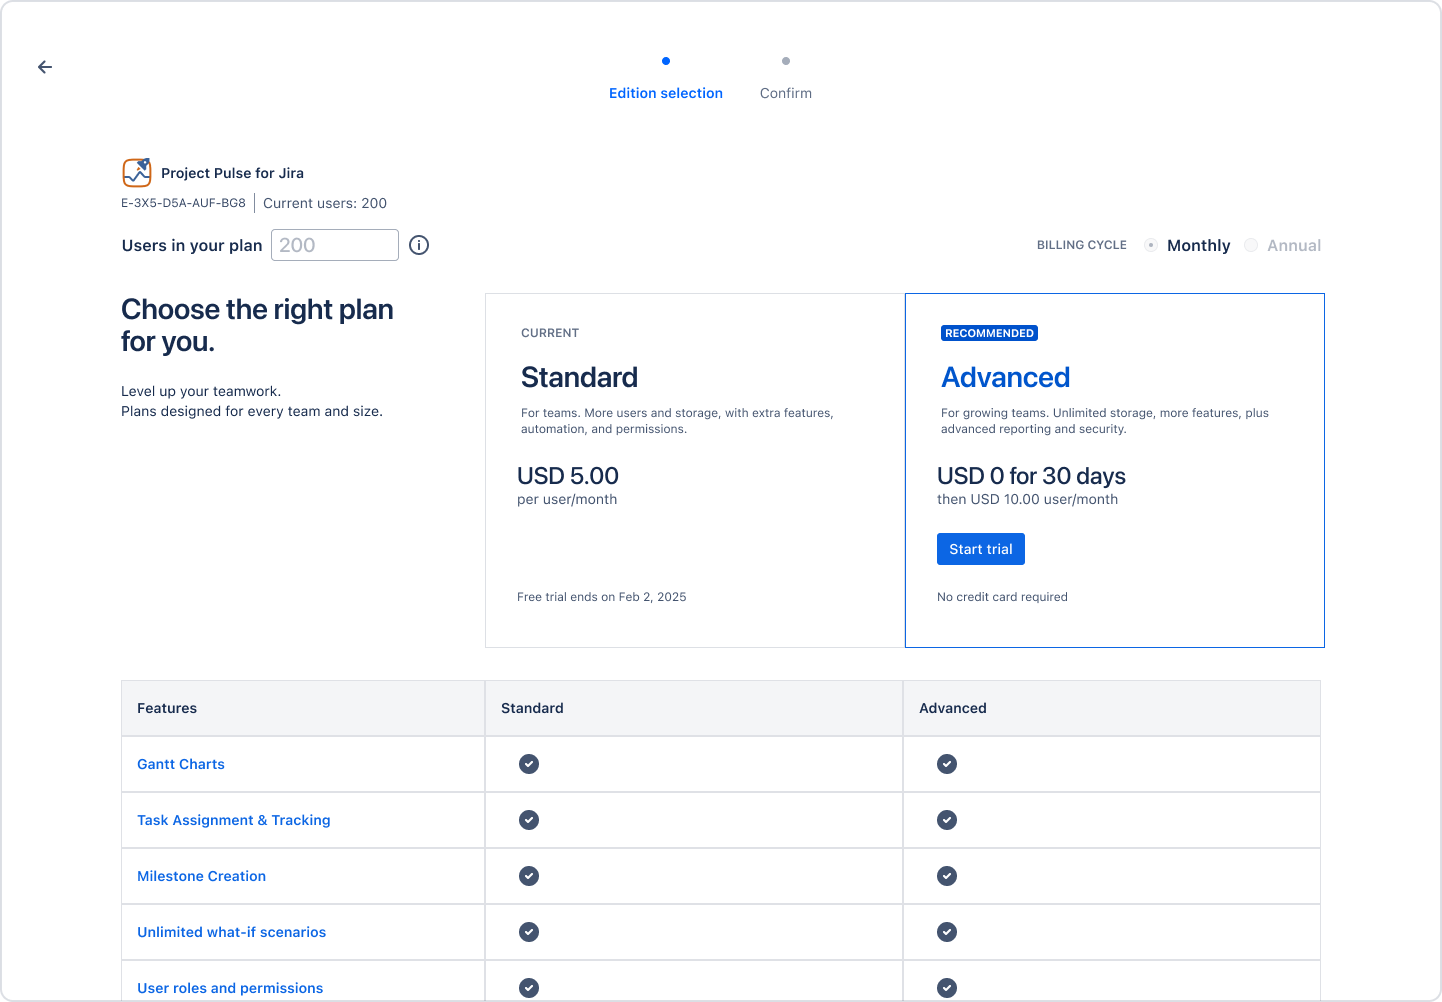
[Advanced edition available (Advanced エディションが利用可能)] セクションで、[Try Advanced (Advanced を試す)] を選択します。
![[接続済みアプリ] 画面の [Try Advanced (Advanced を試す)] ボタンを示すスクリーンショット](http://images.ctfassets.net/zsv3d0ugroxu/1zzcIRoG7V5Mrfk0nuMUdY/810068cf410444ff32324c2df2152024/TryAdvanced.png)
5. Advanced エディションで、[Start trial (トライアルを開始)] を選択します。
6. 次の画面で、請求の詳細をレビューし、[確認] を選択します。
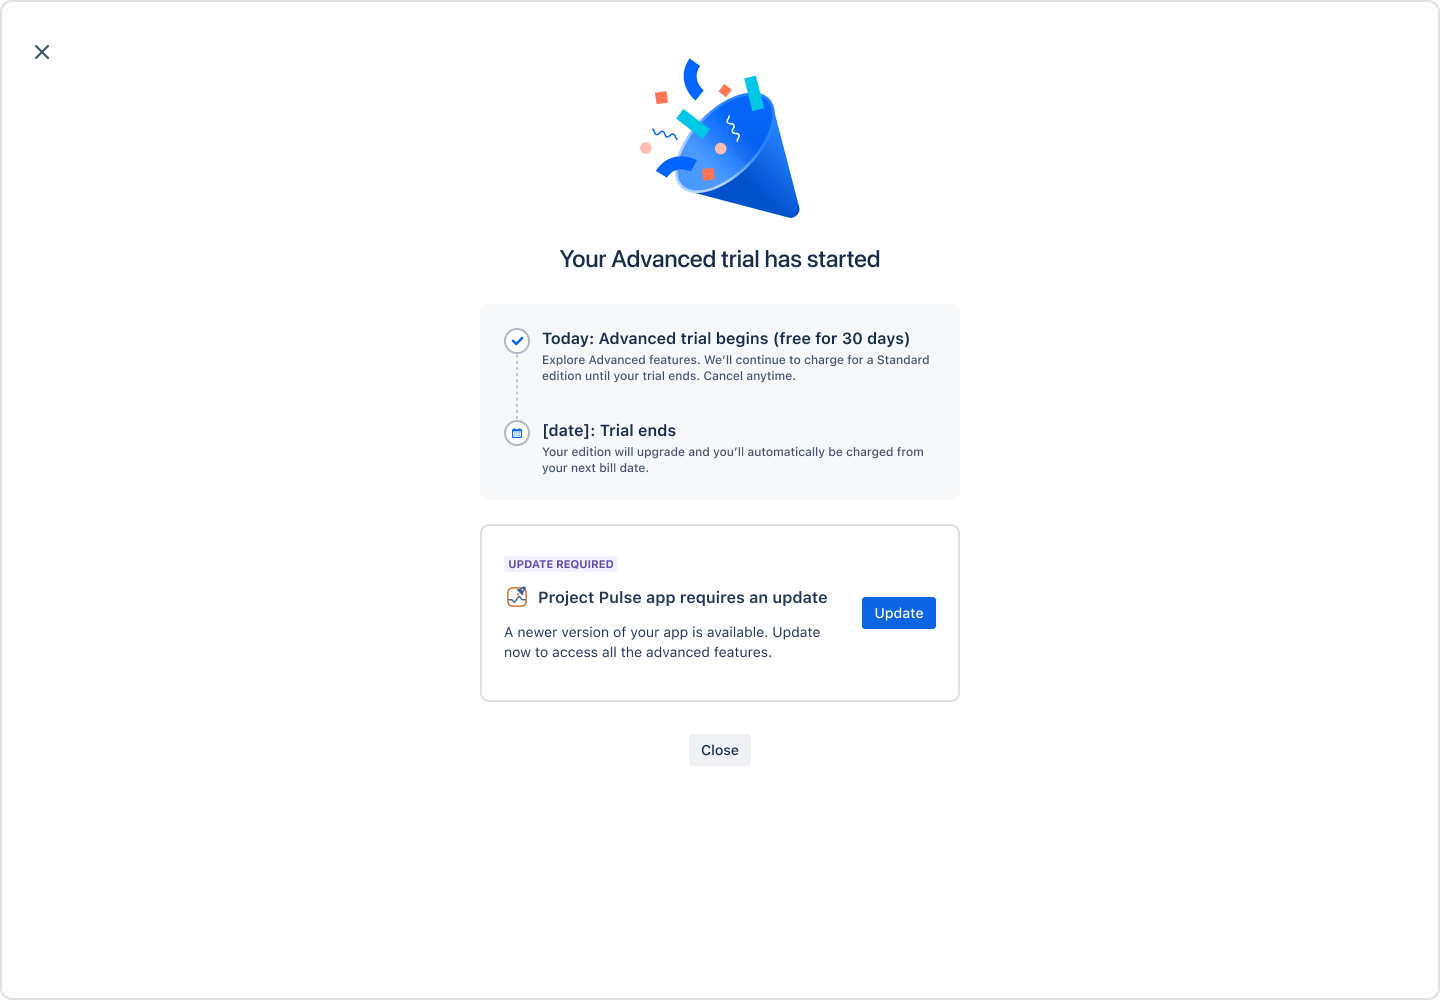
確認メッセージに、Advanced トライアルが開始されたことが示されます。
必要なアプリのアップデートを必ず実行してください。最新のアプリ バージョンをお持ちでない場合、Advanced エディションをご利用であっても、Advanced 機能にアクセスできない可能性があります。
アプリ エディションをダウングレードする
ダウングレードは、現在の請求サイクルの終了後に有効になります。
アプリ エディションをダウングレードするには、次の手順に従います。
admin.atlassian.com に移動します。複数の組織がある場合は、対象の組織を選択します。
[請求] タブを選択します。

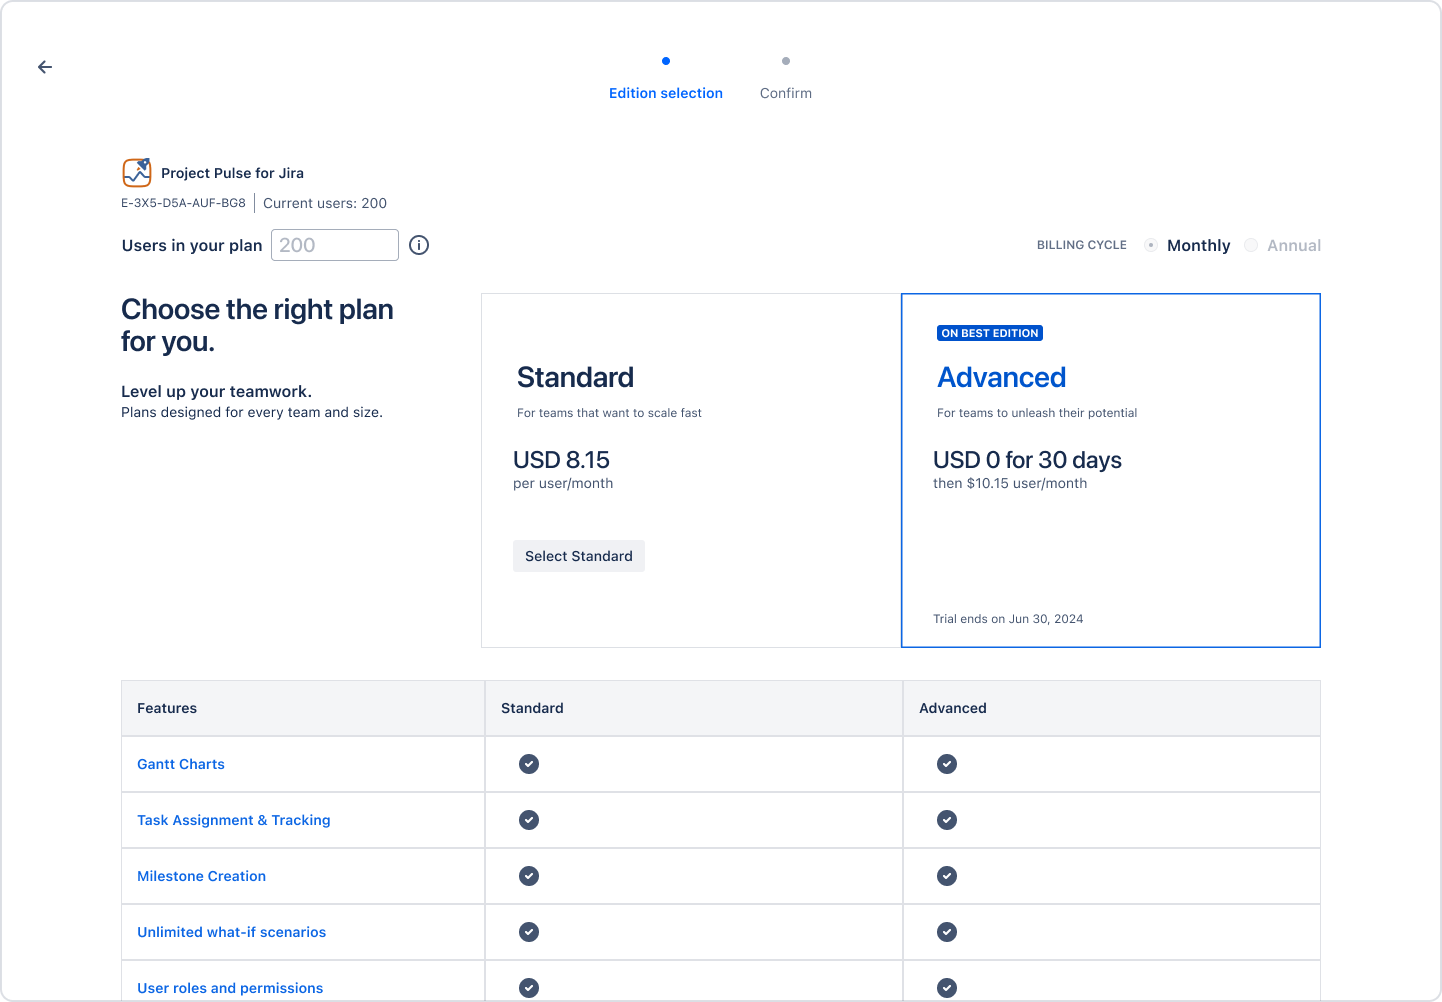
3. 右上隅で、[Change edition (エディションを変更)] を選択します。
4. 次の画面で、[Select Standard (Standard (標準) を選択)] を選択します。
5. 次の画面で、請求の詳細を確認し、[確認] を選択します。
確認メッセージに、エディションが Standard に変更されたことが示されます。
複数の Atlassian アプリと互換性がある Marketplace および非公開アプリ
一部の Marketplace アプリと非公開アプリは、複数の Atlassian アプリに接続できます。インストール中に、接続する Atlassian アプリを選択でき、後でアトラシアンの管理の [接続済みアプリ] 画面でこれらの接続をアップデートできます。
Marketplace アプリについては、Marketplace リストの上部で、そのアプリとさまざまな Atlassian アプリとの互換性を確認できます。
すべてのアプリは、最初に 1 つの Atlassian アプリに接続する必要があります。これは、アプリの Marketplace リストの [Requires (必要な製品)] で指定されています。すべてのアプリのデータは、必要な Atlassian アプリに関連付けられます。アプリのデータ レジデンシー ステータスも、必要な Atlassian アプリに依存します。
非公開アプリのインストール
非公開アプリをインストールするには、次の手順を実行します。
admin.atlassian.com に移動します。
関連するサイトを選択します。
グローバル ナビゲーションで [アプリ] を選択します。
左側のナビゲーションの [サイト] セクションで、アプリを管理するサイトを選択します。
左側のナビゲーションで、[接続されたアプリ] を選択します。接続されたアプリのページには、インスタンスに現在インストールされているすべてのアプリが表示されます。
[設定] タブで、[開発者モードを有効にする] を選択します。
有効にしたら、[非公開アプリをインストール] を選択します。
アプリを接続する Atlassian アプリを選択します。
アプリ記述子 URL を貼り付けます。
[アプリをインストール] を選択します。
すべてのアプリの設定を管理する
管理者またはユーザーがアプリをインストールすると、アプリに関連する権限やスコープの同意を求められます。同意すると、ユーザーはアプリがインストールされている場所ならどこでもアプリを使用できます。ただし、組織が Atlassian Guard Standard のサブスクリプションを持っている場合、またはアトラシアン ガバメント環境に属している場合は、データ セキュリティ ポリシーを作成することで、アプリを使用できる場所を管理できます。
アプリへのアクセスを管理するには、次の手順に従います。
admin.atlassian.com に移動します。
関連するサイトを選択します。
グローバル ナビゲーションで [アプリ] を選択します。
左側のナビゲーションの [サイト] セクションで、アプリを管理するサイトを選択します。
左側のナビゲーションで、[接続されたアプリ] を選択します。接続されたアプリのページには、インスタンスに現在インストールされているすべてのアプリが表示されます。
Select the Settings tab, which will show all settings that apply to all apps installed on the site.
ユーザーのインストール済みアプリを管理する
また、組織管理者とサイト管理者は、[設定] タブの [ユーザーのアプリをブロック] を選択することで、ユーザー アプリのインストールまたはアンインストールを管理者レベルで許可できます。既定では、ユーザーがインストールしたアプリは許可されます。
ただし、組織管理者は、[接続アプリ] ページの [設定] ページからこの設定を管理できます。このコントロールを使用すると、将来のインストールの既定状態を設定して、組織のデータ プライバシー設定を確実に適用できます。また、この設定をアプリのインストール レベルで上書きし、必要に応じて個々のアプリのデータ共有設定を調整できます。
なお、ユーザーは自分の接続されたアプリの画面を使用して、アプリの権限をいつでも取り消せます。
すべてのアプリの分析情報とログへのアクセスを管理する
このセクションの内容は、Forge プラットフォームで構築されたアプリにのみ適用されます。
接続アプリ内のすべてのアプリの分析およびログにアクセスすることにより、次の内容が決定されます。
データが分析目的でサードパーティ ツールに送信されるかどうか
アプリ ログがアプリ ベンダーと共有されるかどうか
既定ではこの設定は有効になっており、新しいアプリをインストールする上記のアクティビティが許可されます。ただし、管理者はサイトに新しいアプリがインストールされる前でも、[接続済みアプリ] ページからいつでもこの設定を無効化できます。新しい設定にアクセスするのに必要な権限については、ドキュメントを確認してください。
新しいアプリのインストールに対する分析情報とログへのアクセスを設定するには、次の手順に従います。
admin.atlassian.com に移動します。
関連するサイトを選択します。
グローバル ナビゲーションで [アプリ] を選択します。
左側のナビゲーションの [サイト] セクションで、アプリを管理するサイトを選択します。
左側のナビゲーションで、[接続されたアプリ] を選択します。接続されたアプリのページには、インスタンスに現在インストールされているすべてのアプリが表示されます。
Select the Settings tab, which will show all settings that apply to all apps installed on the site.
「Access to analytics and logs on installation (インストール時の分析とログへのアクセス)」セクションで、設定を有効または無効にします。
アナリティクスへのアクセスを有効にすると、アプリからアトラシアン以外の分析ドメインにデータを送信できるようになります。
Disabling access to analytics only disables the sending of data to domains that are categorized as analytics in the app. Apps may continue to send data to domains not categorized as analytics. We recommend reviewing such domains when installing new apps or upgrading existing apps.
個々のアプリの分析情報やログへのアクセスを管理する
各アプリの対応する [詳細] ページから、個々のアプリの分析とログ設定を管理できます。これにより、管理者は特定のアプリのデータ共有設定をカスタマイズできます。この設定は、すべてのアプリに適用される設定とは独立して有効化または無効化できます。
個々のアプリの分析やログ設定を管理する方法についてはこちらをご覧ください。
すべてのアプリの AI モデルへの既定のアクセスを管理する
アトラシアンがホストする AI モデルへのアクセスにより、アプリはアトラシアンでの安全運用の要件を満たす方法で AI 主導の機能を使用できます。アプリのすべての新規インストールに対して、これを自動的に許可するかどうかを設定できます。
既定では、この設定は有効になっており、アプリのインストール時に、アトラシアンがホストするすべての AI モデルの使用が自動的に許可されることを意味します。組織およびサイト管理者は、新しいアプリがサイトにインストールされる前であっても、[接続済みアプリ] ページからいつでもこの既定を変更できます。
新しいアプリでアトラシアンがホストする AI モデルへのアクセスを自動的に許可するかどうかを変更するには、次の手順に従います。
admin.atlassian.com に移動します。
関連するサイトを選択します。
グローバル ナビゲーションで [アプリ] を選択します。
左側のナビゲーションの [サイト] セクションで、アプリを管理するサイトを選択します。
左側のナビゲーションで、[接続されたアプリ] を選択します。接続されたアプリのページには、インスタンスに現在インストールされているすべてのアプリが表示されます。
[設定] タブを選択すると、サイトにインストールされているアプリに適用されるすべての設定が表示されます。
[Default access to AI models hosted by Atlassian (アトラシアンがホストする AI モデルへの既定のアクセス)] セクションで、設定を有効または無効にします。
この設定の有効化/無効化は、新規インストールにのみ影響します。サイトにすでにインストールされているアプリは影響を受けません。
アプリが使用できる、アトラシアンがホストする AI モデルの完全なリストについては、開発者向けドキュメントを参照してください。
個々のアプリの AI モデルへのアクセスを管理する
特定のアプリについて、アトラシアンがホストする AI モデルへのアクセスを管理できます。この設定により、[Default access to AI models hosted by Atlassian (アトラシアンがホストする AI モデルへの既定のアクセス)] 設定の例外を管理できます。
これは、組織のコンプライアンスやデータ処理要件により、特定のアプリの使用が禁止されている場合に便利です。
特定の AI モデル
AI 機能
特定のアプリに対してこれを設定するには、次の手順に従います。
サイトの [接続済みアプリ] ページに移動します。
左側のナビゲーションで、[接続されたアプリ] を選択します。接続されたアプリのページには、インスタンスに現在インストールされているすべてのアプリが表示されます。
[アクション] 列で、アプリの [アプリの詳細の表示] リンクをクリックします。これにより、アプリの [詳細] ページが開きます。
[AI モデル] セクションを探します。このセクションでは、アクセスが必要な、アトラシアンがホストする特定の AI モデルが表示されます。このセクションからアクセスを無効化または有効化することもできます。
アプリが使用できる、アトラシアンがホストする AI モデルの完全なリストについては、開発者向けドキュメントを参照してください。
この内容はお役に立ちましたか?