OAuth 2.0 を使用して Jira をアトラシアン アプリにリンクする
このページでは、Atlassian アプリ間のアプリ リンクについてのみ説明しています。サードパーティ アプリへのリンクの詳細については、「OAuth 2.0 (3LO) アプリ」をご確認ください。
アプリ リンク (AppLinks とも呼ばれる) を使用すると、Jira を外部アプリ、または同じ環境 (Atlassian Government 環境を含む) 内の他のアプリに接続できます。
最も一般的な統合は Confluence との統合です。この統合により、Confluence ページを Jira の作業項目に接続して、作業項目とドキュメント間のリンクを作成できます。たとえば、Jira スペース Bear の作業項目 A は Jira スペース Honey の作業項目 B によって異なります。
Jira を任意の Atlassian Data Center アプリに接続したり、Jira と Confluence を接続したりできます。
同じ組織内の Jira と Confluence 間のリンクは自動的に生成されるため、手動で作成する必要はありません。
OAuth 2.0 を使用して Atlassian アプリを接続するには、次の手順に従います。
リンクを表示するアプリで、受信リンクと送信リンクを設定します。
リンク元のアプリで、受信リンクと送信リンクを設定します。
設定中に、アプリ間を移動します。変更内容は随時保存できます。
本ページに記載されている内容を実行するには、次のものが必要です。
ロール: アプリ管理者
権限: スペースの管理
受信 OAuth 2.0 リンクを設定する
受信リンクを設定すると、クライアント ID とクライアント シークレットを取得できます。送信リンクを設定して統合を完了するには、これらの情報が必要です。
まず、リンクを表示する側のアプリから始めます。
[Jira 設定]、[アプリ] の順に移動します。
[アプリケーション リンク] を選択します。
[リンクを作成] を選択します。
リンク先の Atlassian アプリのアプリ URL を入力します。[次へ] を選択します。
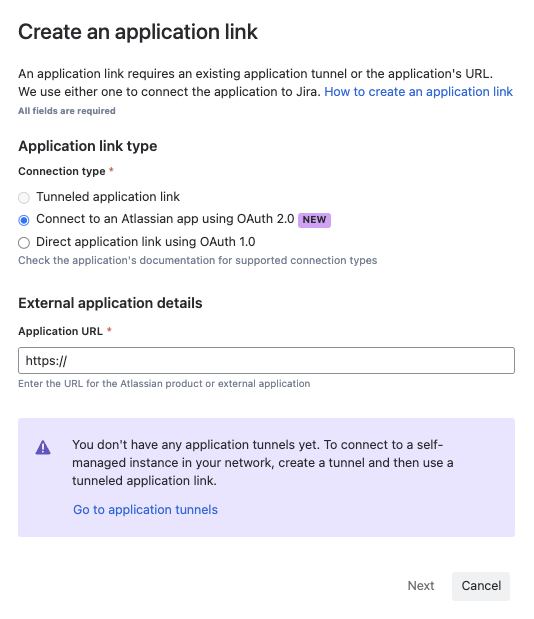
URL はネットワークからアクセスできる必要があるため、着信接続を許可するようにファイアウォールを設定する必要がある場合があります。
トンネリングされたアプリ リンクは OAuth 2.0 アプリ リンクではサポートされていないため、統合を機能させるには直接アクセスが必要になります。
Cloud から Data Center へのアプリケーション リンクの作成
リモート アプリケーションが OAuth 2.0 をサポートしていない場合は通知されます。
アプリケーション URL が表示 URL と異なる場合は、確認し、必要に応じて調整します。次に、[続行] を選択して、接続の詳細を確認します。
作成しようとしているリンクの詳細を確認します。すべて問題なければ、[続行] を選択します。
[保存] を選択するか、送信 OAuth 2.0 のクライアント ID とクライアント シークレットをコピーします。
リンク元となるアプリで、これらの手順を繰り返します。この手順は Confluence でも同じです。
以上で、受信リンクが設定できました。つまり、ご使用のアプリからリンク元のアプリにリクエストを送信できるようになりました。
次に、元のアプリがリンクを送り返すことができるように、送信リンクを設定する必要があります。
送信 OAuth 2.0 リンクを設定する
送信リンクを設定すると、アプリが接続されます。
リンクを表示する側のアプリで、[Jira 設定]、[アプリ] の順に移動します。
[アプリケーション リンク] を選択します。
[Configure OAuth client details (OAuth クライアントの詳細を構成)] に移動します。
他のアプリで受信リンクを設定するときに保存したクライアント ID とクライアント シークレットを入力します。
[接続] を選択して、アプリ間の双方向通信を設定します。
OAuth 2.0 リンクを使用して Cloud を Data Center に接続する
Atlassian Data Center アプリからリンクする場合は、リダイレクト URL を入力します。この URL は Data Center アプリの送信リンクの作成ページにあります。
リンク元のアプリに対して有効にする OAuth スコープを選択します。
この内容はお役に立ちましたか?