OneDrive を Rovo に接続する
Note: The OneDrive connector is now the SharePoint and OneDrive connector. Use this unified connector to ingest assets from both sources. Connect SharePoint to Rovo | Atlassian Support.
We’re migrating existing OneDrive connector customers to the SharePoint connector. You don’t need to do anything, and we’ll handle the migration for you. This change won't affect which content is ingested, and we'll continue to honor your file permissions. If you need to change your settings, you can do so in the SharePoint connector.
ドキュメントから回答を取得して、企業のすべてのナレッジとともにファイルを管理しましょう。
何がインデックス化されますか?
OneDrive コネクタは、次のオブジェクトをインデックス化します。
Word 文書 (.doc、.docx)
Excel スプレッドシート (.xls、.xlsx)
PowerPoint プレゼンテーション (.ppt、.pptx)
PDF (最大 10 MB)
各オブジェクトについて、次の属性がインデックス化されます。
名前
URL
createdDate
最終更新日
作成者
協力者
ドキュメント本文
はじめる前に
OneDrive を Rovo に接続するには、Microsoft Entra グローバル管理者権限が必要です。
Rovo は常に権限を遵守します。ユーザーには、すでにアクセス権があるファイルのみが表示されます。
OneDrive に接続する
アトラシアンの管理で OneDrive のセットアップ画面を開くには、次の手順に従います。
admin.atlassian.com に移動します。複数の組織がある場合は、対象の組織を選択します。
Select Apps, then Connectors.
If you have more than one site, pick the site you want to connect, then select Add connector.
[Microsoft OneDrive] を選択して [次へ] を押します。
Azure ポータル
Azure ポータルにログインして、Microsoft Entra ID に移動します。
2. In the side navigation, under Manage, select App registrations, then New registration.
If you’ve set up other Entra app registrations for Teamwork Graph connectors (such as SharePoint or Teams), we strongly recommend setting up a new registration for each connector to avoid issues with rate limiting.
3. Azure ポータルの「アプリの登録」ページで、Rovo への接続に名前をつけて (たとえば “OneDrive Atlassian Rovo”)、[この組織ディレクトリのみに含まれるアカウント] > [登録] の順に選択します。
4. サイド・ナビゲーションの [管理] で [API 権限] を選択し、[API のアクセス許可] ページで [アクセス許可の追加] を選択し、次に [Microsoft Graph] を選択します。
5. [アプリケーションの許可] を選択し、[すべて表示] を選択します。
6. これらの権限を 1 つずつコピーして、検索行に貼り付けます。チェックボックスをクリックします。すべての権限について繰り返します。
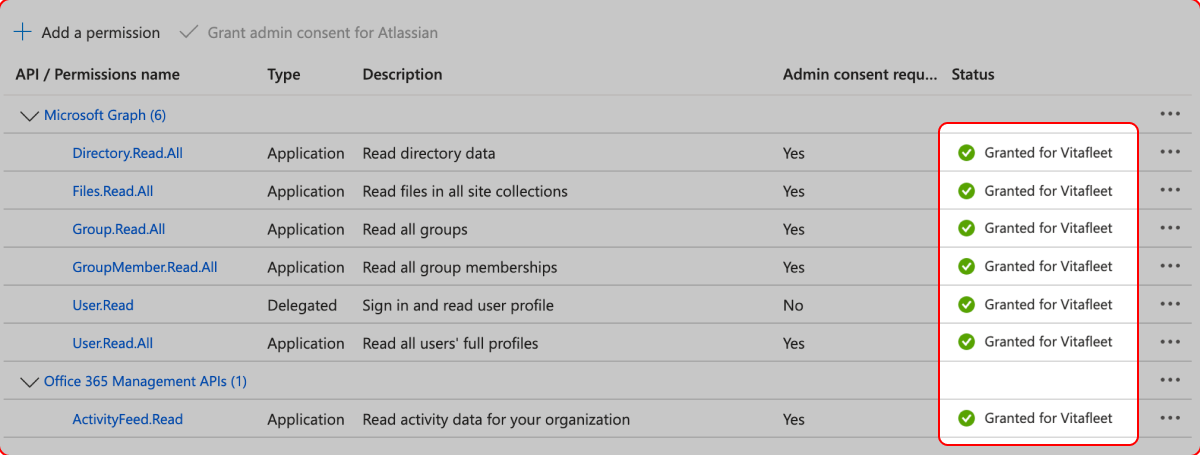
Directory.Read.All
Files.Read.All
Group.Read.All
GroupMember.Read.All
User.Read.All
7. [権限を追加] を選択します。
8. 追加する権限がもう 1 つありますが、それは別の API にあります。もう一度 [権限を追加] を選択して、今度は [Office 365 管理 API] を選択します。
9. [アプリの権限] を選択して ActivityFeed.Read を探します。チェックボックスを選び、[権限を追加] を選択します。
10. [<workspaceName> に対する管理者の同意を付与] を選択します。
11. これが完了すると、[管理] > [API 権限] 画面に戻ります。テーブルの [ステータス] 列に緑色のチェックマークと「<workspace> に付与されています」と表示されるはずです (管理者の同意を必要としない User.Read 権限を除く)。
12. [管理] > [証明書とシークレット] の順に移動して、[アプリ シークレットを作成] を選んでフォームに入力します。
13. シークレットを作成したら、[値] フィールドをコピーします (シークレット ID ではありません。以下のスクリーンショットを参照)。これはすぐに必要になります。
14. [概要] に移動して、次の詳細を admin.atlassian.com コネクタのセットアップ画面にコピーします。
アプリ ID
ディレクトリ ID
15. 先ほどコピーしたクライアント シークレットの値を、クライアント シークレットとして入力します。
16. 最後に免責事項を確認して、[保存] を選択します。
次のステップ
OneDrive との接続が完了すると、次のようになります。
ドキュメントは、数時間かけて徐々に検索に表示されるようになります。
チーム メンバーには、検索のフィルター オプションとして OneDrive が表示されます。Atlassian アカウントから OneDrive に接続していないチーム メンバーに対しては、結果が表示される前に接続を求められる場合があります。これは、Rovo においてチーム メイトに表示する結果をそれぞれのアクセス権に基づいて制限するために必要となります。
OneDrive 内にあるドキュメントの数によっては、OneDrive のすべてのコンテンツがインデックス化されて検索に表示されるまでに時間がかかる場合があります。
この内容はお役に立ちましたか?