Connect Azure DevOps to Jira
Connecting your Azure DevOps account to Jira allows your team to track their work in Jira as it ships through the deployment and development pipelines. You’ll get deployment, build, and development information in your team’s Jira work items, on your Jira board, on the deployments timeline, in the development dialog, and in the Releases feature. Read more about integrating deployments with Jira
To connect Azure DevOps for Jira, you need:
Jira site administrator permissions.
Access to an Azure DevOps organization with Access level set to Basic.
Admin permissions on Azure DevOps spaces you'd like to connect to Jira
Connect an Azure DevOps account to Jira
Install the Azure DevOps for Jira (Official) Marketplace app
From your Jira space, go to Apps, then Explore more apps in the sidebar.
Search for Azure DevOps for Jira. Select the version with "Official" in the title.
Select Get app, then Get it now.
Once the app has installed, select Configure now. You’ll then be prompted to connect your Azure DevOps account and organizations.
Connect your Azure DevOps account and organizations
To connect your Azure DevOps account, you must sign in to your Microsoft account and accept the requested permissions:
From the configuration screen, select Continue.
A new tab will open with the Microsoft sign in page. Enter your credentials to sign in to the Azure DevOps account you want to connect to Jira.
Next, Microsoft will request your permission to send data to Jira. Select Accept.
Once your Azure DevOps account has been connected, you’ll see a list of available organizations to connect to Jira. Select Connect for any organizations you want to link.
If your Microsoft account has access to multiple Azure DevOps tenants, and you’ve connected using the wrong one, here’s how to switch to a different Azure DevOps tenant.
Enable OAuth in Azure DevOps
You must enable OAuth in an Azure DevOps organization before it can send data to Jira. If you connect an organization where OAuth has not yet been enabled, you’ll see a message in Jira that tells you OAuth needs to be enabled.
Select Go to Azure DevOps.
In your Azure DevOps organization settings, go to Security, then Policies.
Under Application connection policies, use the toggle to turn on Third-party application access via OAuth and SSH authentication.
Set up a CI/CD pipeline in Azure DevOps
You can trigger deployment events in Azure DevOps that the Azure DevOps for Jira app will recognize by using:
deployment jobs
the classic release pipeline
Use deployment jobs to trigger deployment events
When your deployment is part of the YAML pipeline, you can use the deployment jobs to trigger deployment events. The Azure DevOps for Jira app will create a deployment event for each deployment job that runs through your pipeline. The app won't consider other jobs, such as running tests or installing a module, as deployment events.
You must have each deployment job in a separate stage in the pipeline. The environment name in the job will be mapped to the corresponding environment name in the deployment information in your Jira work items, on the board, and on the deployment timeline.
Here is an example of a stage in a pipeline with a deployment job:
- stage: 'development'
    displayName: 'Dev Deployment'
    jobs:
      - deployment: Deploy
        pool:
          vmImage: 'ubuntu-latest'
        environment: dev
        strategy:
          runOnce:
            deploy:
              steps:
              - download: current
                artifact: www
In this example, the pipeline contains a stage with a deployment job to the dev environment. This will be mapped to deployment with environment name dev in Jira.
Use the classic release pipeline to trigger deployment events
You can trigger deployment events by using a classic release pipeline in Azure DevOps.
For this method to work, select Build as the Source type when you add a trigger artifact.
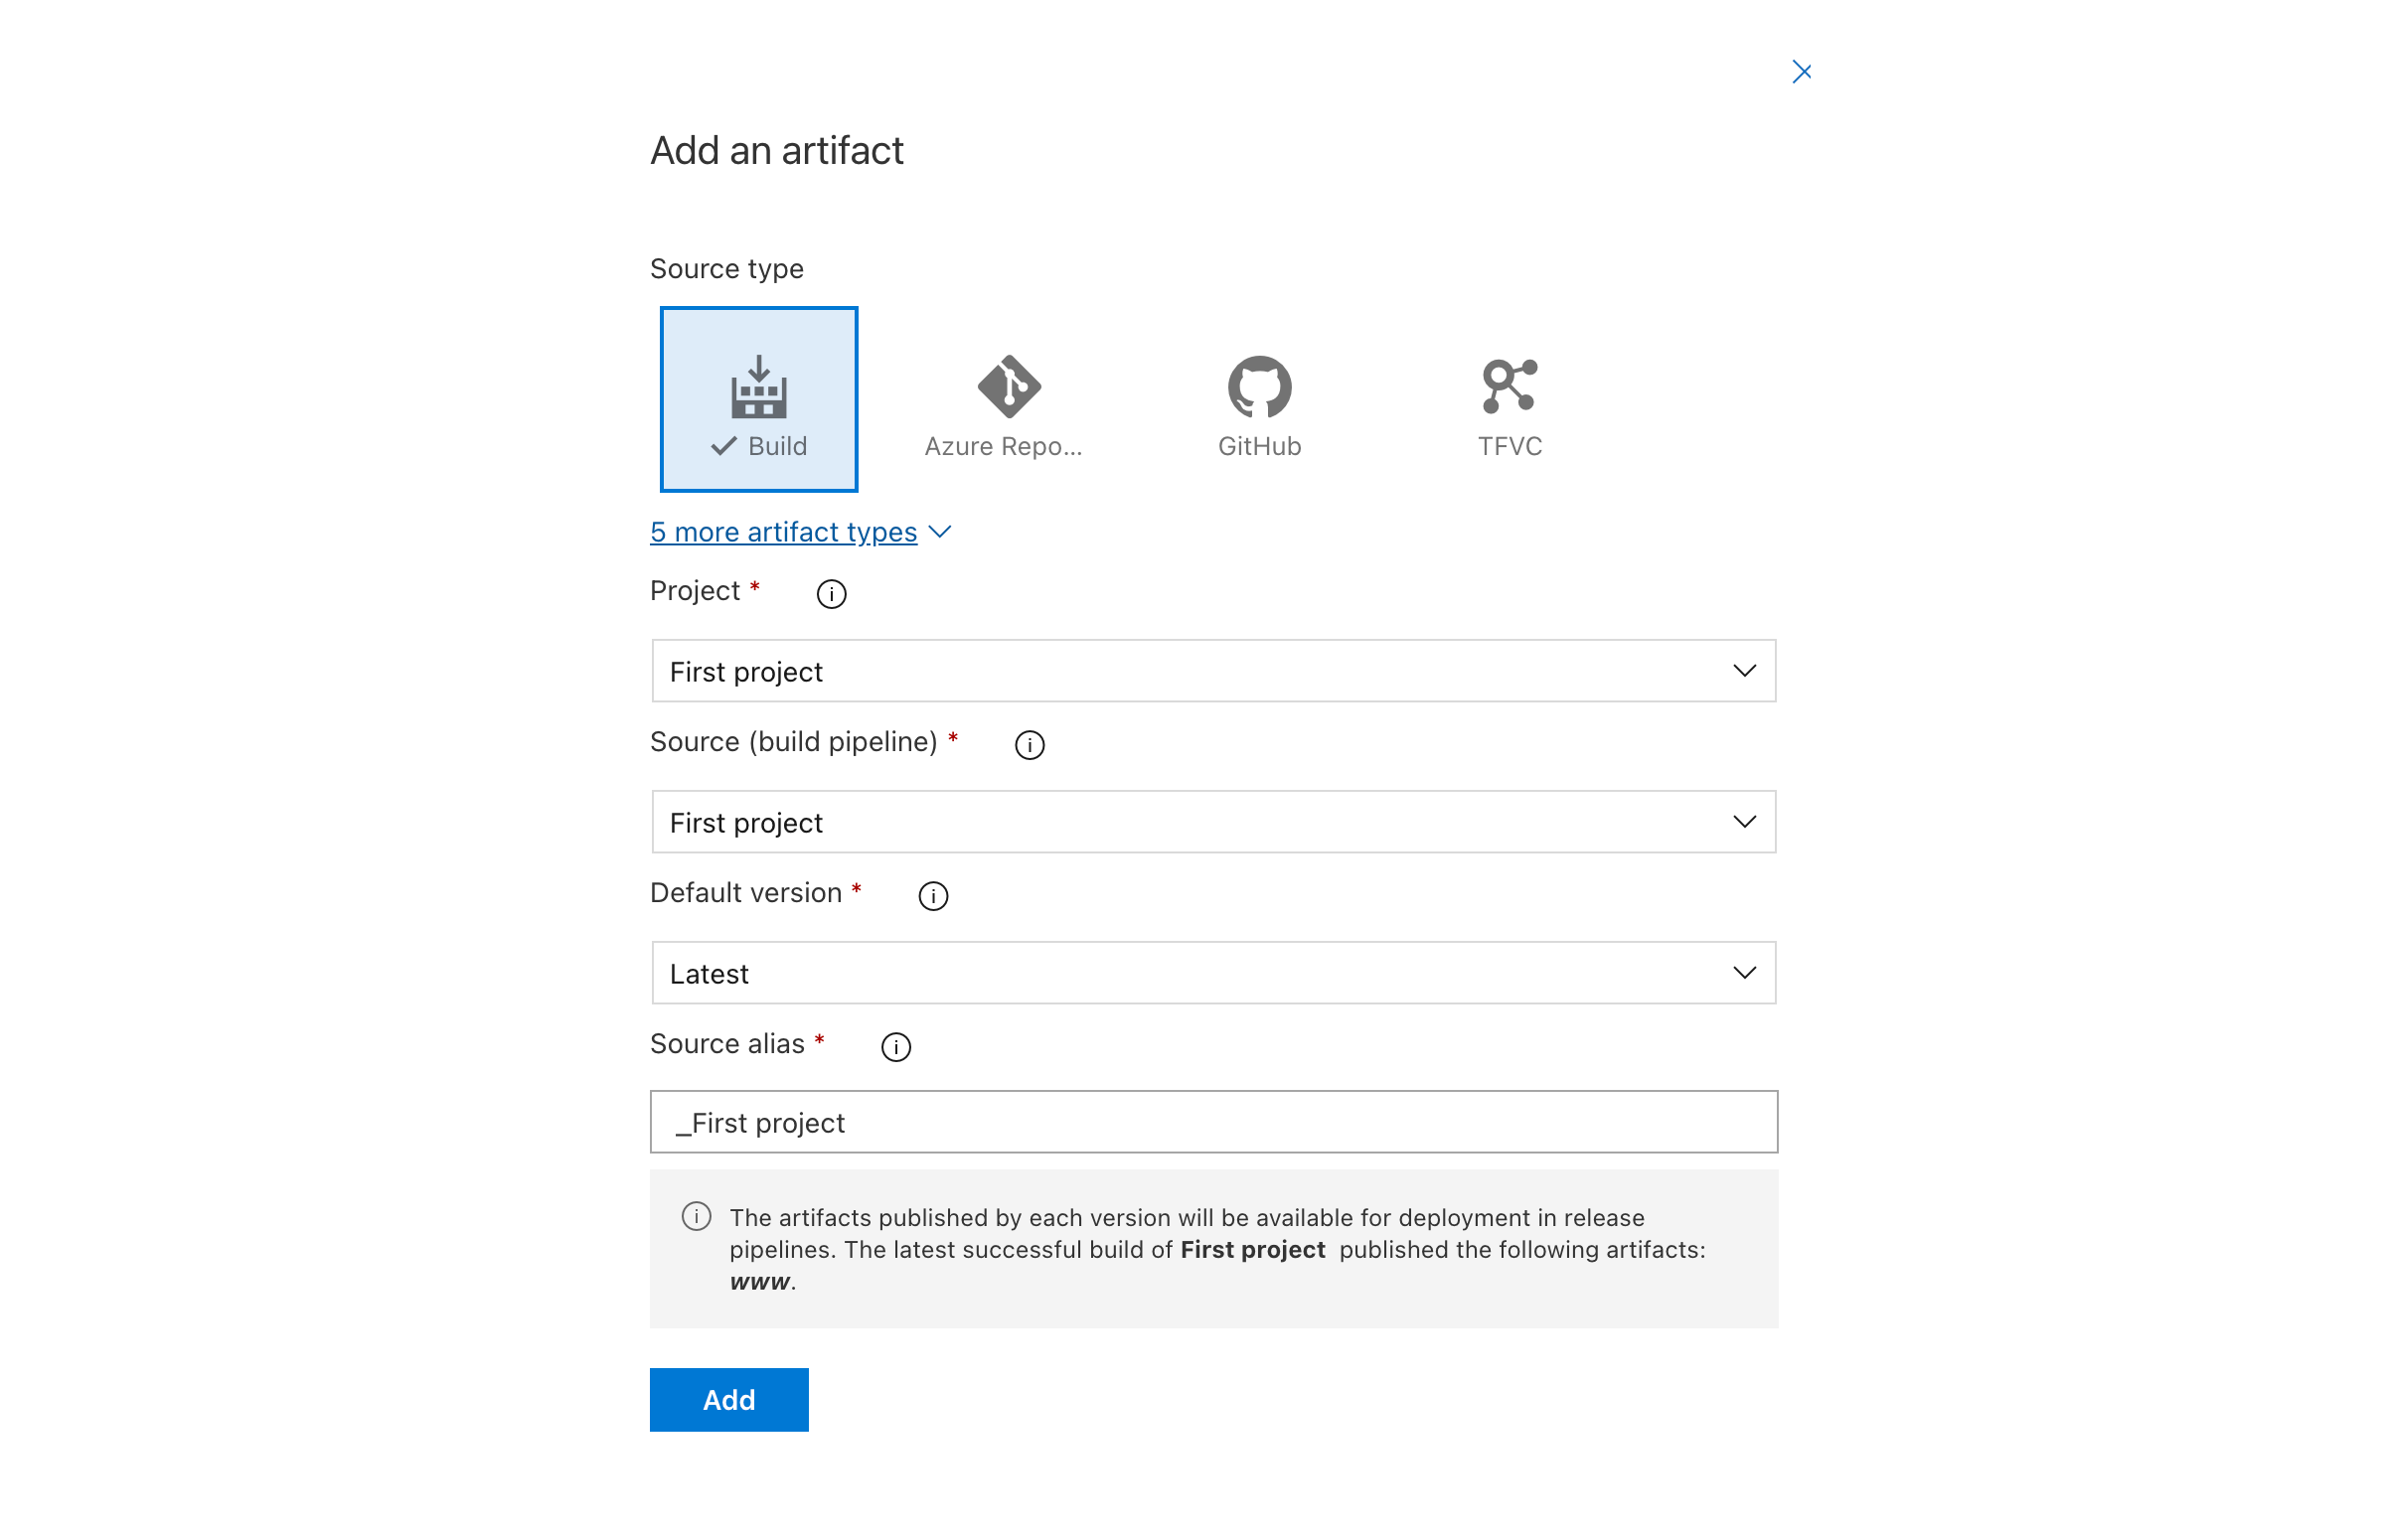
Each deployment should have its stage. A stage name will be mapped to the corresponding environment name in the deployment information in your Jira work items, on the board, and on the deployment timeline.
Deployment events include the name of the environment to which your app was deployed. To show the environment details in your Jira work items, Jira needs to know whether the environment is a development, testing, staging, or production environment. Based on the environment name, Jira tries to guess the environment to map your deployment event. For example, a deployment to an environment named dev would be considered a development environment.
If you use other environment names (for example, non-English environment names), Jira might show these as undefined environments. To resolve this, you can specify your custom environments by adding a file called .jira/config.yml to the main branch of your repository with the following content:
deployments:
  environmentMapping:
    development:
      - "dev*"
      - "Entwicklung"
      - "desenvolvimento"
      - "дев"
    testing:
      - "testes"
      - "Test"
      - "TST-*"
      - "тест"
    staging:
      - "Pre-Prod"
      - "STG-*"
      - "staging"
    production:
      - "Produktion"
      - "produção"
      - "продакшн"
      - "PROD-*"
In this example, a deployment to an environment named “STG-2” would be mapped as a deployment to the staging environment in Jira, and a deployment to an environment named “Produktion” would be mapped as a deployment to the production environment in Jira.
In Jira, you can specify up to 10 glob patterns for the four valid environments: development, testing, staging, or production.
Use work item keys to link deployment events to Jira
To link your team’s development activity to Jira, you must include Jira work item keys in commit messages, branch names, and pull requests. Once a deployment has run on a linked branch, commit, or pull request, you’ll see deployment information in your Jira work items, on the board, and on the deployment timeline. Read more about referencing work items in your development work
The app will only link keys added directly within a pipeline’s repository. It will not recognize keys from other repositories.
Link your development information to Jira work items
To link to branches, commits, and pull requests made in Azure Repos, your team must include Jira work item keys in their development actions.
Find the key for the Jira work item you want to link to, for example “JRA-123”. You can find the key in several places in Jira:
On the board, work item keys appear at the bottom of a card.
On the details, work item keys appear in the navigation at the top of the page.
Check out a new branch in your repo, using the work item key in the branch name. For example,
git checkout -b JRA-123-<branch-name>.When committing changes to your branch, use the work item key in your commit message to link those commits to the development panel in your Jira work item. For example,
git commit -m "JRA-123 <summary of commit>".When you create a pull request, use the work item key in the pull request title or description.
After you push your branch, you’ll see development information in your Jira work item. Read more about referencing work items in your development work
Re-enable OAuth in Azure DevOps after an inactive period of 12 months
The OAuth token necessary for data synchronization expires every 12 months if no data has been synchronized from Azure DevOps to Jira within that timeframe. Once the token expires, synchronization of your Azure DevOps data with Jira will no longer be possible.
You can resume data synchronization by getting a new OAuth refresh token.
To get a new OAuth refresh token:
Go to your Azure DevOps for Jira configuration page by selecting Apps > Manage your apps.
In your sidebar, under Azure DevOps for Jira, select Configure to log in.
Once you log in, a new OAuth token is automatically generated, restoring the data synchronization between Azure DevOps and Jira.
Authorize Azure DevOps for Jira with Microsoft Entra ID
Microsoft is deprecating the Azure DevOps OAuth platform. While the exact end-of-life date hasn't been announced, it is scheduled for 2026. All apps must use Microsoft Entra ID for authorization. Read Microsoft's blog about Azure DevOps OAuth platform deprecation
This change affects how Azure DevOps for Jira connects to your Azure DevOps organizations both before and after the end-of-life date. Before the cutoff, the app continues to work as usual. However, authorizing it with Microsoft Entra ID in time will ensure your connection to Azure DevOps remains active and data continues to show in Jira without any interruption.
After the end-of-life date, your connections to your Azure DevOps will become inactive if Azure DevOps for Jira isn’t authorized again with Microsft Entra ID by that time. Data from Azure DevOps will stop appearing in Jira until the app is authorized. Any data created after the cutoff date won't be backfilled, but new data will start appearing in Jira as soon as authorization is complete.
If you're a Jira site admin, you'll need to authorize Azure DevOps for Jira with Microsoft Entra ID. To do this, make sure you’ve enabled OAuth in Azure DevOps, then complete the authorization.
To authorize with Microsoft Entra ID:
In Jira, select Apps from the sidebar. Then, select More actions (···) and Manage Apps.
In the sidebar, under Azure DevOps for Jira, select Configure.
If you’re redirected to the Connected apps page in Atlassian Administration select Take me there. Then, search for Azure DevOps for Jira (Official), select the more action icon (···), then select Get Started.
On the configuration page, select Authorize with Microsoft Entra ID.
Follow the prompts to complete the authorization.
After authorization, your existing organizations will reconnect automatically. If available, you can also choose to connect new organizations.
Allowlisting Atlassian IPs for Microsoft Entra Conditional Access
With Microsoft deprecating the Azure DevOps OAuth platform (scheduled for 2026), Azure DevOps for Jira must now be authorized via Microsoft Entra ID. If your organization enforces Conditional Access policies with IP-based named locations in Microsoft Entra, you must allowlist Atlassian's outgoing IP address ranges to ensure the integration continues to function.
Why this is required
Conditional Access policies in Microsoft Entra ID can restrict access to resources based on network location. Policies can target Conditional Access Policy: Using Network Signals - Microsoft Entra ID — defined sets of IP address ranges — and block or challenge authentication requests that originate from outside those trusted ranges.
Since the Azure DevOps for Jira integration makes outgoing connections from Atlassian's cloud infrastructure to Azure DevOps (to sync deployments, builds, commits, branches, and pull requests), those connections originate from Atlassian's egress IP ranges. If these IPs are not included in your Conditional Access named locations as trusted, the integration traffic may be blocked, causing data synchronization to fail silently.
What to allowlist
Add the following Atlassian outgoing connection IPv4 ranges as a trusted named location in Microsoft Entra:
For the full and most up-to-date list, see: IP addresses and domains for Atlassian cloud apps
How to configure in Microsoft Entra
Sign in to the Microsoft Entra admin center.
Navigate to Entra ID → Conditional Access → Named locations.
Create a new IP ranges location (e.g. "Atlassian Cloud Egress IPs").
Add the IPv4 (and optionally IPv6) ranges listed above.
Mark the location as a trusted location.
In your Conditional Access policies that apply to Azure DevOps, ensure this named location is excluded from any block rules, or included in your trusted/allowed locations.
Note: Atlassian's IP ranges may change over time. Subscribe to change notifications via the AWS SNS topic. See the Atlassian IP addresses documentation for details.
Need more help?
Was this helpful?