Jira 移行の管理と監視
移行を保存または実行すると、移行ダッシュボードに追加されます。そこでは詳細の表示や進捗の監視を行えます。
ダッシュボードでは次のことを実行できます。
移行されたデータの要約など、すべての移行の詳細を確認する
移行を実行、コピー、編集、削除、アーカイブする
進行中の移行の進捗を監視して、結果を確認する
移行前チェックを表示して、警告やエラーを確認する
移行前と移行後の各レポートやエラー ログを確認する
移行ダッシュボード
ダッシュボードにアクセスするには、Jira Cloud Migration Assistant を開きます。
移行ステータス
移行において起こり得るステータスを次のテーブルに示します。
ステータス | 説明 |
|---|---|
保存済み | 移行が保存済みで実行できる状態です。 |
実行中 | 現在、移行が進行中です。 |
完了 | 移行が終わり、すべてのタスクも完了しました。 |
未完了 | Your migration has finished, but there are errors or things that couldn't be migrated. This also means that some data (users, groups, projects, etc.) has been migrated. If you're on Jira Cloud Migration Assistant (JCMA) 1.21.0 or later, you may be able to retry the failed steps without migrating again. Otherwise, or if you've already selected Continue to app migration, you might need to delete the migrated data from your Cloud site before re-migrating the same projects. |
失敗 | Your migration failed. This might be because a project key already exists in the destination site or the migration hit an unexpected error. If you're on JCMA 1.21.0 or later, you may be able to retry the failed steps after you fix the cause. |
移行の詳細
移行ダッシュボードから [詳細を表示] を選択すると、各移行計画に関する次のような詳細を表示できます。
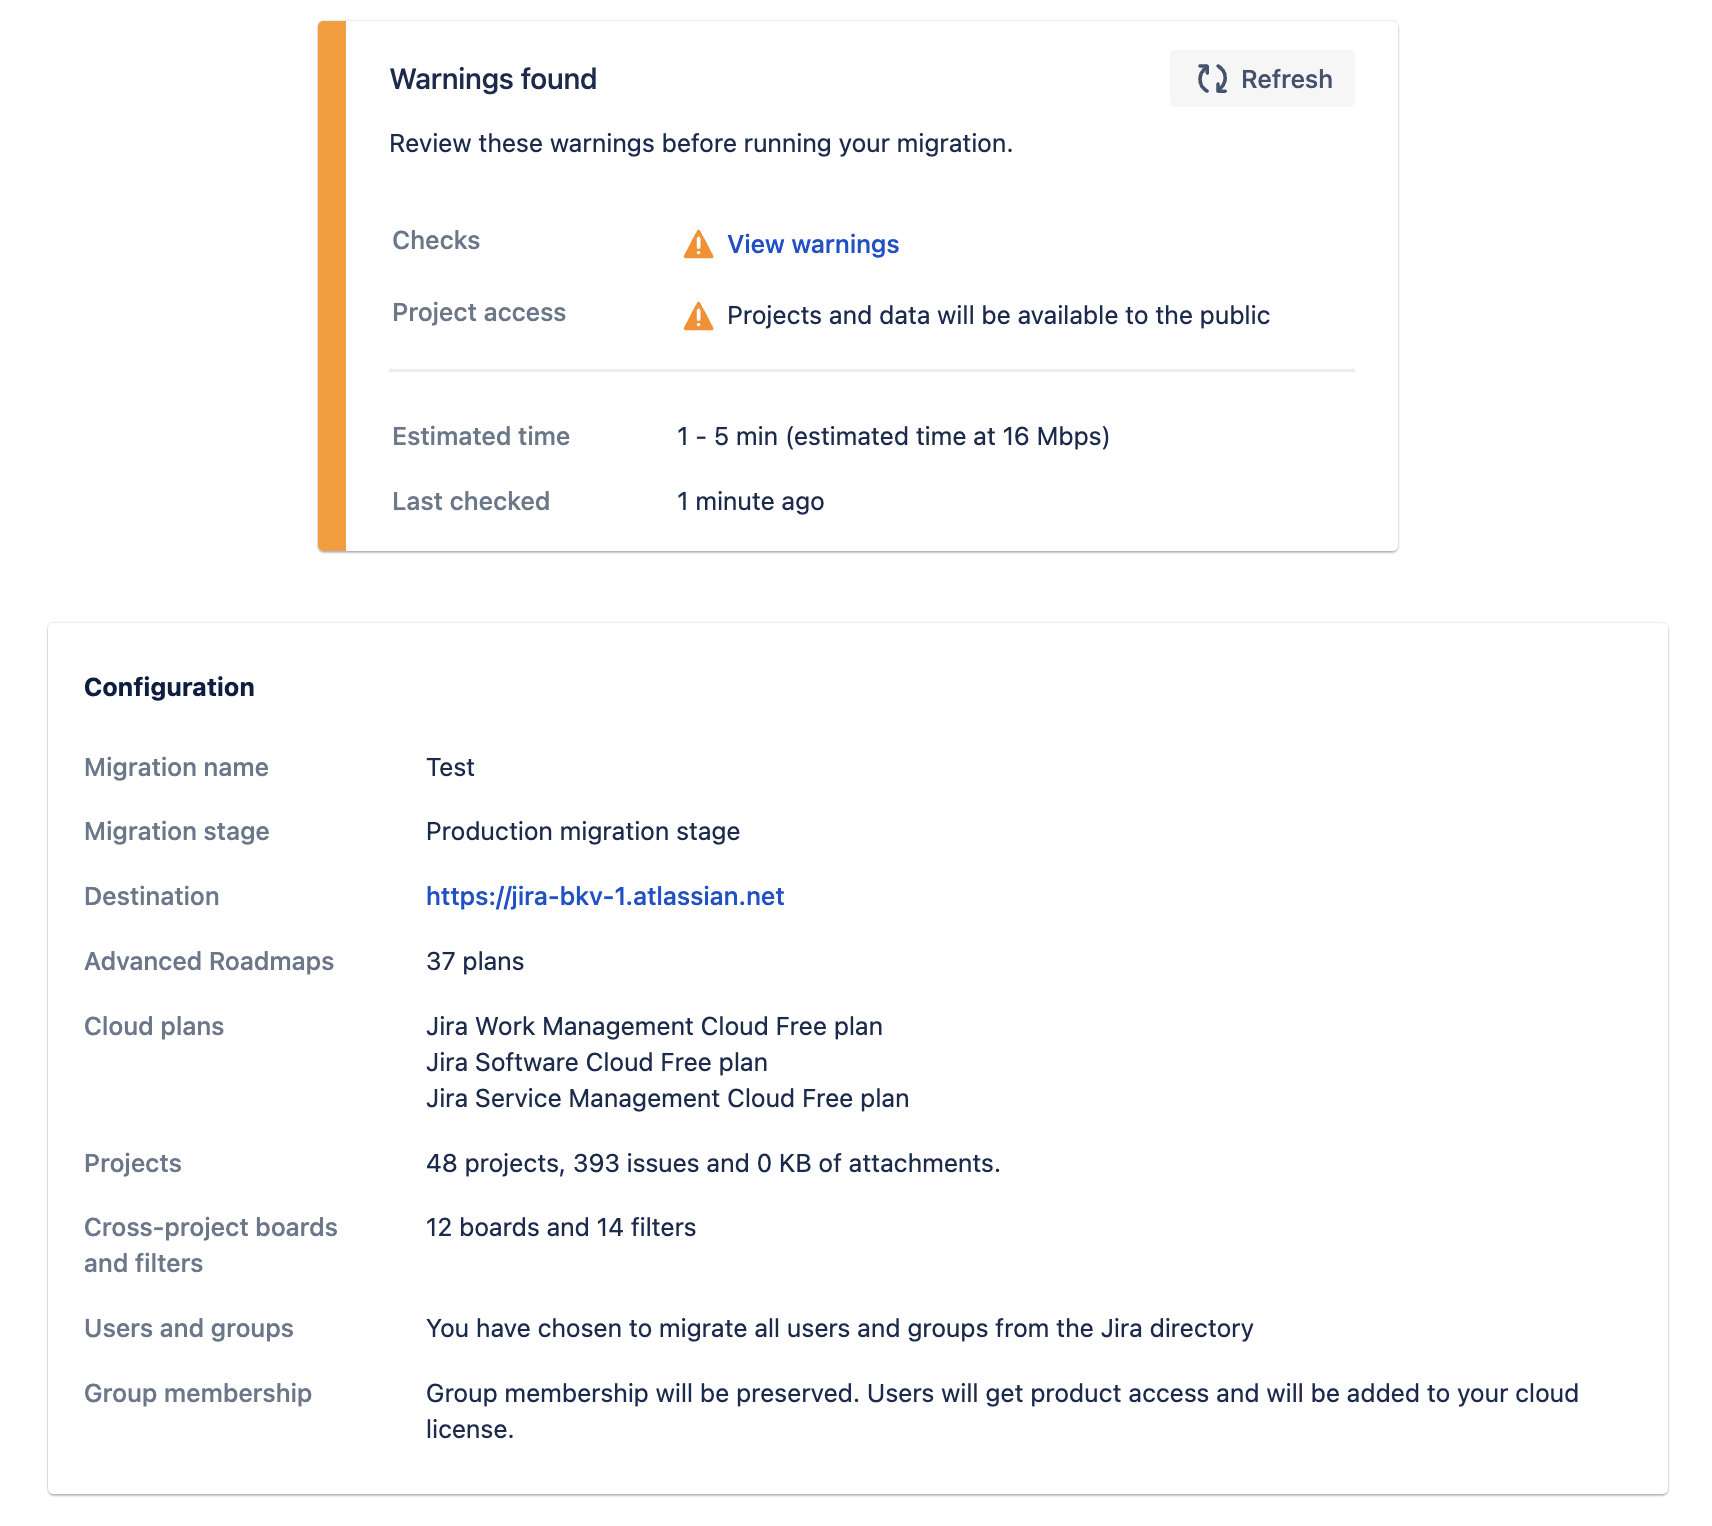
構成の概要
設定の詳細と移行のステータスを示す移行の概要。
移行に含まれるデータ
[この移行に含まれるもの] セクションには、移行された項目の詳細とそのステータスが表示されます。
ログとレポート
[ログとレポート] セクションには、移行のトラブルシューティングに役立つレポートとエラー ログが含まれます。
次の項目をダウンロードできます。
移行前のレポート: 移行に含まれるデータの詳細。
移行後のレポート: 移行されたデータと移行されなかったデータの詳細。
エラー ログ: 移行に関連するエラー。
ログ ファイルのエラーの説明は、トラブルシューティング ガイドに記載されています。
Jira 移行に関するトラブルシューティング方法をご確認ください。
Retry failed migration steps
If your migration is INCOMPLETE or FAILED, you can retry only the steps that failed, from the same migration plan. JCMA skips every step that already completed, and runs again only the failed steps and any steps that didn't run because of the failure. You don't need to create a new migration plan or delete partially migrated data from your Cloud site. Retrying doesn't create duplicate data.
Retrying covers core migration steps, such as project import, attachments, and assets upload. For example, if a project fails during import, retrying runs the import and attachment steps for that project. Retrying doesn't cover app migration. To retry an app migration, see Re-run a Marketplace app migration.
What happens when a step fails
Data shared across projects isn't imported yet. If a project fails during export, preprocessing, or import, JCMA doesn't import data shared across projects, such as filters and dashboards, so that none of it is missed. If only attachments fail, this data is still imported.
App migration waits. If any core migration step fails, app migration doesn't start automatically, and the migration shows App migration on hold. You choose whether to retry the failed steps or continue to app migration. Nothing happens until you choose. Data shared across projects, such as filters and dashboards, isn't imported until you retry the failed steps or continue to app migration. If your plan doesn't include Marketplace apps and you can't retry the failed steps, contact Atlassian Support for help migrating data shared across projects.
You get an email. JCMA emails the admin who started the migration, whether or not the migration plan includes Marketplace apps. The email shows how many steps failed and how many times the migration has been retried, and explains your options.
A countdown starts. The migration details show how many days you have left to retry.
はじめる前に
Use Jira Cloud Migration Assistant 1.21.0 or later. We recommend 1.27.0 or later, which fixes some known issues with retrying.
Be a Jira system administrator on your source site, the same as for running a migration.
If the failure was caused by your data or configuration, find and fix the cause first. For example, if a step failed because a custom field is missing from your Cloud site, add the custom field before you retry. You can fix the cause on your source site or your Cloud site, and the retry uses your latest data. Retrying doesn't fix the original problem, so a step that failed for a reason you haven't addressed will fail again. If the migration details say the failure was caused by a temporary issue on our end, you can retry without changing anything. Learn how to troubleshoot your Jira migration
If you can't find the cause, contact Atlassian Support after the first failed attempt, before you retry. Support can help you find and fix the cause, so that your retry succeeds.
If your migration is large, contact Atlassian Support before you retry, and wait for Support to confirm before you select Retry failed steps.
Retry the failed steps
Open the Jira Cloud Migration Assistant and go to the Migrations dashboard.
Find the failed or incomplete migration and select View details.
Select Retry failed steps.
The migration status changes to RETRYING, and then to RUNNING. When the failed steps complete, the steps that depended on them run. Then data shared across projects is imported and app migration starts automatically.
Continue to app migration instead
If your migration plan includes Marketplace apps, you'll also see Continue to app migration. Select it to start app migration without retrying the failed steps. We recommend retrying the failed steps first, because apps that depend on the failed projects might not migrate successfully.
You can't undo this. App migration includes only the projects that migrated successfully, and you can't retry the failed steps from this migration plan afterwards. To migrate the failed projects, create a new migration plan for them.
Retry limits
You can retry a migration up to 3 times. If you need more retries, contact Atlassian Support to raise the limit.
You can retry a migration for a limited time after it started. The migration details show how many days are left. This is separate from the 12-day limit for re-running an app migration.
Retry attempts are counted separately from the automatic retries JCMA makes for temporary errors.
If Retry failed steps isn't shown, the migration isn't eligible for a retry (for example, because app migration has already started), or it has reached a limit. The migration stays INCOMPLETE or FAILED.
Marketplace アプリの移行
ここでは、アプリ移行に関する情報を説明します。
Monitor your Marketplace app migration
[アプリ移行の進捗] セクションの詳細には、アプリ移行の進捗を監視またはレビューするために以下が表示されます。
アプリのステータス
アプリの移行ログ
Ordered migrations
Ordered migration is a sequencing solution for migrating Marketplace app from Data Center to Cloud using the Jira Cloud Migration Assistant (JCMA). It runs app migrations in dependency-aware groups rather than all at once. By organizing Marketplace apps into sequential groups, the platform ensures that the apps known to modify site data in complex ways complete their processes before other apps begin migrating.
This sequencing helps you avoid migration failures and data conflicts that occur when multiple Marketplace apps attempt to modify the same Cloud site components simultaneously.
Find out how ordered migrations work
Marketplace app migration statuses
ステータス | 説明 |
|---|---|
準備完了 | アプリ データの移行を実行する準備ができています。 |
実行中 | アプリ データの移行が進行中です。 |
paused | The app data migration is paused and will begin after the app migrations in previous group reaches either a SUCCESS or INCOMPLETE state. |
成功 | アプリ データの移行は正常に終了しました。 |
未完了 | アプリ データの移行は完了しましたが、一部のデータが移行されませんでした。不完全なアプリの移行を再試行するには、[再実行] を選択します。アプリの移行が引き続き失敗する場合は、Marketplace パートナー (アプリ ベンダー) に連絡してサポートを受けてください。 |
失敗 | アプリ データの移行に失敗しました。失敗したアプリの移行を再試行するには、[再実行] を選択します。アプリの移行が引き続き失敗する場合は、Marketplace パートナー (アプリ ベンダー) に連絡してサポートを受けてください。 |
タイムアウト | 移行がタイムアウトしました。これは、アプリがデータ移行に許可された期間を超えたためです。アプリのデータ移行を進める方法については、各アプリ ベンダーにお問い合わせください。 |
移行を完了しない、失敗するなど、アプリの問題がある場合は、Marketplace Partner (アプリのベンダー) に直接連絡してサポートを受ける必要があります。
Marketplace app migration progress logs
Cloud Migration Assistant には、各アプリの移行の進捗とステータスを監視するためにダウンロードできるログ ファイルが用意されています。各アプリの [この移行には、次が含まれます] タブに [ログを表示] ボタンがあります。
アプリ ログを表示するには:
移行計画画面を開きます。
[この移行には、次が含まれます] タブ > [アプリ] セクション > [アクティビティ ログ] 列に移動します。移行対象として選択したアプリごとに [ログを表示 ] リンクが表示されます。
アプリの [ログを表示] を選択すると、アプリ移行の進捗の詳細が記載された CSV ファイルをダウンロードできます。
注意:
ログ ファイルには 30 日間のイベント履歴の制限があります。つまり、ログには、アプリ移行開始後のイベントのうち、過去 30 日間のアプリ移行に関する最も関連性の高いイベントのみがリストされます。
ログ ファイルのリストには最新のイベントから順に記載され、ログ ファイルをダウンロードするまで更新されます。最新のイベント リストを確認するには、ファイルを再度ダウンロードしてください。
各ログ ファイルは最新の 4,000 イベントに制限されています。
以下の場合、[ログを表示] リンクが無効になることがあります。
アプリの移行がクラウドで見つからなかった。
ログの有効期限が切れている (30 日間のイベント履歴の制限を超えている)。
アプリに自動パスがない。
アプリの移行がまだ始まっていない。
Re-run a Marketplace app migration
完全に新しい移行計画を作成しなくても、失敗または未完了のステータスが表示されている個々のアプリに対して、失敗したアプリ移行を再実行できます。この機能を使用すると、Cloud Migration Assistant はアプリの移行を再試行して、以前に失敗した、またはアプリ移行が未完了のままだった問題を解決できます。
Re-running applies to app migrations only. To retry failed core migration steps, such as projects, see Retry failed migration steps.
アプリを再実行するには、「アプリ移行の進捗」の表で [再実行] を選択します。
再実行の制限
最初の移行を開始してから 12 日以内にアプリ移行を再実行してください。アプリ再実行機能は、12 日間の期限を過ぎたアプリでは使用できなくなります。
この機能は、失敗または未完了のステータスが表示されているアプリでのみ使用できます。この機能をサポートしていない特定のアプリでは利用できない場合があります。
Cancel a Marketplace app migration
アプリが動作しない、移行に時間がかかりすぎる、気が変わってアプリの移行を取りやめるなどの場合には、アプリの移行を個別にキャンセルできます。この機能を使用すると、特定のアプリをキャンセルしても、移行中のその他のアプリの進捗には影響しないため、アプリの移行をより適切に制御できます。
アプリがキャンセルを開始した後に、このアクションを元に戻すことはできません。
次のことをお勧めします。
アプリの移行をキャンセルする前に、Marketplace パートナーに連絡し、移行の進捗を確認して、スムーズに実行されている移行のキャンセルを回避する
CMA の進捗ログを確認し、アプリのデータ移行のステータスを把握する
アプリの移行をキャンセルした後で、Marketplace パートナーに連絡し、アプリのデータはクラウドに移行済みか、詳細なガイダンスの提供を受けられるかを確認する
[キャンセル] オプションは [アクション] 列にあります。
移行のトラブルシューティング
移行で問題が発生している場合は、トラブルシューティング ガイドで解決策を探してみてください。
Jira 移行に関するトラブルシューティング方法をご確認ください。
移行後
移行後にできることは次のとおりです。
移行後のレポート
移行後のレポート (.zip ファイル) をダウンロードして、Cloud サイト内の移行後データのステータスを確認できます。レポートには次の情報が含まれます。
要約 - このリストは、正常に移行されたものと移行されなかったものに関する要約データを示します。
留意事項 - このリストは、移行のサポート対象外だったアイテムなど、注意する必要があるアイテムを示します。
詳細は、上記の「ログとレポート」セクションをご確認ください。
ユーザーとグループ
ユーザーとグループが正しくセットアップされていることを確認するには、次の手順を実行します。
[管理] > [ユーザー管理] に移動して、グループのメンバーを確認し、権限を承認します。
必要に応じ、汎用の管理グループにユーザーを追加します。汎用グループの例: "site-admins"、"system-administrators"、"atlassian-addons"、 "atlassian-addons-admin"。
外部のユーザー管理システムを使用している場合は、ユーザーが正しく同期されていることを確認します。
準備が整ったら、ユーザーを招待します。[管理] > [ユーザー] > [詳細の表示] の順に選択し、[招待の再送] を選択します。ユーザーが初めてログインすると、新しいパスワードを設定し、個人情報を追加するように求めるメッセージが表示される場合があります。
ユーザー管理エクスペリエンスの向上を行っている場合は、[管理] > [ディレクトリ] > [ユーザー] > [詳細の表示] > [招待の再送] の順に選択します。
プロジェクト
プロジェクト データの移行が完了したら、添付ファイルの移行が完了していない場合であっても、クラウド サイトでプロジェクトを確認できます。移行の詳細ページでプロジェクト名を選択します。
プロジェクトの移行が正常に完了したことを確認するには、次の手順を実行します。
プロジェクトおよび課題を確認するか、ユーザーに自身のプロジェクトの確認を依頼します。
旧ユーザーが意図せず表示されているところがないかどうかを確認します。これは、コンテンツをユーザーに関連付けられなかったことを意味します。
JQL とクイック フィルターを使用して、いずれかのインスタンスに (migrated) というフレーズがあるかどうかを確認します。これが見つかった場合、フィルターを動作させるには、Cloud で (migrated) フィールドを既存のバージョンにマージする必要があります。
[設定] (歯車アイコン) > [Jira 設定] > [製品] > [アプリケーション リンク] に移動し、他のアトラシアン製品にリンクします。
その後、必要な他のアプリをインストールして、ユーザーのオンボーディングを実行できます。
詳細情報とサポート
移行をサポートする多数のチャンネルをご用意しています。
移行の詳細な計画情報や FAQ については、Atlassian Cloud 移行センターを参照してください。
技術的な問題が発生していたり、戦略やベスト プラクティスで支援が必要な場合、お問い合わせください。
専門的なアドバイスについては、アトラシアン コミュニティもご利用ください。
専門家によるサポートが必要な場合は、アトラシアン パートナーにご相談ください。
アトラシアン サーバー製品のサポートは 2024 年 2 月に終了します。サーバーのサポート終了スケジュールで詳細をご参照ください。
この内容はお役に立ちましたか?