Jira Automation のアクション
Actions are the doers of your flow. They allow you to automate tasks such as editing a work item, sending a notification, or creating sub-tasks.
See how to use all of these actions in our Jira automation template library.
作業項目を割り当てる
スマート バリューの使用: あり
必要な権限: 作業項目の割り当て、割り当て可能なユーザー
作業項目をユーザーに割り当てます。
作業項目の割り当て方法を設定します:
定義されたリストのユーザー – 作業項目が JQL で指定された制限を通過した場合、以下に基づいて指定されたユーザーのリストからユーザーに割り当てます。
バランスの取れたワークロード: 各ユーザーが同数の作業項目を持ちます (スコープは JQL で定義)
ランダム: リストからランダムに割り当てます
ラウンドロビン: リストの順序に従って順番に割り当てます
別のフィールド値またはコメント – 作業項目のユーザー フィールド値またはコメントに関連付けられたユーザーに割り当てます。例えば、
作業項目の履歴に基づいて以前の担当者に割り当てる
作業項目を作成者に割り当てる
特定のユーザーを除外したり、特定のユーザー グループに割り当てを制限したりして、さらに設定できます。その場合、アクションは作業項目の担当者履歴をさらに遡って確認します。
自動 – スペースの既定の担当者に割り当てます。
別の作業項目からコピー – 関連する作業項目から担当者をコピーします。(または JQL を使用して作業項目の条件を指定します)。
Smart value – Assign it based on a smart value. For example, when a work item is commented on, assign it to the comment’s author.
ユーザーを指定 – 選択した担当者に割り当てます。
未割り当て – 既存のユーザーを削除し、作業項目を「未割り当て」に設定します。
イベントをトリガーしたユーザー – イベントをトリガーしたユーザーに割り当てます。
ロール内のユーザー – チーム内の特定のロールに割り当てます。
グループ内のユーザー – 指定されたユーザー グループ内の誰かに割り当てます。
オンコール対応者 – チームの Opsgenie オンコール スケジュールに基づいて、オンコール中のユーザーに割り当てます。スケジュールに複数のローテーションが含まれている場合、対応者はランダムに割り当てられます。
フォームを添付する
スペース固有。グローバルに設定できません。
Attach one or more forms to a work item. You can also set the visibility of the forms. Learn more about how forms work in the work item view.
値を指定したフォームを添付
スペース固有。グローバルに設定できません。
既存の作業項目に値を含むフォームを添付して、選択したデータソースのコンテンツでフォームに入力できます。これらは、スマート値または選択肢などの事前定義された値のいずれかです。これらのフォームは、入力内容が保存された状態で作業項目に添付されますが、まだ送信されていません。
Assets and attachment form field types also aren’t supported at this time. Read more about how forms work in the work item view
フォーム ステータスを変更
スペース固有。グローバルに設定できません。
Change a form from one status to another. Read more about form statuses
作業項目複製
スマート バリューの使用: あり
同じスペース内または選択したスペース内で作業項目の複製を作成します。
It can be used as part of a workaround for moving work items between spaces.
このアクションでは、サポートされる作業項目フィールドのリストから [添付ファイル] フィールドを選択し、添付ファイルのコピー元となるソース作業項目を選択することで、新しい作業項目を作成して、添付ファイルをコピーする機能を含む、利用可能なすべてのフィールド データをコピーします。
その後、対応するワークフローの最初のステップにステータスが設定され、元の作業項目にあるすべての解決が削除されます。作業項目は純粋な複製ではないため、元の作業項目には紐づけされません。
You can also set values to override any copied data in supported fields. For Jira Service Management, you set both Jira fields and Assets fields. Learn more about Assets in Jira Service Management.
Select More options to display additional fields for advanced field editing.
このアクションでは、作業項目のリンクまたはコメントは複製されません。
In the action, when you set the Organizations field and choose Use reporter’s email domain, it checks only the domains explicitly added to an organization’s Manage email domains list. If the reporter’s domain matches exactly one organization, that organization is automatically selected. If the domain matches more than one organization, any one of the organizations associated with that email domain will be selected. If the domain isn’t listed anywhere and you’ve selected Create organization if it doesn’t exist, a new organization will be created using the email domain as its name.
Comment on work item (作業項目にコメントを追加)
スマート バリューの使用: あり
作業項目にコメントを追加します。
You can use smart values to reference work item fields to personalize the comment. You can also set the comment visibility.
フォームをコピーする
フォーム アクションはスペース固有のみで、グローバルに設定することはできません。
1 つ以上のフォームを他の作業項目から現在の作業項目にコピーします。
ブランチを (製品名で) 作成する
ブランチを選択したツールで作成します。現在、次の 3 つの方法があります。
ブランチを Bitbucket で作成
ブランチを GitHub で作成
ブランチを GitLab で作成
This requires setting up a connection between your automation flow and the other tool. Learn more about connections in automation.
You can also use smart values to access information related to these branches - learn more about created branch smart values.
ブランチに名前を付ける際の制限
次はブランチの名前に使用できません。
HEAD(予約語であるため)/で開始または終了する名前.で開始または終了する名前末尾が
.lockスペースを含む名前
次の記号セットを含む名前:
..、~、^、:、?、*、[、/、\\、@{
Confluence ページを作成する
スマート バリューの使用: あり
Creates a Confluence page (or blog) in an Atlassian Cloud site of your choosing. Note that this creates the Confluence page, but it doesn’t enter any content. This means while you can define the page title using smart values, the automation flow can’t define any of the page content.
Requires a connection between your Jira space and Confluence. Learn more about using Jira automation with Confluence.
作業項目を作成
スマート バリューの使用: あり
必要な権限: スペースの参照、作業項目の作成
スペース内で任意のタイプの作業項目を作成します。フィールドを選択して設定し、値を設定できます。添付ファイルをコピーするには、サポートされている作業項目フィールドのリストから添付ファイルフィールドを選択し、添付ファイルのコピー元となるソース作業項目を選択します。
Select More options to display additional fields for advanced field editing.
For Jira Service Management, you can set both Jira fields and Assets fields. For Jira Service Management, if the flow is triggered by an object, you can select Insert object to automatically add the triggered object via AQL. Learn more about Assets in Jira Service Management.
Take care when using Space > Same space as trigger on global flows. As the space type is unknown until the flow runs, all work item types are available to configure. This means that you can select a work item type that will not exist in the space.
In the action, when you set the Organizations field and choose Use reporter’s email domain, it checks only the domains explicitly added to an organization’s Manage email domains list. If the reporter’s domain matches exactly one organization, that organization is automatically selected. If the domain matches more than one organization, any one of the organizations associated with that email domain will be selected. If the domain isn’t listed anywhere and you’ve selected Create organization if it doesn’t exist, a new organization will be created using the email domain as its name.
ルックアップ テーブルを作成する
Create a table of key-to-value mappings and assign it to a smart value, which can be used in other actions and conditions in your flow. In the following example:
スマート値 {{departments.get("HR")}} は人事を返します。
Note that your key-to-value map can only be called within the same flow. If the action is used in a branch, the smart value can only be used within the same branch. Key/value mappings don’t carry across to other flows or branches.
ユース ケースの例
Let’s say you want to create an automation flow that assigns due dates on a bug based on priority; bugs that are high priority need to be completed within the week, while bugs that are lowest priority can be completed within the next 6 months.
次の値でキー/値のマップを作成できます。
そして、作業項目を編集アクションと {{dueDates.get(issue.Priority.name)}} スマート値を使用して、バグの緊急度に基づいて期限付きの日付を自動的に割り当てることができます。
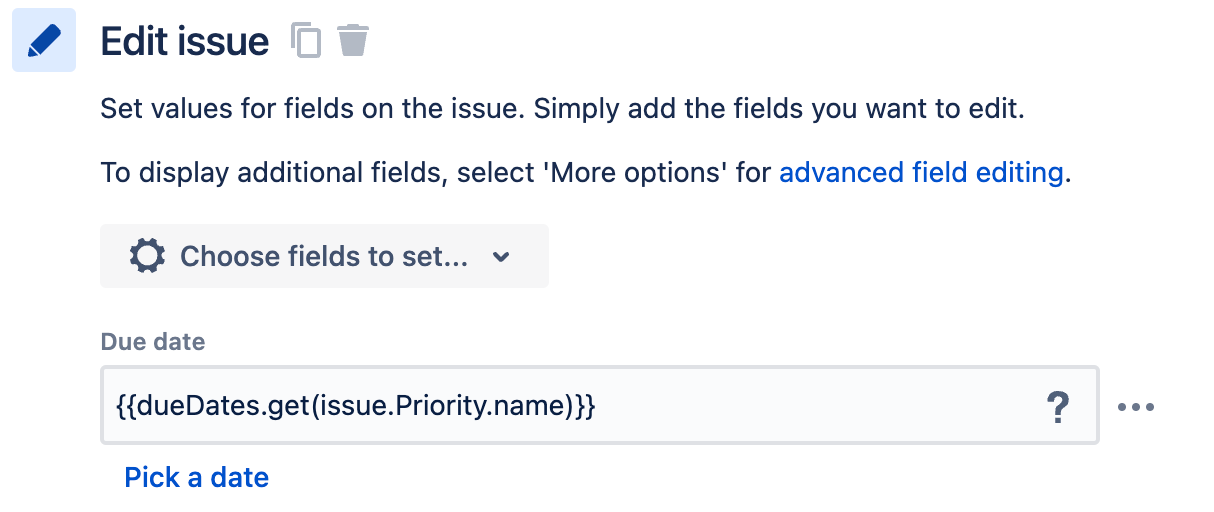
この方法でスマート値をネストする場合、ネストされたスマート値によって返される値は文字列でなければならないことに注意してください。この例では、代わりに issue.Priority.id を使用した場合、.format(“#”) を追加して出力を文字列 (つまり {{dueDates.get(issue.Priority.id.format("#"))}}) に変換しない限り機能しません
動的なルックアップ テーブルを作成する
Create a table of key-to-value mappings from an existing smart value and assign it to a new smart value, which can be used in other actions and conditions in your flow. The dynamic source is a smart value that produces a collection, list, or array of values.
キー入力フィールドと値入力フィールドの両方でスマート値のドット表記を使用して、使用したい値までドリルダウンできます。
Note: your key-to-value map can only be called within the same flow. If the action is used in a branch, the smart value can only be used within the same branch. Key/value mappings don’t carry across to other flows or branches.
アセットを使用したユースケースの例
例えば、ある情報を保存するために使うアセット スキーマがあるとします。
この例では、いくつかのチームの Slack チャンネルと Confluence のスペース キーがあります。この情報から参照テーブルを作成できます。
キーはスペース名になり、値はスペース キーになります。ログ アクションが Development を要求する場合、そのスペースのスペース キーが提示される必要があります。上の例では DEVELOP です。
「Web リクエストを送信」の使用例
The result of a send web request can also be turned into a lookup table. Consider the following example flow that calls out to a jokes API:
作業項目にジョーク ID が保存されていれば、作業項目からジョークを取得できます。
サブタスクの作成
スマート バリューの使用: あり
作業項目にサブタスクを作成します。
このアクションは、サブタスクの要約の設定のみをサポートします。
Selecting Add fields will convert the Create sub-tasks action into a Create work item (work item type: sub-task) action, allowing you to set additional fields.
スプリントの作成
スマート バリューの使用: あり
Jira 専用です。
選択したソフトウェア スペース ボードにスプリントを作成します。
企業管理スペースの場合、ボードはスクラム ボードである必要があります。
チーム管理対象スペースの場合、ボードでスプリント機能を有効にする必要があります。
You also have the option of entering specific values for start date, end date, and goal. For start and end dates, you may find it useful to use date and time smart values. For example, you could set {{now}} as the start date, and {{now.plusweeks(2)}} as the end date. Learn more about date and time smart values.
注意事項:
開始日を設定する場合は、終了日も設定する必要があります。
スプリント名は 30 文字を超えることができないため、手動で入力するスプリント名や、長すぎるテキストを返すスマート バリューに注意する必要があります。
変数の作成
スマート バリューの使用: あり
Define your own smart value, which can be used in other actions and conditions in the same flow. The smart value you define can consist of other smart values, as well as math functions.
この場合、常に文字列が返されることに注意してください。たとえば、スマート値 {{issue.watchers.distinct}} で Stakeholders という変数を作成した場合、変数はウォッチャーのリストを返しますが、リストは文字列としてレンダリングされます。
オブジェクトを作成する
スマート バリューの使用: あり
Jira Service Management にのみ適用されます。
Creates a new object in an Assets schema and sets its attribute values.
To reference the newly created object later in the flow you need to use lookupObjects action available in both project flows and global automation flows : Explore Assets in Jira Service Management
Related smart values
{{object.id}}{{object.key}}{{object.<attribute name>}}
コメントの削除
スマート バリューの使用: あり
作業項目のコメントを削除するために使用できます。このアクションを使用する方法は 2 つあります。
Deleting a trigger comment: If the flow uses a trigger that involves adding a comment, such as Work item commented, Work item transitioned, or Work item updated,
{{comment.id}}will delete that comment.他のコメントの削除:
{{issue.comment.first.id}}などのコメント スマート値を使用して、アクティブな作業項目のコメントを削除します。
作業項目を削除
スマート バリューの使用: なし
現在コンテキスト内にある作業項目を削除します。
This action allows you to remove unwanted work items from Jira, such as when automating moving work items between spaces.
Delete work item links
ここでのスマート値の使用: なし
このアクションを使用すると、作業項目に現在設定されている任意の作業項目リンクを削除できます。特定のタイプの作業項目リンクをすべて削除する(例:「ブロックされた」作業項目をすべて削除する)か、特定の作業項目を選択してリンクを解除できます。
コメントを編集する
スマートの使用: あり
このアクションによって、コメントの表示やコメントの内容を編集できるようになります。利用可能なオプションは次のとおりです。
最初のコメント: 作業項目の最も古いコメントを編集します。
最新のコメント: 作業項目の最新のコメントを編集します。
Trigger comment: Edit the comment that triggered the flow. Used with triggers such as Work item commented or Work item comment edited. Learn more about automation triggers.
スマート値: コメント スマート値を指定して、編集するコメントを選択します。
オプションを選択したら、次のフィールドを空白のままにしてコメントを変更せずに残せます。これは、コメントの表示のみを編集して他の部分には手を付けない際に役立ちます。スマート値 {{currentComment}} を入力すると、コメントの現在のコンテンツが返されます。これは、現在のコメントを保持してその前後にコンテンツを追加する際に役立ちます。
[アセット] フィールドの属性を編集する
スマート バリューの使用: あり
Jira Service Management でのみ利用できます。このアクションは、[アセット] フィールドの属性値を編集します。スマート値、文字列値、またはアセット オブジェクトの ID/キーのいずれかを入力できます。ここでフィールドを空のままにすると、オブジェクトの値がクリアされます。
Assets attributes can have many different types of values (string, integer, user, date, reference object, etc.), so you have to get the input right here. This flow will result in an error if the value in this action doesn't match the attribute type.
作業項目を編集する
スマート バリューの使用: あり
Edit the current work item by choosing the field to set and value to add. For Jira Service Management, you can edit both Jira fields and Assets fields. Learn more about Assets in Jira Service Management.
You can set some values to be dynamic. You can also copy attachments by selecting the Attachment field from the list of supported work item fields and then choosing the source work item from which attachments need to be copied. Select More options to display additional fields for advanced field editing.
In the action, when you set the Organizations field and choose Use reporter’s email domain, it checks only the domains explicitly added to an organization’s Manage email domains list. If the reporter’s domain matches exactly one organization, that organization is automatically selected. If the domain matches more than one organization, any one of the organizations associated with that email domain will be selected. If the domain isn’t listed anywhere and you’ve selected Create organization if it doesn’t exist, a new organization will be created using the email domain as its name.
オブジェクトを編集する
スマート バリューの使用: あり
Jira Service Management にのみ適用されます。
オブジェクトの属性値を更新します。スマート値、文字列値、またはアセット オブジェクトの ID/キーのいずれかを入力できます。ここでフィールドを空のままにすると、オブジェクトの値がクリアされます。
Assets attributes can have many different types of values (string, integer, user, date, reference object, etc.), so you have to get the input right here. This flow will result in an error if the value in this action doesn't match the attribute type. Learn more about Assets in Jira Service Management.
このアクションは、次の場合にのみ使用できます。
for global automation flows and only when an object is the focus of the flow. For example, if the flow begins with an Object trigger, the object that triggered the flow will be the object that is edited by this action.
AQL ブランチのブランチの下にある場合。単体では機能せず、[オブジェクトを検索] アクションと一緒には機能しません。
リクエスト タイプの編集
スマート バリューの使用: あり
Jira Service Management にのみ適用されます。
Updates the request type for a work item. Note that request types are based on work item types; any number of request types can correspond to one work item type. However, this means that when your automation flow acts on a work item, the chosen request type must correspond to that work item type. If it doesn't, the action will result in an error in the audit log.
作業項目をリンクする
スマート バリューの使用: あり
作業項目を別の作業項目にリンクするには、リンクタイプとリンクする作業項目を選択します。
You can link to the work item that triggers the flow, the current work item on a Related work items branch, a smart value, or a work item key.
作業項目を重点分野にリンクする
必要な権限: Focus での ユーザー ロールと 作業の追加 Jira 権限
条件を満たす作業項目を重点分野にリンクします。
脆弱性を作業項目にリンクする
スマート バリューの使用: なし
「脆弱性の検出時」トリガーとの併用時にのみ使用できます。
トリガーとなる脆弱性を作業項目にリンクします。
トリガーとなる脆弱性ごとに新しい作業項目を作成してリンクするには、次の手順に従います。
「脆弱性の検出時」トリガーと「作業項目を作成」アクションを使用して、自動化を作成します。
「作業項目を脆弱性にリンクする」アクションのドロップダウン メニューで、最近作成された作業項目を選択します。
トリガーとなるすべての脆弱性を 1 つの作業項目にリンクするには、次の手順に従います。
「脆弱性の検出時」トリガーで自動化を作成します。
[作業項目を脆弱性にリンクする] アクションのドロップダウン メニューで、作業項目キーを入力します。
If you enter a work item key in this action, the automation will fail if the work item doesn’t exist when the flow is run.
ログ
スマート バリューの使用: あり
Logs time against a work item.
You can use date and time smart values to dynamically set the date started, and text smart values to customize the description.
作業項目を検索する
スマート バリューの使用: あり
Search for up to 100 work items using a JQL query. Include the results list in other actions by using the {{lookupIssues}} smart value. Learn more about using smart values with work item lists.
すべてのフィールドとカスタム フィールドは、lookupIssues リストからアクセスできます。たとえば、各作業項目の作業項目キーを箇条書き形式で表示するには、次を実行します。
{{#lookupIssues}}
* {{key}}
{{/}}
次の例では、作業項目リスト内のすべてのストーリー ポイントを合計します。
There are {{lookupIssues.Story Points.sum}} story points remaining.オブジェクトのルックアップ
スマート バリューの使用: あり
Jira Service Management にのみ適用されます。
AQL を使用して最大 100 件のアセット オブジェクトを検索します。AQL クエリを入力するか、[ベーシック] フィルターを使用して、スマート値でカスタマイズできるクエリを生成します。[ベーシック] フィルターはスマート値をサポートしており、アセット属性だけでなく動的なクエリにも対応しています。[ベーシック] フィルターでアセット属性を使用する場合は、AQL クエリを動的にするために、属性の代わりに関連するスマート値を使用してください。添付のリンクをクリックすると、選択したアセット スキーマに簡単に移動できます。
The results of this query can be used in other Automation actions using the {{lookupObjects}} smart value. This can be used to access and print the list of objects, but can't be used to trigger other flows. Read more about using smart values for Assets.
ウォッチャーの管理
スマート バリューの使用: あり
作業項目のウォッチャーを追加または削除する。
フィールドで直接スマート バリューを使って、ユーザーを指定して追加または削除できます。
メールを送信
非推奨。
ブランド化されたメールを作成する際により柔軟性とカスタマイズ性を高めるには、カスタマイズされたメールを送信アクションを使用します。
The Send email actions in existing flows will automatically be migrated, ensuring a seamless transition without data loss.
カスタマイズしたメールを送信
スマート バリューの使用: あり
Sends a branded email from a custom email address, while complying with your organization’s external user security policy. This action can be useful in scenarios like automating an email series that gets sent to a new starter as part of an onboarding workflow.
プレーン テキスト、リッチ テキスト、HTML コンテンツ形式から選択でき、ロゴ、画像、リンクを追加して目的に合わせてメールをカスタマイズできます。独自のカスタム フィールドをすべて参照するスマート値を使用することもできます。
Free plan limit: 100 emails in 24 hours
Read more about Automation service limits
まず [カスタマイズしたメールを送信] アクションを選択し、次に [設定] タブにメールの詳細を入力します。
[受信者] フィールド:
ドロップダウン リストから、ユーザー フィールドやグループを選択できます。スマート値や、組織内外の受信者のメール アドレスを入力することもできます。受信者には個別のメールが送信され、他の受信者アドレスは表示されません。
Selecting All customers involved in this field will send the email to the reporter, request participants, customers whose organization has been added to the work item, and customers who have subscribed to work item notification. Read about customers and organizations in Jira Service Management.
Note that some emails may be blocked and not sent to some recipients if your organization has policies such as filter content or external user security.
[差出人] フィールド:
ご利用のサイトから送信される既定のメール ドメインのメール プリフィックスをカスタマイズするオプションが利用できます。
You can also send emails from any custom email address added at admin.atlassian.com by your organisation admins. Read how to set up custom email addresses.
[コンテンツ] タブで、次の操作を行います。
メールで使いたいコンテンツ形式を選択します。次の選択肢を利用できます。
プレーン テキスト – コンテンツのフォーマットはありませんがスマート値を含めることができます。
リッチ テキスト – エディターのツールバーを使用したコンテンツ フォーマット (リンクや画像を含む) です。スマート値を含めることもできます。画像は、ホスト画像ファイルの公開 URL を入力することで追加するか、スマート値を使用して動的にレンダリングできます。サイズと配置は、[コンテンツ] フィールドのコンテキスト ドラッグ ハンドルとツールバーを使用して管理できます。
HTML – HTML によるコンテンツ フォーマット。スマート値を含めることができます。
Enter your content in the Content field. Note that your email content is only saved once the flow is turned on, saved, or updated. Switching between content formats will delete any existing content from the Content field.
From the Attachments field, browse or drop up to 10 files you want to attach to the email (most file formats up to a total size of 4MB accepted). Note that the flow must be saved or enabled before you can add attachments to the email action.
このアクションは、HIPAA 準拠のお客様にはご利用いただけません。
Microsoft Teams のメッセージを送信する
スマート バリューの使用: あり
Sends a Microsoft Teams message to notify a team when a flow is run. Messages can’t be send to private channels.
You can personalize the message in this action. Learn more about using automation with Microsoft Teams.
Global admins can also set restrictions on which domains can be used by the action - read more about adding restrictions to automation steps.
[許可リストを表示] を選択して、追加する webhook URL が含まれていることを確認してください。許可リストは、グローバル管理者によって管理されています。
Slack のメッセージを送信する
スマート バリューの使用: あり
Sends a Slack message to notify a team or individual when a flow is run
You can personalize the message in this action. Learn more about using automation with Slack.
Global admins can also set restrictions on which domains can be used by the action - read more about adding restrictions to automation steps.
Twilio (SMS) メッセージを送信する
スマート バリューの使用: あり
Twilio サービスを使用して通知を送信します。
このアクションは、オンコール シナリオで SMS を利用するサービス チームで役立ちます。
Global admins can also set restrictions on which domains can be used by the action - read more about adding restrictions to automation steps.
Web リクエストを送信
スマート バリューの使用: あり
Your network must allow requests from Atlassian in order for this to work. For outgoing connections, see IP addresses and domains for Atlassian cloud apps.
Sends an outgoing web request to notify another system when a flow is run. You can set this action to return response data that can then be used in a subsequent action.
Global admins can also set restrictions on which domains can be used by the action - read more about adding restrictions to automation steps.
データ形式
以下の 3 つの形式から選択できます。
Work item data (Jira format) - The format used throughout most of Jira Cloud, including Jira Cloud’s Legacy Automation feature. Learn more about the Jira format.
Work item data (Automation format) - The format used by Jira Cloud automation steps. Learn more about the automation format.
カスタム形式 - 独自のデータ形式を入力するには、このオプションを選択します。
非表示の値
When configuring your web request, you can also Hide certain values, making them more secure. If a value is marked as hidden and the flow is saved, the value will be replaced by asterisks (i.e., *****). It will no longer be visible, and you won’t be able to inspect any payload. This can’t be reversed (i.e. the Hidden checkbox can’t be unselected), though the value itself can still be changed when editing your flow.
For security reasons, hidden values will be lost if the entire flow is duplicated or exported/imported, or if the Send web request step itself is duplicated. If this happens, you’ll need to reconfigure the step and re-enter those values.
その他の注意点
許可されるポート: 「Web リクエストを送信」アクションからの URL に使用できるポートは、80、8080、443、6017、8443、8444、7990、8090、8085、8060、8900、9900 だけであることに注意してください。
Data sensitivity: The Send web request action can be used to configured to sensitive data to third-parties. This is true even after the flow is saved, because someone with permission to edit the flow can reconfigure the Send web request action to send out data that they shouldn’t. For this reason, we recommend that before using this action, ensure that only people you trust can edit automation flows.
作業項目をトランジションする
スマート バリューの使用: あり
ワークフロー内で、作業項目をあるステータスから別のステータスにトランジションします。
課題のトランジションと同時に更新するフィールドを選択できます。たとえば、以下を更新できます。
Copy from work item: copies the status from a related work items or a work item on a branch flow.
親からコピー: サブタスクと併用するために、親課題からステータスをコピーします。
エピックからコピー: 作業項目に関連するエピックからステータスをコピーします。
Copy from Trigger work item: copies the status from the work item that triggered the flow.
同一ステータス (ループ): トランジションした課題が現在のステータスに戻ってくる際に使用します。画面と一緒に使用すると、ユーザーから詳細データを収集できます。たとえば、エスカレーションへのトランジションなどです。
You can also copy attachments by selecting the Attachment field from the list of supported work item fields and then choosing the source work item from which attachments need to be copied. Select More options to display additional fields for advanced field editing.
For Jira Service Management, you can edit both Jira fields and Assets fields. Learn more about Assets in Jira Service Management.
When you set the Organizations field and choose Use reporter’s email domain, it checks only the domains explicitly added to an organization’s Manage email domains list. If the reporter’s domain:
1 つの組織と完全に一致 – その組織が自動的に選択されます
複数の組織と一致 – そのメール ドメインに関連付けられた組織のいずれか 1 つが選択されます
どこにも表示されておらず、存在しない場合は組織を作成を選択している場合 – メール ドメインを名前として使用して新しい組織が作成されます
Rovo エージェントを使用する
スマート バリューの使用: あり
選択したエージェントが代わって応答を生成するよう促します。セカンダリアクションと組み合わせる必要があります。このセカンダリアクションは、コメントを追加などのテキストベースの出力を持ち、応答の送信先を指定します。
You’ll be asked to connect Rovo to automation to allow agents to act on your behalf. Connections are kind of like when you give a social media app permission to access your photos.
When setting up this action, you provide a prompt describing what the agent should analyze. For example:
この作業項目の説明フィールドの品質を読んでレビューしてください。
サービス スペース顧客を追加
スマート バリューの使用: あり
Jira Service Management スペースに新しい顧客を追加します。
スマート バリューはすべてのフィールドで使用でき、既存組織に顧客を追加できます。
このアクションを短い間隔で複数回連続して呼び出した場合、カスタマーが存在するものの、ユーザーの検索結果にはまだ表示されないため、最初の呼び出しは成功し、後続の呼び出しは失敗します。検索結果に新しいユーザーが表示されてこの問題が解決されるまで、最大で15 秒かかります。
{{customer}} のスマート バリューでは、検索結果に表示できない既存のユーザーは返されないため、エラーが発生します。
If this work item is affecting your flow, you can introduce a delay into your flow by adding the Delay action right before the Add service space customer action.
リクエストを承認/却下する
スマート バリューの使用: なし
Jira Service Management のリクエストを承認または却下します。ワークフローを進めるために必要な承認者の数は問いません。
You can use this action on Jira Service Management work items that are pending approval on the current workflow status. Approvals are managed through the workflow. Learn more about approvals in Jira Service Management.
インシデントを作成
スマート バリューの使用: あり
必要な権限: スペースの参照、作業項目の作成
このアクションが実行されると、選択したリクエスト タイプのインシデントが、Jira Service Management の選択したサービス スペースに作成されます。たとえば、このアクションを使用して、作業項目が作成され、特定の条件を満たした場合に新しいインシデントを作成できます。
また、アクションによって同じタイプの未解決のインシデントがスペース内にすでに作成されている場合は、新しいインシデントの作成を回避するオプションもあります。
You need to have a service space and a request type for incidents to use this action.
バージョンの作成
スマート バリューの使用: あり
作業項目を割り当てることができる新しいバージョンを作成します。
同じ名前のバージョンがすでに存在する場合は、新しいバージョンは作成されません。
リクエスト タイプで作業項目を作成
スマート バリューの使用: あり
選択したリクエスト タイプを使用して、Jira Service Management スペースに新しい課題を作成します。
All request types you’ve added to the service space can be used with this action. Learn how to organize your request types into portal groups
Similar to the Create work item action, this action allows you to configure any field available using smart values.
使用可能なフィールドには、非表示ではなく、リクエスト タイプに追加されているすべてのフィールドが含まれます。非表示のフィールドはサポートされていません。ただし、Premium プランまたは Enterprise プランで利用できるメジャー インシデントは例外です。
バージョンをリリースする
スマート バリューの使用: あり
バージョンをリリースします。
既定では、このアクションは既存のリリース日でスペースの次の未リリース バージョンをリリースします。これは リリース でバージョンが設定された順序によって決まります。
リリースする特定のバージョンを選択し、スマート バリューを使って動的な名前を設定できます。
添付ファイルを削除する
スマート バリューの使用: あり
添付ファイルのファイル名に基づいて、正規表現の一致を使って添付ファイルを削除します。
ログ アクション
スマート バリューの使用: あり
監査ログに値を記録します。
This action is useful when testing smart values, and debugging flows.
「作業項目データを再取得する」
スマート バリューの使用: なし
最新のフィールド値でスマート バリューを更新します。
By default, the {{issue}} reference is not updated during flow execution, and contains the same values as when the flow originally triggered.
エンティティのプロパティを設定する
スマート バリューの使用: あり
Sets entity properties on work items, spaces, and users related to the trigger work item of the flow execution.
これらの非表示プロパティは、特定の機能でアプリによって使用される場合があります。エンティティプロパティを使用すると、プラグインで作業項目やスペースにキー/値ストアを追加できます。これらの値にはインデックスが作成され、REST API または JQL を使用してクエリできます。
バージョンのリリースを元に戻す
スマート バリューの使用: あり
Unrelease a released version for a chosen space. By default, this will be the flow's space, but you can select More options to choose a different space.
Amazon SNS トピックにメッセージを送信する
スマート バリューの使用: あり
このアクションを実行すると、選択した Amazon Simple Notification Service トピックに JSON メッセージが送信されます。
You can add up to 10 key-value pairs to an action. If you’d like to add more, contact support.

スマート値はすべての値タイプ (文字列、リスト、数値、ブール値、カスタム) で使用できます。ただし、カスタムはスマート値のみをサポートしています。
Make sure that your Amazon SNS topic allows Atlassian Automation to publish messages. Learn more about configuring Amazon SNS.
AWS SSM ドキュメントを実行する
スマート バリューの使用: あり
このアクションを実行すると、選択した AWS Systems Manager ドキュメントが実行されます。ドキュメントの事前設定されたパラメータに値を追加できます。
Make sure that the IAM role has a Permission Policy allowing Atlassian Automation to access and run SSM documents. Learn more about configuring AWS IAM.
Enterprise plan: Pause the flow until a response is received from AWS SSM.
When enabled, the flow will resume if AWS SSM returns a success response within the specified duration (up to 15 minutes). Otherwise the flow will fail.
You can also configure the flow to resume after:
指定時間内での応答に失敗した
指定された時間内に応答がない
AWS SSM からペイロードにアクセスするには、{{awsSsm.output}} スマート値 を使用します。
応答のステータスを確認するには、{{awsSsm.status}} スマート値を使用します。
「成功」または「失敗」が表示されます。
応答が受信されない場合、値は空になります。
仮想マシンを Azure で再起動
スマート バリューの使用: なし
このアクションを実行すると、Microsoft Azure で選択された仮想マシンがアトラシアン自動化によって再起動されます。
Make sure you’ve added Email in your Microsoft Azure profile information for authentication of the flow’s connection. Learn how to add or change profile information in Microsoft Azure
Enterprise plan: Pause the flow until a response is received from Azure Virtual Machine.
When enabled, the flow will resume if Azure Virtual Machine returns a success response within the specified duration (up to 15 minutes). Otherwise the flow will fail.
You can also configure the flow to resume after:
指定された時間内に応答がない
応答のステータスを確認するには、{{azureVm.status}} スマート値を使用します。
「成功」または「失敗」が表示されます。
応答が受信されない場合、値は空になります。
Azure でランブックを開始
スマート バリューの使用: なし
このアクションを実行すると、Microsoft Azure で選択されたランブックが Atlassian Automation によって開始され、実行されます。Microsoft Azure に送信される JSON メッセージに含めるキーと値のペアを追加することもできます。
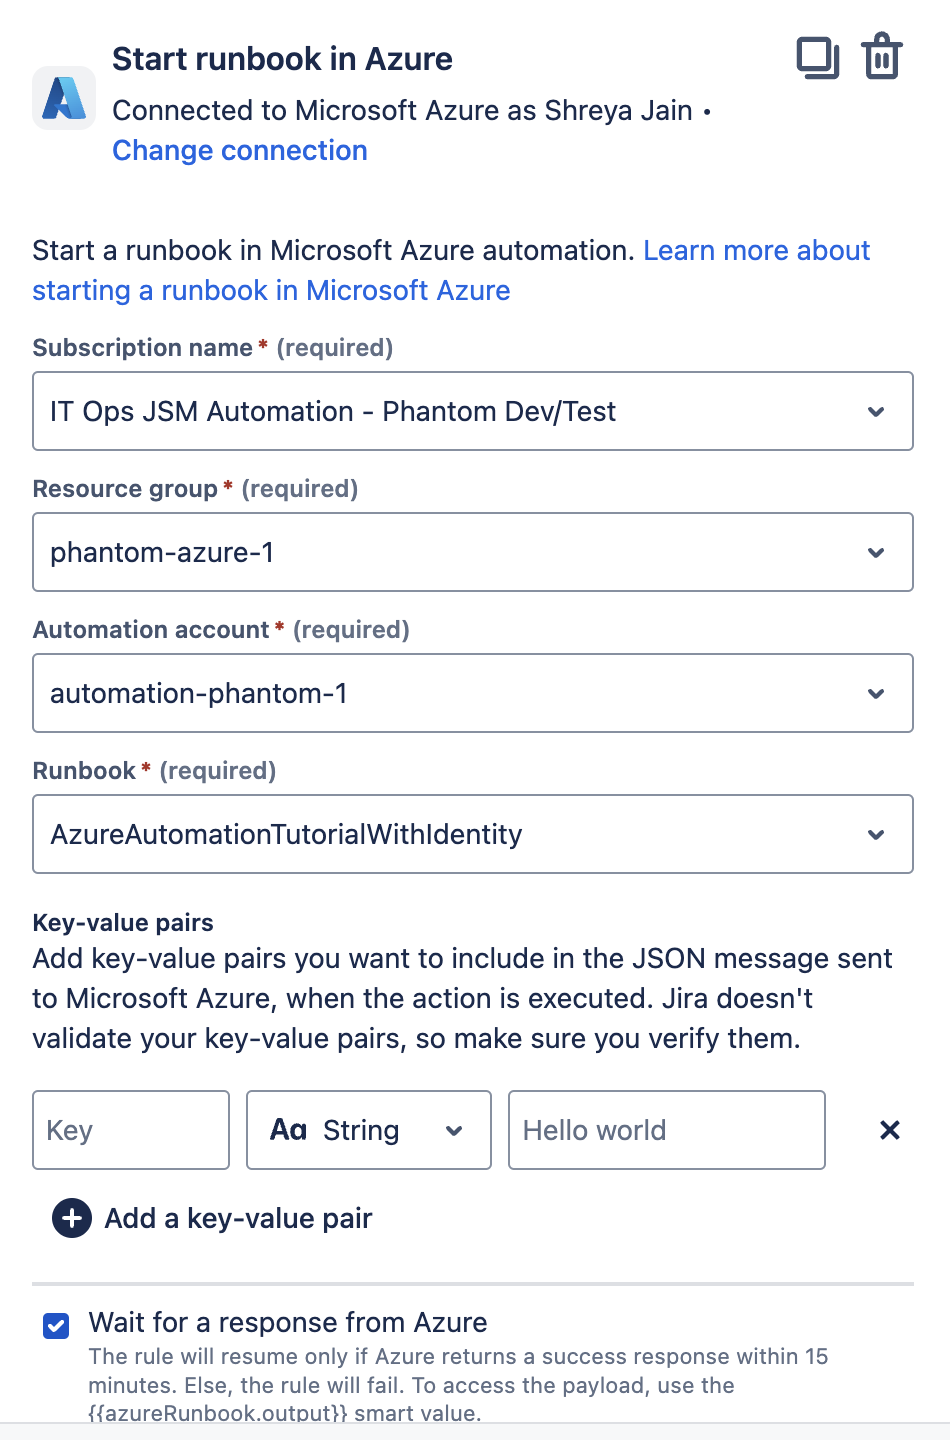
Make sure you’ve added Email in your Microsoft Azure profile information for authentication of the flow’s connection. Learn how to add or change profile information in Microsoft Azure.
Enterprise plan: Pause the flow until a response is received from Azure.
When enabled, the flow will resume if Azure returns a success response within the specified duration (up to 15 minutes). Otherwise the flow will fail.
You can also configure the flow to resume after:
指定時間内での応答に失敗した
指定された時間内に応答がない
Azure からペイロードにアクセスするには、{{azureRunbook.output}} スマート値 を使用します。
応答のステータスを確認するには、{{azureRunbook.status}} スマート値を使用します。
「成功」または「失敗」が表示されます。
応答が受信されない場合、値は空になります。
インシデントに関係者を追加する
Premium および Enterprise プランの限定機能
スマート バリューの使用: あり
選択したユーザー (Jira Service Management エージェントと関係者ロールを持つ) を関係者としてインシデントに追加します。これにより、タイムリーな更新情報とインシデントの進捗の可視性が確保されます。
関係者は、次のようないくつかの方法で追加できます。
インシデント ビューから手動で追加
影響を受けるサービスを通じて自動で追加 (それらのサービスにユーザーが割り当てられている場合)
このアクションを使用した自動化により、サービス構成に関係なく、主要なユーザーに常に通知が届くようになります。
このアクションの実行は、Jira Service Management インシデントに対してのみ成功します。
Read more about stakeholders in Jira Service Management.
Send update to Statuspage
Use this action to create or update an incident on a Jira Service Management-native status page directly from your automation rule. The first time the action runs for a Jira issue, it creates a new status page incident and links it back to the work item.
Every subsequent run for the same work item posts a new update to the linked status page incident — there's no separate "link" or "update" action to add.
Tip: This action is intentionally simple. Use If / Else condition blocks earlier in your rule to control when an update is posted (for example, only for P1/P2 incidents, or only when the status changes to "In Progress").
「パフォーマンス」の場所
In the rule builder, choose Add component, then New action, then Jira Service Management and select Send update to Statuspage.
可用性
Jira Service Management Enterprise plans since status pages are natively available only in enterprise plan.
Available only in projects that have at least one Jira Service Management–native status page configured.
Works with both public and private Jira Service Management–native status pages.
動作の仕組み
Each time the rule runs, Jira automation checks whether the Jira work item is already linked to a status page incident:
If it isn't linked yet then the action creates a new status page incident on the page you selected and links it to the Jira issue.
If it's already linked then the action posts a new update to the linked status page incident.
If the issue was manually linked to a status page incident (from the incident view), the action updates that linked incident — no extra setup is needed.
When the status is set to Resolved, the linked status page incident is marked as resolved and subscribers are notified per the page's notification settings.
You only configure the action once. The system handles whether to create or update behind the scenes.
インシデント事後レビューを作成
Premium および Enterprise プランの限定機能
スマート バリューの使用: あり
インシデントのインシデント事後レビュー (PIR) を自動的に作成します。これにより、チームはインシデント解決プロセスの一環としてナレッジとフォローアップアクションを記録できます。
PIR のタイトルと説明は、スマート値を使用して定義するか、元のインシデントからフィールドを取り込むことができます。
自動化を使用しない場合、インシデント事後レビューはインシデント ビューで手動で作成する必要があります。このアクションにより、ワークフローの一部として一貫して生成されることが保証されます。
このアクションの実行は、Jira Service Management インシデントに対してのみ成功します。
Read more about post-incident reviews.
インシデントのための Zoom ミーティングを作成する
Premium および Enterprise プランの限定機能
スマート バリューの使用: あり
インシデントの対応者がコラボレーションするための Zoom ミーティングを開始します。これは、Jira Service Management スペースのチャットおよびビデオ ツール設定で接続された Zoom アカウントを使用します。
スマート値を使用してミーティング名をカスタマイズできます。Zoom で利用できるようになったら、ミーティングの記録を内部メモとしてインシデントに自動的に添付することもできます。
ミーティングは、スペース設定で Zoom アカウントを接続したユーザーの Zoom ユーザー トークンを使用して作成されます。自動化を通じて作成されたすべてのミーティングでこのトークンが使用されます。
This action will run successfully only for Jira Service Management incidents.
To get started, connect your Zoom account and enable it in your space’s incident management settings.
Read more about creating Zoom meetings for incidents.
インシデント用の Slack チャンネルを作成
Premium および Enterprise プランの限定機能
スマート バリューの使用: あり
このアクションを実行すると、選択した Slack ワークスペースに新しい Slack チャンネルが作成され、インシデント担当者がそのチャンネルに自動で追加されます。利用可能なすべてのインシデントの詳細とアクションが投稿され、対応チームが迅速に状況を把握して行動を起こせるようになります。
以下をカスタマイズできます。
プレーン テキストまたはスマート値を使用したチャンネル名と説明。
スマート値やメール アドレスを使用してチャンネル メンバーとして追加する Slack ユーザー。
アプリ ID またはスマート値を使用してチャンネルにインストールする Slack アプリ。
アプリ ID を見つける
このアクションを使用して Slack チャンネルに追加するには、アプリのメンバー ID が必要です。
次の方法で確認できます。
Slack を開き、サイドバーの [アプリ] セクションに移動します。
アプリの名前を選択します。
アプリ ビューで、上部にあるアプリ名を選択して詳細パネルを開きます。
[Member ID (メンバー ID)] フィールドを探します。これがアプリの ID です。
既定では、チャンネルの名前と説明には、作業項目キー、要約、インシデント URL が使用されます。
このアクションの実行は、Jira Service Management インシデントに対してのみ成功します。
To get started, connect your Slack workspace with your Jira Service Management instance and space. Read how to connect Slack with Jira Service Management.
Set channel topic for incident Slack channel
このアクションは、Jira Service Management の Premium と Enterprise の各プランでのみ利用できます。
スマート バリューの使用: あり
Sets the topic of the Slack channel linked to the incident. Use smart values to update the channel topic when an incident is created or changed, so responders and stakeholders always have a quick context of the incident.
The channel topic supports emojis in Slack message format (for example : fire :), allowing teams to visually highlight incident status or urgency.
For this action to run successfully, the Slack channel must already be linked to the incident. The related Slack workspace must be connected from Jira Service Management > Settings () Jira admin settings > Operations > Chat and video tools.
このアクションの実行は、Jira Service Management インシデントに対してのみ成功します。
To get started, connect your Slack workspace with your Jira Service Management site and project. Read how to connect Slack with Jira Service Management
Slack チャンネルにアプリを追加
Premium および Enterprise プランの限定機能
スマート バリューの使用: あり
選択した Slack アプリをインシデントの Slack チャンネルに追加します。監視ボット、ドキュメント アプリ、統合などのツールにより、対応ワークフローを強化することができます。
Slack チャンネルをインシデントにリンクする必要があります。
スマート値を使用するか、アプリ ID を指定して、追加するアプリをカスタマイズできます。チャンネルに追加するには、接続されたワークスペースに Slack アプリがすでにインストールされている必要があります。
アプリ ID の見つけ方
このアクションを使用して Slack チャンネルに追加するには、アプリのメンバー ID が必要です。
次の方法で確認できます。
Slack を開き、サイドバーの [アプリ] セクションに移動します。
アプリの名前を選択します。
アプリ ビューで、上部にあるアプリ名を選択して詳細パネルを開きます。
[Member ID (メンバー ID)] フィールドを探します。これがアプリの ID です。
This action will run successfully only for Jira Service Management incidents.
To get started, connect your Slack workspace with your Jira Service Management instance and space.
Read how to connect Slack with Jira Service Management.
Slack でダイレクト メッセージを送る
スマート バリューの使用: あり
インシデントが発生したときに、選択したユーザーに直接 Slack メッセージを送信します。優先度の高いイベントについて、対応者や意思決定者に非公開で通知するのに役立ちます。
スマート値を使用して、メッセージの内容と受信者をカスタマイズできます。メッセージ内でユーザーにタグ付けするには、フォーマット @{{smart_value}} を使用します。
This action will only run for Jira Service Management incidents.
To get started, connect your Slack workspace with your Jira Service Management instance and space.
Read how to connect Slack with Jira Service Management.
Slack チャンネルでメッセージを送信する
スマート バリューの使用: あり
インシデントにリンクされた Slack チャンネルにメッセージを送信します。これを使用すると、インシデントの更新、ステータスの変更、または次のステップを自動化できます。
スマート値を使用してメッセージの内容をパーソナライズし、要約、ステータス、解決までの時間などの作業項目フィールドを参照します。メッセージ内でユーザーにタグ付けするには、フォーマット @{{smart_value}} を使用します。
This action will run successfully only for Jira Service Management incidents.
To get started, connect your Slack workspace with your Jira Service Management instance and space.
Read how to connect Slack with Jira Service Management.
Slack チャンネルにメンバーを追加する
Premium および Enterprise プランの限定機能
スマート バリューの使用: あり
インシデントに関連する Slack チャンネルに特定のユーザーを追加します。これを使用すると、インシデントさまざまな段階で、対象分野のエキスパートやエスカレーション担当者を自動的に取り込むことができます。
Slack チャンネルをインシデントにリンクする必要があります。
スマート値を使用して追加するユーザーを定義することも、Slack ID やメール アドレスとして手動で入力することもできます。
This action will run successfully only for Jira Service Management incidents.
To get started, connect your Slack workspace with your Jira Service Management instance and space.
Read how to connect Slack with Jira Service Management.
Slack チャンネルにブックマークを追加
Premium および Enterprise プランの限定機能
スマート バリューの使用: あり
インシデント対応中に作成されたインシデント Slack チャンネルにブックマークのリストを追加します。ブックマークはダッシュボード、ランブック、Confluence ページなどの主要なリソースを指すことができ、対応者は迅速に行動を起こせるようになります。
Slack チャンネルをインシデントにリンクする必要があります。
プレーン テキストとスマート値を使用して各リンクの名前と URL を定義し、ブックマークをカスタマイズできます。ブックマークとして追加できるのは有効な URL だけです。
This action will run successfully only for Jira Service Management incidents.
To get started, connect your Slack workspace with your Jira Service Management instance and space.
Read how to connect Slack with Jira Service Management.
インシデントに Microsoft Teams のチャットまたはミーティングを作成する
「スマート値の使用: あり
このアクションを実行すると、選択した Microsoft テナントに新しい Microsoft Teams チャットまたはミーティングが作成され、インシデント担当者がチャットまたはミーティングに自動で追加されます。利用可能で関連するすべてのインシデントの詳細とアクションが投稿され、対応チームが迅速に状況を把握して行動を起こせるようになります。
Microsoft テナント、チャットまたはミーティングの名前と説明、追加するメンバーをカスタマイズできます。既定では、チャットまたはミーティングの名前と説明には、インシデントの作業項目キー、要約、URL が使用されます。
制限と動作:
For the chat or meeting name, only the work item key can be safely used as a smart value. Microsoft Teams doesn’t support special characters in chat names, so using the work item summary or URL may cause the flow to fail.
For members added to the chat or meeting, only the responders on the incident are included by default. If you want to add other users—such as stakeholders—you must explicitly include them in the "members" field of the automation flow.
This action will run successfully only for work items of an incident request type. Read about creating a request type.
To get started, connect your Microsoft tenant with your Jira Service Management instance and space. Read how to connect Microsoft Teams with Jira Service Management.
Jira Edge Connector を使用してスクリプトを実行する
このアクションを実行すると、オンプレミス システムで選択したアクションが Jira Edge Connector 経由で実行されます。
Microsoft Azure に送信される JSON メッセージに、含めたいキーと値のペアを追加することもできます。Jira はキーと値のペアを検証しないため、必ず確認してください。
Read how to use Jira automation with Jira Edge Connector.
Enterprise plan: Pause the flow until a response is received from JEC.
When enabled, the flow will resume if JEC returns a success response within the specified duration (up to 15 minutes). Otherwise the flow will fail.
You can also configure the flow to resume after:
指定時間内での応答に失敗した
指定された時間内に応答がない
JEC からペイロードにアクセスするには、{{jecAction.output}} スマート値 を使用します。
応答のステータスを確認するには、{{jecAction.status}} スマート値を使用します。
「成功」または「失敗」が表示されます。
応答が受信されない場合、値は空になります。
アラート ステータスを変更
Premium および Enterprise プランの限定機能
このアクションが実行されると、アラートのステータスはユーザーが選択した新しいステータスに変更されます。アラートのステータスを、確認済み、オープン、クローズ済み、スヌーズに変更できます。
When SNOOZED is selected, you get to pick a custom snooze duration (between 1 minute and 7 days) which also supports the date and time smart values.
Ansible でジョブ テンプレートを起動
Premium および Enterprise プランの限定機能
このアクションが実行されると、選択したジョブ テンプレートが Ansible で起動されます。ジョブ テンプレートを正常に起動するために追加情報が必要な場合は、アクションにその情報を JSON 形式で指定できます。
Make sure you’ve created an application in Ansible Automation Controller, as you’ll need its token to connect it with Atlassian Automation. Read more about connecting with Ansible
Enterprise plan: Pause the flow until a response is received from Ansible.
When enabled, the flow will resume if Ansible returns a success response within the specified duration (up to 15 minutes). Otherwise the flow will fail.
You can also configure the flow to resume after:
指定時間内での応答に失敗した
指定された時間内に応答がない
Ansible からペイロードにアクセスするには、{{ansibleJobTemplate.output}} スマート値 を使用します。
応答のステータスを確認するには、{{ansibleJobTemplate.status}} スマート値を使用します。
「成功」または「失敗」が表示されます。
応答が受信されない場合、値は空になります。
New Relic でクエリを実行する
Premium および Enterprise プランの限定機能
When this action is executed, the given query is run in New Relic using NRQL. You can connect with New Relic using your user key.
接続したら、New Relic のアカウント ID と、New Relic で実行したいクエリを入力できます。
This action pauses the flow until a response is received from New Relic.
The flow will resume if New Relic returns a success response within 15 minutes. Otherwise the flow will fail.
You can configure the flow to still resume after:
15 分以内の応答に失敗した
15 分以内に応答なし
New Relic からペイロードにアクセスするには、{{newRelicQuery.results}} スマート値を使用します。
遅延
Premium および Enterprise プランの限定機能
スマート バリューの使用: なし
When this action is added to a flow (before a condition or another action), it adds a time-based delay in between two steps. The flow gets delayed by X amount of time before executing the next step in the flow.
Adding the delay step to a branch only delays the execution of the branch’s steps and does not affect the rest of the flow.
A delay step can’t have more than 15 minutes or 900 seconds of delay. And the total amount of delay in a flow can’t be more than 60 minutes. This action is available only for Premium and Enterprise plans at the moment.
アラート イベントが発生するまでの遅延
Premium および Enterprise プランの限定機能
スマート バリューの使用: なし
The event-based delay action allows you to delay the execution of a flow up to 15 minutes until a specific event occurs on a related alert entity. The Alert smart values will be re-fetched before initiating the delay and after receiving the event. This feature is particularly useful in incident management scenarios, where it's crucial to validate that certain conditions or metrics are met before proceeding to the next step in a flow.
サポートされているイベント:
優先度が変更されました
ステータスが更新されました
設定:
Admins can choose which field (for example, Priority or Status) to monitor for changes. The flow will pause for up to 15 minutes until the specified event occurs on this field.
Define the condition that must be met for the event to trigger the continuation of the flow. Available conditions include:
指定の値に等しい
等しくない
次のいずれかです
次のいずれでもない
値を選択:
Admins must also specify the value(s) that the event field must meet to trigger the flow continuation.
Flow execution:
The flow pauses up to the set delay time or until the specified event occurs, whichever happens first.
If the event does not occur within the set delay time, the flow resumes automatically, with slight latency in rare cases.
The flow won’t abort execution if the event doesn’t occur; it will continue after the delay.
アラート データを再取得する
スマート バリューの使用: なし
アラート データを最新のアクションで更新し、後続のアクションでアラートの最新の状態を使用できるようにします。
By default, the {{alert}} reference is not updated during flow execution, and contains the same values as when the flow originally triggered.
このアクションはバックグラウンドで実行されます。
この内容はお役に立ちましたか?