Jira automation actions
Actions are the doers of your rule. They allow you to automate tasks such as editing a work item, sending a notification, or creating sub-tasks.
See how to use all of these actions in our Jira automation template library.
Assign work item
Use smart values here: Yes
Required permissions: Assign work items, Assignable user
Assigns a work item to a user.
You configure how to assign work items:
A user in a defined list – If a work item passes a restriction specified in JQL, assign it to a user from a specified list of users based on:
Balanced workload: Each user has an equal number of work items (scope defined in JQL)
Random: Assigns randomly from the list
Round-robin: Assigns in sequential order of the list
Another field value or comment – Assign it to a user associated with the work item’s user field values or comments. For example,
Assign it to a previous assignee based on the work item history
Assign the work item to its creator
You can configure it further by excluding specific people or limiting assignments to specific user groups. In that case the action would look further back in the work item’s history of assignees.
Automatic – Assign it to the space’s default assignee.
Copy from another work item – Copy the assignee from a related work item. (Or use JQL to specify work item criteria).
Smart value – Assign it based on a smart value. For example, when a work item is commented on, assign it to the comment’s author.
Specify user – Assign it to a person you select.
Unassigned – Remove existing user and set the work item as ‘Unassigned’.
User who triggered the event – Assign it to the user who triggered the event.
User in a role – Assign it to a specific role within a team.
User in a group – Assign it to someone in a specified user group.
On-call responder – Assign it to who is on-call, based on a team's Opsgenie on-call schedule. If the schedule includes multiple rotations, responders are assigned randomly.
Attach forms
Space-specific. Can’t be configured globally.
Attach one or more forms to a work item. You can also set the visibility of the forms. Learn more about how forms work in the work item view.
Attach forms with values
Space-specific. Can’t be configured globally.
Attach a form with values to an existing work item so you can populate forms with content from your chosen data source. These can either be smart values or predefined values such as choices. These forms will be attached to work items with their inputs saved, not yet submitted.
Assets and attachment form field types also aren’t supported at this time. Read more about how forms work in the work item view
Change form status
Space-specific. Can’t be configured globally.
Change a form from one status to another. Read more about form statuses
Clone work item
Use smart values here: Yes
Creates a duplicate of a work item within the same space or a space of your choosing.
It can be used as part of a workaround for moving work items between spaces.
This action will create a new work item and copy across all field data possible, including the ability to copy attachments by selecting the Attachment field from the list of supported work item fields and then choosing the source work item from which attachments need to be copied.
Its Status is then set to the first step of the corresponding workflow, and any resolutions from the original work item will be cleared. It is not a true clone and won’t be linked to the original work item.
You can also set values to override any copied data in supported fields. For Jira Service Management, you set both Jira fields and Assets fields. Learn more about Assets in Jira Service Management.
Select More options to display additional fields for advanced field editing.
This action will not clone work item links or comments.
In the action, when you set the Organizations field and choose Use reporter’s email domain, it checks only the domains explicitly added to an organization’s Manage email domains list. If the reporter’s domain matches exactly one organization, that organization is automatically selected. If the domain matches more than one organization, any one of the organizations associated with that email domain will be selected. If the domain isn’t listed anywhere and you’ve selected Create organization if it doesn’t exist, a new organization will be created using the email domain as its name.
Comment on work item
Use smart values here: Yes
Adds a comment to a work item.
You can use smart values to reference work item fields to personalize the comment. You can also set the comment visibility.
Copy forms
Form actions are only space-specific and can’t be configured globally.
Copy one or more forms from one work item to the current work item.
Create branch in (product name)
Creates a branch in the tool of your choosing. There are currently three actions that do this:
Create branch in Bitbucket
Create branch in GitHub
Create branch in GitLab
This requires setting up a connection between your automation rule and the other tool. Learn more about connections in automation.
You can also use smart values to access information related to these branches - learn more about created branch smart values.
Restrictions when naming branches
Branch names cannot:
Be
HEAD, as this is a reserved wordStart or end with
/Start or end with
.End with
.lockContain a space
Contain the following symbol sets:
..,~,^,:,?,*,[,/,\\,@{
Create Confluence page
Use smart values here: Yes
Creates a Confluence page (or blog) in an Atlassian Cloud site of your choosing. Note that this creates the Confluence page, but it doesn’t enter any content. This means while you can define the page title using smart values, the automation rule can’t define any of the page content.
Requires a connection between your Jira space and Confluence. Learn more about using Jira automation with Confluence.
Create work item
Use smart values here: Yes
Required permissions: Browse spaces, Create work items
Creates a work item of any type in a space. You can select fields to configure and set their values. You can copy attachments by selecting the Attachment field from the list of supported work item fields and then choosing the source work item from which attachments need to be copied.
Select More options to display additional fields for advanced field editing.
For Jira Service Management, you can set both Jira fields and Assets fields. For Jira Service Management, if the rule is triggered by an object, you can select Insert object to automatically add the triggered object via AQL. Learn more about Assets in Jira Service Management.
Take care when using Space > Same space as trigger on global rules. As the space type is unknown until the rule runs, all work item types are available to configure. This means that you can select a work item type that will not exist in the space.
In the action, when you set the Organizations field and choose Use reporter’s email domain, it checks only the domains explicitly added to an organization’s Manage email domains list. If the reporter’s domain matches exactly one organization, that organization is automatically selected. If the domain matches more than one organization, any one of the organizations associated with that email domain will be selected. If the domain isn’t listed anywhere and you’ve selected Create organization if it doesn’t exist, a new organization will be created using the email domain as its name.
Create lookup table
Create a table of key-to-value mappings and assign it to a smart value, which can be used in other actions and conditions in your rule. In the following example:
The smart value {{departments.get("HR")}} would return Human Resources.
Note that your key-to-value map can only be called within the same rule. If the action is used in a branch, the smart value can only be used within the same branch. Key/value mappings don’t carry across to other rules or branches.
Example use case
Let’s say you want to create an automation rule that assigns due dates on a bug based on priority; bugs that are high priority need to be completed within the week, while bugs that are lowest priority can be completed within the next 6 months.
You could create a key/value map with the following values:
And then, using the Edit work item action and the {{dueDates.get(issue.Priority.name)}} smart value, you can automatically assign due dates based on how urgent the bug is:
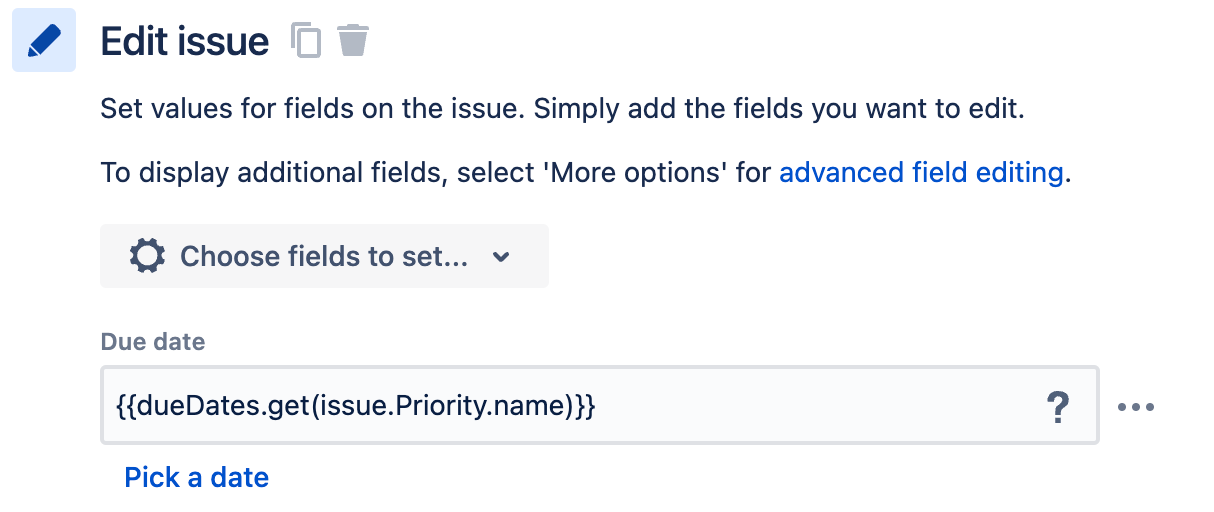
Note that when nesting smart values in this way, the value returned by the nested smart value must be a string. So in this example, if you instead used issue.Priority.id, it won’t work unless you add .format(“#”) to turn the output into a string (i.e. {{dueDates.get(issue.Priority.id.format("#"))}})
Create dynamic lookup table
Create a table of key-to-value mappings from an existing smart value and assign it to a new smart value, which can be used in other actions and conditions in your rule. The dynamic source is a smart value that produces a collection, list, or array of values.
You can use the smart value dot notation in both the key and value input fields to drill down to the value that you wish to use.
Note: your key-to-value map can only be called within the same rule. If the action is used in a branch, the smart value can only be used within the same branch. Key/value mappings don’t carry across to other rules or branches.
Example use case using Assets
Let’s say that you have an Assets schema that you use to store some information:
In this example we have the Slack channel and Confluence space key for a few teams. We can then create a lookup table from this:
The key will be the space name and the value will be the space key. When the log action asks for Development then it should be presented with the Space Key for that space, which we can see above is DEVELOP:
Example using Send Web Request
The result of a send web request can also be turned into a lookup table. Consider the following example rule that calls out to a jokes API:
Assuming then that you had joke IDs stored in your work items, you’d be able to get the joke from a work item.
Create sub-tasks
Use smart values here: Yes
Creates sub-tasks on a work item.
This action only supports setting the Summary of the sub-task.
Selecting Add fields will convert the Create sub-tasks action into a Create work item (work item type: sub-task) action, allowing you to set additional fields.
Create sprint
Use smart values here: Yes
For Jira only.
Creates a sprint in a chosen software space board:
For company-managed spaces, the board must be a Scrum board.
For team-managed spaces, the board must have the Sprints feature enabled. .
You also have the option of entering specific values for start date, end date, and goal. For start and end dates, you may find it useful to use date and time smart values. For example, you could set {{now}} as the start date, and {{now.plusweeks(2)}} as the end date. Learn more about date and time smart values.
Some things to note:
If you set a start date, you must also set an end date.
A sprint name can’t be more than 30 characters, so you’ll need to be mindful of sprint names that you manually enter, as well as smart values that return text that is too long.
Create variable
Use smart values here: Yes
Define your own smart value, which can be used in other actions and conditions in the same rule. The smart value you define can consist of other smart values, as well as math functions.
Note that this will always return a string. For example, if you created variable called Stakeholders with the smart value {{issue.watchers.distinct}}, your variable would return the list of watchers but the list would be rendered as a string.
Create object
Use smart values here: Yes
For Jira Service Management only.
Creates a new object in an Assets schema and sets its attribute values.
To reference the newly created object later in the rule you need to use lookupObjects action available in both project rules and global automation rules : Explore Assets in Jira Service Management
Related smart values
{{object.id}}{{object.key}}{{object.<attribute name>}}
Delete comment
Use smart values here: Yes
Can be used to delete a comment on a work item. There are two different ways to use this action:
Deleting a trigger comment: If the rule uses a trigger that involves adding a comment, such as Work item commented, Work item transitioned, or Work item updated,
{{comment.id}}will delete that comment.Deleting other comments: Delete a comment on an active work item by using a comment smart value, such as
{{issue.comment.first.id}}.
Delete work item
Use smart values here: No
Deletes the current work item that is in context.
This action allows you to remove unwanted work items from Jira, such as when automating moving work items between spaces.
Delete work item links
Use smart values here: No
This action allows you to remove any work item links currently on a work item. You can remove all work item links of a certain type (for example, remove all "blocked by" work items), or select specific work items to unlink.
Edit comment
Use smart here: Yes
This action allows you to edit a comment's visibility, or the contents of a comment. Available options are:
First comment: Edit the oldest comment on a work item.
Last comment: Edit the most recent comment on a work item.
Trigger comment: Edit the comment that triggered the rule. Used with triggers such as Work item commented or Work item comment edited. Learn more about automation triggers.
Smart value: Choose a comment to edit by providing a comment smart value.
Once you've selected an option, you can leave the next field blank to keep the comment unchanged; this is useful if you only want to edit the comment's visibility, and nothing else. Entering the smart value {{currentComment}} will return the current content of the comment; this is useful if you want to retain the current comment and add content before or after it.
Edit Assets field attributes
Use smart values here: Yes
For Jira Service Management only. This action edits the attribute values of an Assets field. You can enter either a smart value, a string value, or the ID/Key of an Assets object. If the field is left empty here, the object's value will be cleared.
Assets attributes can have many different types of values (string, integer, user, date, reference object, etc.), so you have to get the input right here. This rule will result in an error if the value in this action doesn't match the attribute type.
Edit work item
Use smart values here: Yes
Edit the current work item by choosing the field to set and value to add. For Jira Service Management, you can edit both Jira fields and Assets fields. Learn more about Assets in Jira Service Management.
You can set some values to be dynamic. You can also copy attachments by selecting the Attachment field from the list of supported work item fields and then choosing the source work item from which attachments need to be copied. Select More options to display additional fields for advanced field editing.
In the action, when you set the Organizations field and choose Use reporter’s email domain, it checks only the domains explicitly added to an organization’s Manage email domains list. If the reporter’s domain matches exactly one organization, that organization is automatically selected. If the domain matches more than one organization, any one of the organizations associated with that email domain will be selected. If the domain isn’t listed anywhere and you’ve selected Create organization if it doesn’t exist, a new organization will be created using the email domain as its name.
Edit object
Use smart values here: Yes
For Jira Service Management only.
Updates an object's attribute values. You can enter either a smart value, a string value, or the ID/Key of an Assets object. If the field is left empty here, the object's value will be cleared.
Assets attributes can have many different types of values (string, integer, user, date, reference object, etc.), so you have to get the input right here. This rule will result in an error if the value in this action doesn't match the attribute type. Learn more about Assets in Jira Service Management.
You can only use this action:
for global automation rules and only when an object is the focus of the rule. For example, if the rule begins with an Object trigger, the object that triggered the rule will be the object that is edited by this action.
when it's under a branch on an AQL branch. It won't work on its own and it won't work with the Lookup objects action.
Edit request type
Use smart values here: Yes
For Jira Service Management only.
Updates the request type for a work item. Note that request types are based on work item types; any number of request types can correspond to one work item type. However, this means that when your automation rule acts on a work item, the chosen request type must correspond to that work item type. If it doesn't, the action will result in an error in the audit log.
Link work items
Use smart values here: Yes
Links a work item to another by selecting the link type and the work item to link.
You can link to the work item that triggers the rule, the current work item on a Related work items branch, a smart value, or a work item key.
Link work item to focus area
Required permissions: User role in Focus with Add work Jira permissions
Links work items that meet the conditions to a focus area.
Link vulnerability to work item
Use smart values here: No
Can only be used with Vulnerability found trigger.
Links the trigger vulnerability to a work item.
To create and link a new work item for every trigger vulnerability:
Create an automation with the Vulnerability found trigger and the Create work item action.
In the drop-down menu in the Link work item to vulnerability action, choose the most recently created work item.
To link all trigger vulnerabilities to one work item:
Create an automation with the Vulnerability found trigger.
In the drop-down menu in the Link work item to vulnerability action, enter the work item key.
If you enter a work item key in this action, the automation will fail if the work item doesn’t exist when the rule is run.
Log work
Use smart values here: Yes
Logs time against a work item.
You can use date and time smart values to dynamically set the date started, and text smart values to customize the description.
Lookup work items
Use smart values here: Yes
Search for up to 100 work items using a JQL query. Include the results list in other actions by using the {{lookupIssues}} smart value. Learn more about using smart values with work item lists.
All fields and custom fields can be accessed from the lookupIssues list. For example, to print the work item key for each work item in bullet point form:
{{#lookupIssues}}
* {{key}}
{{/}}
And the following example sums all story points in the work item list:
There are {{lookupIssues.Story Points.sum}} story points remaining.Lookup objects
Use smart values here: Yes
For Jira Service Management only
Search for up to 100 Assets objects using AQL. Either enter an AQL query or use the Basic filter to generate a query that can be customized with smart values. Basic filter supports smart values allowing for dynamic querying as well as assets attributes. If using assets attributes in the Basic filter be sure to replace attributes with relevant smart values in order for the AQL query to be dynamic. Follow the attached link to easily navigate to the selected Assets schema.
The results of this query can be used in other Automation actions using the {{lookupObjects}} smart value. This can be used to access and print the list of objects, but can't be used to trigger other rules. Read more about using smart values for Assets.
Manage watchers
Use smart values here: Yes
Add or remove watchers on a work item.
You can specify users to add or remove by using smart values directly in the fields.
Send email
Deprecated.
Use Send customized email action for greater flexibility and customization when creating branded emails.
The Send email actions in existing rules will automatically be migrated, ensuring a seamless transition without data loss.
Send customized email
Use smart values here: Yes
Sends a branded email from a custom email address, while complying with your organization’s external user security policy. This action can be useful in scenarios like automating an email series that gets sent to a new starter as part of an onboarding workflow.
You can choose between plain text, rich text, and HTML content formats, and tailor your emails for each purpose adding logos, images, and links. You can also use smart values that reference all of your own custom fields.
Free plan limit: 100 emails in 24 hours
Read more about Automation service limits
Begin by selecting the Send customized email action, then in the Settings tab, enter the email details:
For the Recipient(s) field:
From the dropdown list you can select user fields or groups. You can also enter smart values, or email addresses for recipients internal or external to your organization. Recipients receive separate emails and will not see other recipient addresses.
Selecting All customers involved in this field will send the email to the reporter, request participants, customers whose organization has been added to the work item, and customers who have subscribed to work item notification. Read about customers and organizations in Jira Service Management.
Note that some emails may be blocked and not sent to some recipients if your organization has policies such as filter content or external user security.
For the From field:
You’ll have the option to customize the email prefix of the default email domain that comes with your site.
You can also send emails from any custom email address added at admin.atlassian.com by your organisation admins. Read how to set up custom email addresses.
In the Content tab:
Select the content format you want to use for your email. You’ll have the choice of:
Plain text – no content formatting, but can include smart values.
Rich text – content formatting via the editor toolbar including links and images, and can include smart values. Images can be added by entering a public URL to a hosted image file, or using smart values for dynamic image rendering, with size and position managed using contextual drag handles and toolbars within the Content field.
HTML – content formatting via HTML, and can include smart values.
Enter your content in the Content field. Note that your email content is only saved once the rule is turned on, saved, or updated. Switching between content formats will delete any existing content from the Content field.
From the Attachments field, browse or drop up to 10 files you want to attach to the email (most file formats up to a total size of 4MB accepted). Note that the rule must be saved or enabled before you can add attachments to the email action.
This action is not available to HIPAA compliant customers.
Send Microsoft Teams message
Use smart values here: Yes
Sends a Microsoft Teams message to notify a team when a rule is run. Messages can’t be send to private channels.
You can personalize the message in this action. Learn more about using automation with Microsoft Teams.
Global admins can also set restrictions on which domains can be used by the action - read more about adding restrictions to automation components.
Select View allowlist to make sure the webhook URL you add is included. The allowlist is controlled by global admins.
Send Slack message
Use smart values here: Yes
Sends a Slack message to notify a team or individual when a rule is run
You can personalize the message in this action. Learn more about using automation with Slack.
Global admins can also set restrictions on which domains can be used by the action - read more about adding restrictions to automation components.
Send Twilio (SMS) message
Use smart values here: Yes
Sends a notification using the Twilio service.
This action is useful for service teams that rely on SMS for on-call scenarios.
Global admins can also set restrictions on which domains can be used by the action - read more about adding restrictions to automation components.
Send web request
Use smart values here: Yes
Your network must allow requests from Atlassian in order for this to work. For outgoing connections, see IP addresses and domains for Atlassian cloud apps.
Sends an outgoing web request to notify another system when a rule is run. You can set this action to return response data that can then be used in a subsequent action.
Global admins can also set restrictions on which domains can be used by the action - read more about adding restrictions to automation components.
Data formats
There are three different formats you can select from:
Work item data (Jira format) - The format used throughout most of Jira Cloud, including Jira Cloud’s Legacy Automation feature. Learn more about the Jira format.
Work item data (Automation format) - The format used by Jira Cloud automation components. Learn more about the automation format.
Custom format - Select this option to enter your own data format.
Hidden values
When configuring your web request, you can also Hide certain values, making them more secure. If a value is marked as hidden and the rule is saved, the value will be replaced by asterisks (i.e., *****). It will no longer be visible, and you won’t be able to inspect any payload. This can’t be reversed (i.e. the Hidden checkbox can’t be unselected), though the value itself can still be changed when editing your rule.
For security reasons, hidden values will be lost if the entire rule is duplicated or exported/imported, or if the Send web request component itself is duplicated. If this happens, you’ll need to reconfigure the component and re-enter those values.
Other things to note
Permitted ports: Note that the only permitted ports for urls from the Send web request action are 80, 8080, 443, 6017, 8443, 8444, 7990, 8090, 8085, 8060, 8900, 9900.
Data sensitivity: The Send web request action can be used to configured to sensitive data to third-parties. This is true even after the rule is saved, because someone with permission to edit the rule can reconfigure the Send web request action to send out data that they shouldn’t. For this reason, we recommend that before using this action, ensure that only people you trust can edit automation rules.
Transition work item
Use smart values here: Yes
Transitions a work item from one status to another, through a workflow.
You can select field to update as part of this transition, for example:
Copy from work item: copies the status from a related work items or a work item on a branch rule.
Copy from parent: for use with sub-tasks; copies the status from a parent.
Copy from Epic: copies the status from the work item’s associated Epic.
Copy from Trigger work item: copies the status from the work item that triggered the rule.
Same status (loop): for use when a transition exists from the current status back to itself; this can be used together with a screen to gather more data from users, e.g. an Escalate transition.
You can also copy attachments by selecting the Attachment field from the list of supported work item fields and then choosing the source work item from which attachments need to be copied. Select More options to display additional fields for advanced field editing.
For Jira Service Management, you can edit both Jira fields and Assets fields. Learn more about Assets in Jira Service Management.
When you set the Organizations field and choose Use reporter’s email domain, it checks only the domains explicitly added to an organization’s Manage email domains list. If the reporter’s domain:
Matches exactly one organization – that organization is automatically selected
Matches more than one organization – any one of the organizations associated with that email domain will be selected
Isn’t listed anywhere and you’ve selected Create organization if it doesn’t exist – a new organization will be created using the email domain as its name
Use Rovo agent
Use smart values here: Yes
Prompts an agent of your choosing on your behalf to generate a response. It must be coupled with a secondary action with text-based output, like Add comment, to direct the response to.
You’ll be asked to connect Rovo to automation to allow agents to act on your behalf. Connections are kind of like when you give a social media app permission to access your photos.
When setting up this action, you provide a prompt describing what the agent should analyze. For example:
Read and review the quality of the description field for this work item.
Add service space customer
Use smart values here: Yes
Adds new customers to your Jira Service Management space.
You can use smart values in all fields and add the customer to an existing organization.
Calling this action multiple times in quick succession will result in the first call succeeding and then subsequent calls failing due to the customer existing but not yet showing up in user search results. It can take up to 15 seconds for the new user to appear in searches and this to resolve itself.
The {{customer}} smart value will not return the existing user until they are available in the user search results and the action will result in an error.
If this work item is affecting your rule, you can introduce a delay into your rule by adding the Delay action right before the Add service space customer action.
Approve/Decline request
Use smart values here: No
Approves or declines a request in Jira Service Management, regardless of how many approvers are needed to proceed in the workflow.
You can use this action on Jira Service Management work items that are pending approval on the current workflow status. Approvals are managed through the workflow. Learn more about approvals in Jira Service Management.
Create incident
Use smart values here: Yes
Required permissions: Browse spaces, Create work items
When this action is executed, an incident of selected request type will be created in the selected service space on Jira Service Management. For example, you can use this action to create a new incident when a work item is created and meets certain criteria.
You'll also have the option to avoid creating a new incident if the action has already created an open incident of the same type in the space.
You need to have a service space and a request type for incidents to use this action.
Create version
Use smart values here: Yes
Creates a new version that you can assign work items.
If a version with the same name already exists, the version will not be created.
Create work item with a request type
Use smart values here: Yes
Creates a new issue in a Jira Service Management space using the selected request type.
All request types you’ve added to the service space can be used with this action. Learn how to organize your request types into portal groups
Similar to the Create work item action, this action allows you to configure any field available using smart values.
Available fields include all fields that are not hidden and added to the request type. Hidden fields aren’t supported, except for Major Incident, which is available for Premium or Enterprise plans.
Release version
Use smart values here: Yes
Releases a version.
By default, this action will release the next unreleased version of a space with the existing release date. This is determined by the order the versions are set in Releases.
You can select a specific version to release, and use smart values to set dynamic names.
Delete attachments
Use smart values here: Yes
Cleans up attachments using regular expression matches, based on the attachment filename.
Log action
Use smart values here: Yes
Logs a value to the audit log.
This action is useful when testing smart values, and debugging rules.
Re-fetch work item data
Use smart values here: No
Refreshes smart values with the latest field values.
By default, the {{issue}} reference is not updated during rule execution, and contains the same values as when the rule originally triggered.
Set entity property
Use smart values here: Yes
Sets entity properties on work items, spaces, and users related to the trigger work item of the rule execution.
These hidden properties can be used by apps for certain functions. Entity properties allow plugins to add key/value stores to work items and spaces. These values can be indexed and queried via REST API or JQL.
Unrelease version
Use smart values here: Yes
Unrelease a released version for a chosen space. By default, this will be the rule's space, but you can select More options to choose a different space.
Send message to Amazon SNS topic
Use smart values here: Yes
When this action is executed, a JSON message is sent to the selected Amazon Simple Notification Service topic.
You can add up to 10 key-value pairs to an action. If you’d like to add more, contact support.

Smart values can be used with all value types (String, List, Number, Boolean, and Custom). However, Custom only supports smart values.
Make sure that your Amazon SNS topic allows Atlassian Automation to publish messages. Learn more about configuring Amazon SNS.
Run AWS SSM document
Use smart values here: Yes
When this action is executed, the selected AWS Systems Manager document will be run. You can add values to the pre-configured parameters of the document.
Make sure that the IAM role has a Permission Policy allowing Atlassian Automation to access and run SSM documents. Learn more about configuring AWS IAM.
Enterprise plan: Pause the rule until a response is received from AWS SSM.
When enabled, the rule will resume if AWS SSM returns a success response within the specified duration (up to 15 minutes). Otherwise the rule will fail.
You can also configure the rule to resume after:
Failed response within the specified time
No response within the specified time
To access the payload from AWS SSM, use the {{awsSsm.output}} smart value.
To determine the status of the response, use the {{awsSsm.status}} smart value.
It will display either "success" or "failed."
In cases where no response is received, the value will be empty.
Restart Virtual Machine in Azure
Use smart values here: No
When this action is executed, the selected Virtual Machine in Microsoft Azure will be restarted by Atlassian Automation.
Make sure you’ve added Email in your Microsoft Azure profile information for authentication of the rule’s connection. Learn how to add or change profile information in Microsoft Azure
Enterprise plan: Pause the rule until a response is received from Azure Virtual Machine.
When enabled, the rule will resume if Azure Virtual Machine returns a success response within the specified duration (up to 15 minutes). Otherwise the rule will fail.
You can also configure the rule to resume after:
No response within the specified time
To determine the status of the response, use the {{azureVm.status}} smart value.
It will display either "success" or "failed."
In cases where no response is received, the value will be empty.
Start runbook in Azure
Use smart values here: No
When this action is executed, the selected runbook in Microsoft Azure will be started and run by Atlassian Automation. You can even add key-value pairs you want to include in the JSON message sent to Microsoft Azure.
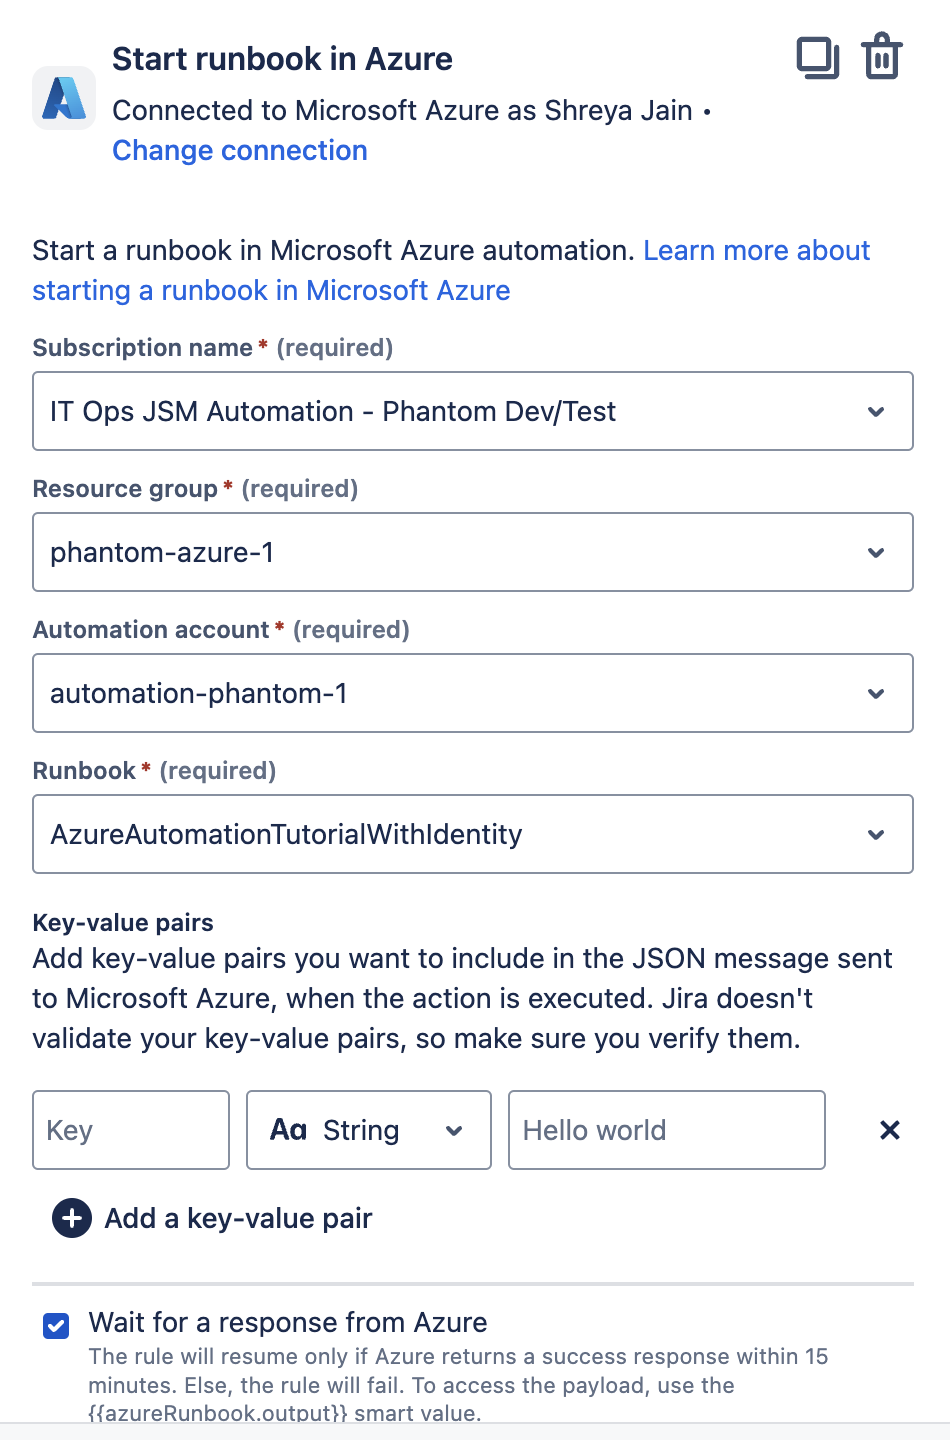
Make sure you’ve added Email in your Microsoft Azure profile information for authentication of the rule’s connection. Learn how to add or change profile information in Microsoft Azure.
Enterprise plan: Pause the rule until a response is received from Azure.
When enabled, the rule will resume if Azure returns a success response within the specified duration (up to 15 minutes). Otherwise the rule will fail.
You can also configure the rule to resume after:
Failed response within the specified time
No response within the specified time
To access the payload from Azure, use the {{azureRunbook.output}} smart value.
To determine the status of the response, use the {{azureRunbook.status}} smart value.
It will display either "success" or "failed."
In cases where no response is received, the value will be empty.
Add stakeholders to incident
Exclusive to Premium and Enterprise plans
Use smart values here: Yes
Adds selected users (with Jira Service Management agent and stakeholder role) as stakeholders to the incident. This ensures they receive timely updates and visibility into the incident’s progress.
Stakeholders can be added in several ways:
Manually from the incident view
Automatically through affected services (if those services have people assigned)
Through automation using this action, ensuring key people are always informed, regardless of service configuration
This action will run successfully only for Jira Service Management incidents.
Read more about stakeholders in Jira Service Management.
Create post-incident review
Exclusive to Premium and Enterprise plans
Use smart values here: Yes
Automatically creates a post-incident review (PIR) for the incident. This helps teams capture learnings and follow-up actions as part of the incident resolution process.
You can define the title and description of the PIR using smart values, or pull in fields from the original incident.
Without automation, post-incident reviews must be manually created in the incident view. This action ensures they’re generated consistently as part of your workflow.
This action will run successfully only for Jira Service Management incidents.
Read more about post-incident reviews.
Create Zoom meeting for incident
Exclusive to Premium and Enterprise plans
Use smart values here: Yes
Starts a Zoom meeting to help responders collaborate on the incident. This uses the Zoom account connected in your Jira Service Management space’s chat and video tools settings.
You can customize the meeting name using smart values. You also have the option to automatically attach the meeting recording to the incident as an internal note once it's available in Zoom.
The meeting will be created using the Zoom user token of the person who connected the Zoom account in your space settings. All meetings created through automation will use this token.
This action will run successfully only for Jira Service Management incidents.
To get started, connect your Zoom account and enable it in your space’s incident management settings.
Read more about creating Zoom meetings for incidents.
Create Slack channel for incident
Exclusive to Premium and Enterprise plans
Use smart values here: Yes
When this action is executed, a new Slack channel will be created in the selected Slack workspace, and incident responders get added to the channel automatically. All available incident details and actions will be posted to help your responder team catch up and take action quickly.
You can customize:
The channel name and description using plain text or smart values.
The Slack users to be added as channel members using smart values or email addresses.
The Slack apps to install in the channel using app IDs or smart values.
Find the app ID
You’ll need the app’s member ID to add it to a Slack channel using this action.
To find it:
Open Slack and go to the Apps section in the sidebar.
Select the name of the app.
In the app view, select the app name at the top to open the details panel.
Look for the Member ID field — this is the app’s ID.
By default, the channel’s name and description use the work item key, summary, and incident URL.
This action will run successfully only for Jira Service Management incidents.
To get started, connect your Slack workspace with your Jira Service Management instance and space. Read how to connect Slack with Jira Service Management.
Set channel topic for incident Slack channel
This action is available only for Jira Service Management’s Premium and Enterprise plans.
Use smart values here: Yes
Sets the topic of the Slack channel linked to the incident. Use smart values to update the channel topic when an incident is created or changed, so responders and stakeholders always have a quick context of the incident.
The channel topic supports emojis in Slack message format (for example : fire :), allowing teams to visually highlight incident status or urgency.
For this action to run successfully, the Slack channel must already be linked to the incident. The related Slack workspace must be connected from Jira Service Management > Settings () Jira admin settings > Operations > Chat and video tools.
This action will run successfully only for Jira Service Management incidents.
To get started, connect your Slack workspace with your Jira Service Management site and project. Read how to connect Slack with Jira Service Management
Add apps to Slack channel
Exclusive to Premium and Enterprise plans
Use smart values here: Yes
Adds selected Slack apps into the incident’s Slack channel. This can help enrich your response workflow with tools like monitoring bots, documentation apps, or integrations.
Slack channel must be linked to the incident.
You can customize which apps to add using smart values or by specifying app IDs. The Slack app must already be installed in the connected workspace to be added to the channel.
How to find the app ID
You’ll need the app’s member ID to add it to a Slack channel using this action.
To find it:
Open Slack and go to the Apps section in the sidebar.
Select the name of the app.
In the app view, select the app name at the top to open the details panel.
Look for the Member ID field — this is the app’s ID.
This action will run successfully only for Jira Service Management incidents.
To get started, connect your Slack workspace with your Jira Service Management instance and space.
Read how to connect Slack with Jira Service Management.
Send direct message on Slack
Use smart values here: Yes
Sends a direct Slack message to selected users when an incident occurs. This is useful for notifying responders or decision-makers privately about high-priority events.
You can customize the message content and recipients using smart values. To tag people in the message, use the format @{{smart_value}}.
This action will only run for Jira Service Management incidents.
To get started, connect your Slack workspace with your Jira Service Management instance and space.
Read how to connect Slack with Jira Service Management.
Send message on Slack channel
Use smart values here: Yes
Sends a message to the Slack channel linked to the incident. This can be used to automate incident updates, status changes, or next steps.
Personalize the message content using smart values to reference work item fields like summary, status, or time to resolution. To tag people in the message, use the format @{{smart_value}}.
This action will run successfully only for Jira Service Management incidents.
To get started, connect your Slack workspace with your Jira Service Management instance and space.
Read how to connect Slack with Jira Service Management.
Add members to Slack channel
Exclusive to Premium and Enterprise plans
Use smart values here: Yes
Adds specific users to the Slack channel associated with the incident. This can be used to automatically bring in subject matter experts or escalation contacts at different stages of an incident.
Slack channel must be linked to the incident.
You can define which users to add using smart values or enter them manually as Slack IDs or email addresses.
This action will run successfully only for Jira Service Management incidents.
To get started, connect your Slack workspace with your Jira Service Management instance and space.
Read how to connect Slack with Jira Service Management.
Add bookmarks to Slack channel
Exclusive to Premium and Enterprise plans
Use smart values here: Yes
Adds a list of bookmarks to the incident Slack channel created during the incident response. These bookmarks can point to key resources like dashboards, runbooks, or Confluence pages to help responders take action quickly.
Slack channel must be linked to the incident.
You can customize the bookmarks using plain text and smart values to define the name and URL of each link. Only valid URLs can be added as bookmarks.
This action will run successfully only for Jira Service Management incidents.
To get started, connect your Slack workspace with your Jira Service Management instance and space.
Read how to connect Slack with Jira Service Management.
Create Microsoft Teams chat or meeting for incident
“Use smart values here: Yes
When this action is executed, a new Microsoft Teams chat or meeting will be created in the selected Microsoft tenant, and incident responders will be added to the chat or meeting automatically. All available and relevant incident details and actions will be posted to help your responder team catch up and take action quickly.
You can customize the Microsoft tenant, the name and description of the chat or meeting, and the members to include. By default, the chat or meeting name and description use the work item key, summary, and URL of the incident.
Limitations and behavior:
For the chat or meeting name, only the work item key can be safely used as a smart value. Microsoft Teams doesn’t support special characters in chat names, so using the work item summary or URL may cause the rule to fail.
For members added to the chat or meeting, only the responders on the incident are included by default. If you want to add other users—such as stakeholders—you must explicitly include them in the "members" field of the automation rule.
This action will run successfully only for work items of an incident request type. Read about creating a request type.
To get started, connect your Microsoft tenant with your Jira Service Management instance and space. Read how to connect Microsoft Teams with Jira Service Management.
Run script using Jira Edge Connector
When this action is executed, the selected action in your on-prem system will be run via Jira Edge Connector.
You can add key-value pairs you want to include in the JSON message sent to the on-prem system. Jira doesn't validate your key-value pairs, so make sure you verify them.
Read how to use Jira automation with Jira Edge Connector.
Enterprise plan: Pause the rule until a response is received from JEC.
When enabled, the rule will resume if JEC returns a success response within the specified duration (up to 15 minutes). Otherwise the rule will fail.
You can also configure the rule to resume after:
Failed response within the specified time
No response within the specified time
To access the payload from JEC, use the {{jecAction.output}} smart value.
To determine the status of the response, use the {{jecAction.status}} smart value.
It will display either "success" or "failed."
In cases where no response is received, the value will be empty.
Change alert status
Exclusive to Premium and Enterprise plans
When this action is executed, the alert’s status is changed to a new status that’s selected by the user. You can change the status of the alert to ACKNOWLEDGED, OPEN, CLOSED, and SNOOZED.
When SNOOZED is selected, you get to pick a custom snooze duration (between 1 minute and 7 days) which also supports the date and time smart values.
Launch job template in Ansible
Exclusive to Premium and Enterprise plans
When this action is executed, the selected job template is launched in Ansible. If the job template requires additional information to be launched successfully, you can provide it in the action in JSON format.
Make sure you’ve created an application in Ansible Automation Controller, as you’ll need its token to connect it with Atlassian Automation. Read more about connecting with Ansible
Enterprise plan: Pause the rule until a response is received from Ansible.
When enabled, the rule will resume if Ansible returns a success response within the specified duration (up to 15 minutes). Otherwise the rule will fail.
You can also configure the rule to resume after:
Failed response within the specified time
No response within the specified time
To access the payload from Ansible, use the {{ansibleJobTemplate.output}} smart value.
To determine the status of the response, use the {{ansibleJobTemplate.status}} smart value.
It will display either "success" or "failed."
In cases where no response is received, the value will be empty.
Run a query in New Relic
Exclusive to Premium and Enterprise plans
When this action is executed, the given query is run in New Relic using NRQL. You can connect with New Relic using your user key.
Once connected you can provide the New Relic account ID and the query you wish to run in New Relic.
This action pauses the rule until a response is received from New Relic.
The rule will resume if New Relic returns a success response within 15 minutes. Otherwise the rule will fail.
You can configure the rule to still resume after:
Failed response within 15 minutes
No response within 15 minutes
To access the payload from New Relic, use the {{newRelicQuery.results}} smart value.
Delay
Exclusive to Premium and Enterprise plans
Use smart values here: No
When this action is added to a rule (before a condition or another action), it adds a time-based delay in between two components. The rule gets delayed by X amount of time before executing the next component in the rule.
Adding the delay component to a branch only delays the execution of the branch’s components and does not affect the rest of the rule.
A delay component can’t have more than 15 minutes or 900 seconds of delay. And the total amount of delay in a rule can’t be more than 60 minutes. This action is available only for Premium and Enterprise plans at the moment.
Delay until an alert event occurs
Exclusive to Premium and Enterprise plans
Use smart values here: No
The event-based delay action allows you to delay the execution of a rule up to 15 minutes until a specific event occurs on a related alert entity. The Alert smart values will be re-fetched before initiating the delay and after receiving the event. This feature is particularly useful in incident management scenarios, where it's crucial to validate that certain conditions or metrics are met before proceeding to the next step in a rule.
Supported events:
Priority changed
Status updated
Configuration:
Admins can choose which field (for example, Priority or Status) to monitor for changes. The rule will pause for up to 15 minutes until the specified event occurs on this field.
Define the condition that must be met for the event to trigger the continuation of the rule. Available conditions include:
Equals
Does not equal
Is one of
Is not one of
Select value:
Admins must also specify the value(s) that the event field must meet to trigger the rule continuation.
Rule execution:
The rule pauses up to the set delay time or until the specified event occurs, whichever happens first.
If the event does not occur within the set delay time, the rule resumes automatically, with slight latency in rare cases.
The rule won’t abort execution if the event doesn’t occur; it will continue after the delay.
Re-fetch alert data
Use smart values here: No
Refreshes the alert data with the latest actions so that subsequent actions can use the most up-to-date state of the alert.
By default, the {{alert}} reference is not updated during rule execution, and contains the same values as when the rule originally triggered.
This action runs in the background.
Was this helpful?