About Jira Product Discovery
Transform product ideas into business impact.
At the moment, two versions of this feature coexist in the product. This page corresponds to the old experience. If you are in the new experience please check this other page. We will be migrating all users to the new experience in the upcoming weeks.
To determine if you are in the old version, check the instructions below.
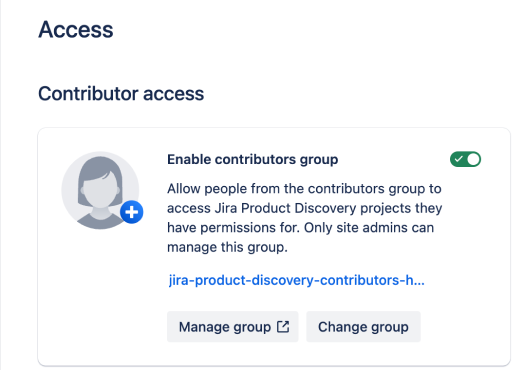
To determine if you are in the old version, go to > Products > Access. If you are in the old version, you will see an image like the one below.

This section defines the user roles within the product. Users with a license will use the product as creators and users without a license will use it as contributors.
The creator and contributor roles in Jira Product Discovery determine which features are available to each role.
Creator | Contributor |
Creator is a licensed user with product access to Jira Product Discovery. Can use all available features of Jira Product Discovery
| Contributor is an unlicensed user who doesn't require product access to Jira Product Discovery. Can, based on what creators make available
Cannot
|
You need to be a site administrator to perform the following actions.
On the upper right of the navigation bar, select > User Management > Directory.
Find the needed user, select the name, and then check what products and groups this person has access to.
To provide product access, click Grant access > Jira Product Discovery, and then from the dropdown, select User > Grant access.
If the user only has access to Jira Product Discovery, they aren’t billed under the Atlassian Guard Standard policy.
Contributors must meet one of the following criteria:
Have product access to Jira or Jira Service Management.
Be a member of the contributors group.
To make sure that users are contributors, you should check:
Whether the user has product access to a Jira product:
On the upper right of the navigation bar, select> User Management > Directory.
Find the needed user, and then select the name. They are a contributor by default if they have product access to Jira or Jira Service Management.
Whether the user is added as a member of the contributors group:
On the upper right of the navigation bar, select> User Management > Directory
Find the needed user, and then select the name.
If the user is not added to the contributors group, select Add to groups, and then add the user to the Jira Product Discovery contributors group: jira-product-discovery-contributors-xxx.
If the user only has access to Jira Product Discovery, they aren’t billed under the Atlassian Access policy.
To start adding users as contributors, make sure to enable the contributors group first.
On the upper right of the navigation bar, select> Products, and then on the left sidebar, select Access under Jira Product Discovery.
Enable the contributors group so the users can access Jira Product Discovery projects as contributors.
Don't add product access to Jira Product Discovery to this group, otherwise every member of this group will consume a license. This group is special and recognized by Jira Product Discovery as the source of the list of contributors.
By default, contributors can’t create ideas, but creators can enable contributors to do so.
Open the needed Jira Product Discovery project.
Go to Project settings > Features > Create ideas > Allow contributors to create ideas.
Once the feature is enabled, contributors can create new ideas by clicking the Create button on the top navigation bar. They are prompted to write a summary and description of the idea. However, you can request additional information from the user by following the steps outlined in the next section.
You can configure the fields the users should fill in when creating a new idea. The customization of an idea form allows to capture all necessary information.
You need to be a project admin to make the changes.
To customize an idea form, open the needed Jira Product Discovery project.
Under Views, click + Create a view > Create a new list. Name your list, and then click Fields to select the ones you want to appear on the idea form.
Go to Project settings > Features > Create ideas.
Under Select a view, select a newly created view from the dropdown list, and then check what fields have been added to the idea form in the Preview form. You can also use a default view or other views from the list as they reflect the views available in your project.
Optionally, mark all fields as mandatory to fill in.
Under Select a template, select a template for the description field, or create a custom description template by clicking + Create a template.
Additionally, select Preview in project to check how users will see the idea form.
Was this helpful?