How to create an application tunnel link between Bamboo Data Center in a Kubernetes Cluster and Jira Cloud
Platform Notice: Data Center Only - This article only applies to Atlassian apps on the Data Center platform.
Note that this KB was created for the Data Center version of the product. Data Center KBs for non-Data-Center-specific features may also work for Server versions of the product, however they have not been tested. Support for Server* products ended on February 15th 2024. If you are running a Server product, you can visit the Atlassian Server end of support announcement to review your migration options.
*Except Fisheye and Crucible
Summary
Creating a tunneled application link between Bamboo Data Center in a Kubernetes cluster and Jira Cloud is an excellent solution for customers whose Kubernetes cluster services are not accessible from the internet. In some cases, organizational policy prevents network administrators from whitelisting specific domains and IP address ranges, which is necessary to ensure Atlassian Cloud products and other services work as expected. This page describes how to achieve this using the following steps:
Installing application tunnels from Atlassian Marketplace.
Configuring the required connection and upstream port using Helm charts.
Creating the application tunnel to your self managed instance.
Creating a tunneled application link between Bamboo Data Center in a Kubernetes cluster and Jira Cloud.
Environment
The following steps have been validated in Bamboo Data Center 9.4.2 and 9.6.3 but may be applicable to other versions.
Solution
These steps assume there has been a successful installation of Bamboo on the Kubernetes cluster using Helm charts.
Now that we have a running Bamboo Data Center instance, we will start with the first step.
Step 1: Installing application tunnels on the Bamboo Data Center instance.
Using the steps from the documentation provided by Install application tunnels from Atlassian Marketplace, we will need to install the application tunnel on the Bamboo instance.
In the upper-right corner of the screen, select Administration>Overview.
Go to Manage Apps > Find new apps.
Search for "Application tunnels".
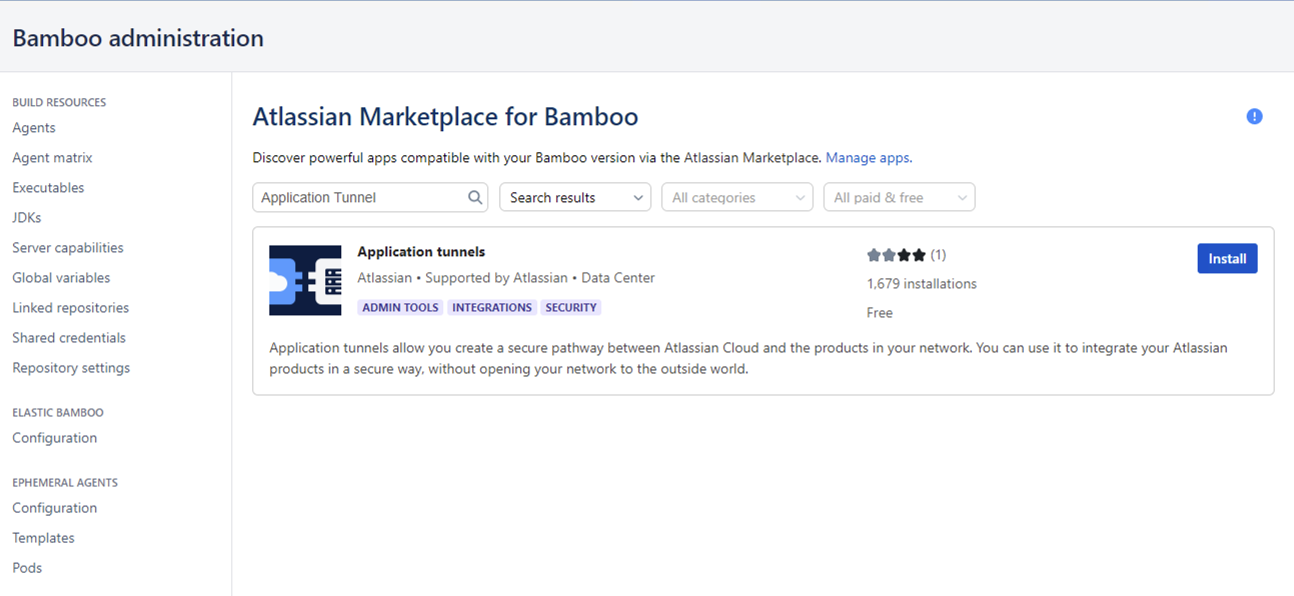
Click on the Install button.
You should get the following message after a successful installation.
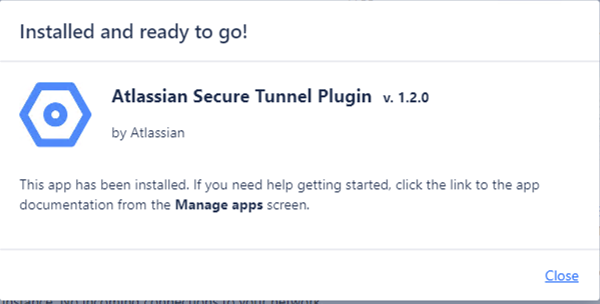
Once you install the app, you'll see a new page in Administration > Application tunnel.
Step 2: Configuring the required connection and upstream port using Helm charts.
To do this, we will modify the Helm chart values file and create a new Kubernetes ConfigMap. Before we do that, let's examine our Bamboo installation.
We will require an HTTP connector and an upstream port. I'll be choosing 8093 as my upstream port; please choose your preferred port based on availability.
We need a JVM parameter as shown below to configure the upstream port:
-Dsecure.tunnel.upstream.port=8093We also need to add a new connector port to the Apache tomcat's server.xml file as shown below:
<Connector port="8093" connectionTimeout="20000" maxThreads="200" minSpareThreads="10"
                   enableLookups="false" acceptCount="10" URIEncoding="UTF-8" />
You can view the Apache tomcat's server.xml file in the running Bamboo instance using the command below:
kubectl -n <namespace> exec -it <bamboo-pod> -- cat /opt/atlassian/bamboo/conf/server.xmlThe content of the server.xml can be copied out using the command below:
kubectl -n <namespace> cp <bamboo-pod>:/opt/atlassian/bamboo/conf/server.xml server.xmlNow modify the server.xml file to include the additional connector as shown below:
...

 </Connector>
    <Connector
               port="8093"
               connectionTimeout="20000"
               maxThreads="200"
               minSpareThreads="10"
               enableLookups="false"
               acceptCount="10"
               URIEncoding="UTF-8" />
    <Engine name="Catalina"
            defaultHost="localhost">

      <Host name="localhost"
            appBase="webapps"

...
Now that we have modified our server.xml file to include the HTTP connector, we will make it a Kubernetes ConfigMap and mount it on the pod by using the mount path/opt/atlassian/bamboo/conf/server.xml. We will be using the command below to create the Kubernetes ConfigMap:
kubectl -n <namespace> create configmap custom-server-xml --from-file server.xml=server.xmlNow we will modify the Helm Chart values file to include the new Kubernetes ConfigMap and the additional JVM argument for the upstream port:
...

  #
  additionalJvmArgs:
    - -Dsecure.tunnel.upstream.port=8093

 ...
#
additionalFiles:
   - name: custom-server-xml
     type: configMap
     key: server.xml
     mountPath:  /opt/atlassian/bamboo/conf
#

...
It is important to note that adding additional connectors in the server.xml file can also be done by using Additional ConfigMaps or Custom server XML.
Now we can proceed to upgrade the Helmrelease using the command below:
helm upgrade <release_name> atlassian-data-center/bamboo -n <namespace> -f <values-file>Once the Bamboo instance is up and running, use the command to verify the new server.xml file:
kubectl -n <namespace> exec -it <bamboo-pod> -- cat /opt/atlassian/bamboo/conf/server.xmlOnce this is verified, we can proceed to the next step.
Step 3: Create the application Tunnel to your self-managed instance
Before you begin
Make sure you’ve prepared your self-managed instance by completing the steps described in Install application tunnels from Atlassian Marketplace and Configure required connections and upstream ports.
In admin.atlassian.com, you can create up to 100 tunnels, each going to a different self-managed instance. However, each self-managed instance can receive only one tunnel. You can still link multiple Atlassian Cloud products to this single tunnel.
You’ll generate a security key for each tunnel. If you’d like to regenerate it later or set up automatic key rotation using APIs, see Regenerate security key and Set up automatic key rotation.
Using the Create an application tunnel to your self-managed instance, create a tunnel from admin.atlassian.com:
Go to admin.atlassian.com, and select your organization.
Go to Settings > Application tunnels.
Select Create tunnel.
A page providing more details about application tunnels will open up, select Create tunnel.
A create tunnel page will open, provide your preferred tunnel name and your Bamboo Base URL as shown below:

Select Next.
Copy the security key and proceed. If the Kubernetes instance can only be reached on a private network, you will likely get a redirection error.
Now go to your Bamboo instance's Administration > Application tunnel.
Select Add security key.
Your application tunnel should have the new tunnel in the CONNECTING status as shown below:

Your tunnel is created. Wait until its status changes to CONNECTED. You can refresh the pages until they are showing CONNECTED:


Now Bamboo has transitioned from CONNECTING to CONNECTED.
Step 4: Creating a tunneled application link between a Bamboo Data Center in a Kubernetes cluster and Jira Cloud
Using the steps in the Create a tunneled application link page, we will proceed to create an application link between a Bamboo Data Center instance in a Kubernetes environment and Jira Cloud.
Before you begin
Before you can create a tunneled app link, you need to complete these steps:
Open your Atlassian Cloud product's administration page and navigate to application links. This is different from admin.atlassian.com, each product has its own administration.
Jira Cloud: Go to Administration > Products > Application links.
Create a link as shown below:

The Create link page will appear as shown below, select the Tunneled application link and choose the name of the application tunnel created earlier:

The Confirm URL page will pop up with URLs of the tunnel and the Display URL of the Bamboo instance as shown below:

Select Continue.
The Review link page will open. Check the "I am an administrator on both instances" option. This will allow the Bamboo admins and Jira Cloud admins to collaborate without exchanging credentials.
Select Continue. You’ll get a pop-up with a URL.
This URL should be copied and shared with the administrator.
Open the URL on a browser where the Bamboo instance can be accessed.

Select Continue.
The application links status in Jira Cloud and Bamboo Data Center will have a CONFIG ERROR statusas shown below:


To fix this, edit the application link in your Atlassian Cloud product. Set the local authentication to OAuth for both incoming and outgoing communication.

Now click Save Changes.
The status should now be CONNECTED for the Bamboo Data Center instance and the Jira Cloud instance as well.


You can verify that the application link was correctly created by viewing its details on the Jira Cloud and Bamboo Data Center instances.
Was this helpful?