Integrating OAuth 2.0 for Google Accounts on Jira
Platform Notice: Data Center Only - This article only applies to Atlassian apps on the Data Center platform.
Note that this KB was created for the Data Center version of the product. Data Center KBs for non-Data-Center-specific features may also work for Server versions of the product, however they have not been tested. Support for Server* products ended on February 15th 2024. If you are running a Server product, you can visit the Atlassian Server end of support announcement to review your migration options.
*Except Fisheye and Crucible
Summary
On Jira Software or Jira Service Management Server and Data Center versions, the Email configuration shows a waring that says "This authentication method is deprecated, you should use OAuth 2.0 instead. Learn more".
Diagnosis
On service management project settings page, click Email Requests and there is a warning that says "This authentication method is deprecated, you should use OAuth 2.0 instead. Learn more". Elsewhere, under system menu on Jira administration, click Incoming Mail, then Add Mail Server and select Password (basic authentication) from Authentication method. This shows a warning "We recommend selecting OAuth to authenticate to this mail server. Basic authentication using only a password is planned to be deprecated by Microsoft and Google. Learn more".
Cause
Google and Microsoft are planning to disable using password as an authentication method. Once this method is disabled, you will not be able to connect to your Gmail or Microsoft Exchange Online. This means you wouldn’t be able to use these providers (Gmail, Microsoft Exchange Online) to let users create issues and comments from emails if you were authenticating using basic auth. To fix this, you need to configure the OAuth 2.0 integration with these providers, and then update the configuration of your mail servers.
Solution
Configure OAuth 2.0 integration and select it as your authentication method (learn more about OAuth 2.0 integration). It involves setting up an application registration at the provider side and integrating the same on Jira. The steps below are for the integration of Gmail accounts on Jira and it provides a general guidance to the app registration on Gmail as well. Gmail specific steps may get changed side and at this time of writing this KB article, the relevant Google link is here.
Before you begin
You need to ensure the following:
Your server needs to run over HTTPS. If it doesn’t, you will not be able to configure OAuth 2.0.
Your base URL needs to be configured correctly. This is important as the redirect URL you’ll need to provide is based on Jira’s base URL.
Port 443 needs to be open for outgoing and incoming connections since the OAuth 2.0 authentication uses https connections.
IMAP or POP port (depending on the connection protocol) needs to be open for outgoing connections.
ℹ️ You can use the same OAuth2 configuration to authenticate all the users if you have multiple mail servers. This applies if the users are from the same tenant. Otherwise, you would need to have an additional OAuth2 configuration.
Creating OAuth 2.0 Integration for Gmail
From Jira v8.22 onwards, the OAuth 2.0 Integration has been moved from global Jira administration "System" menu to "Application Links" menu. The Jira specific steps are explained in this documentation page for Jira version above 8.22 and in this documentation page for Jira version below 8.22. The steps are common from #2 onwards.
1. Add a New Integration
For Jira versions above 8.22.0.
In the upper-right corner of the screen, select Administration ⚙
> Applications.
Under the Integrations (the left-side panel), select Application links.
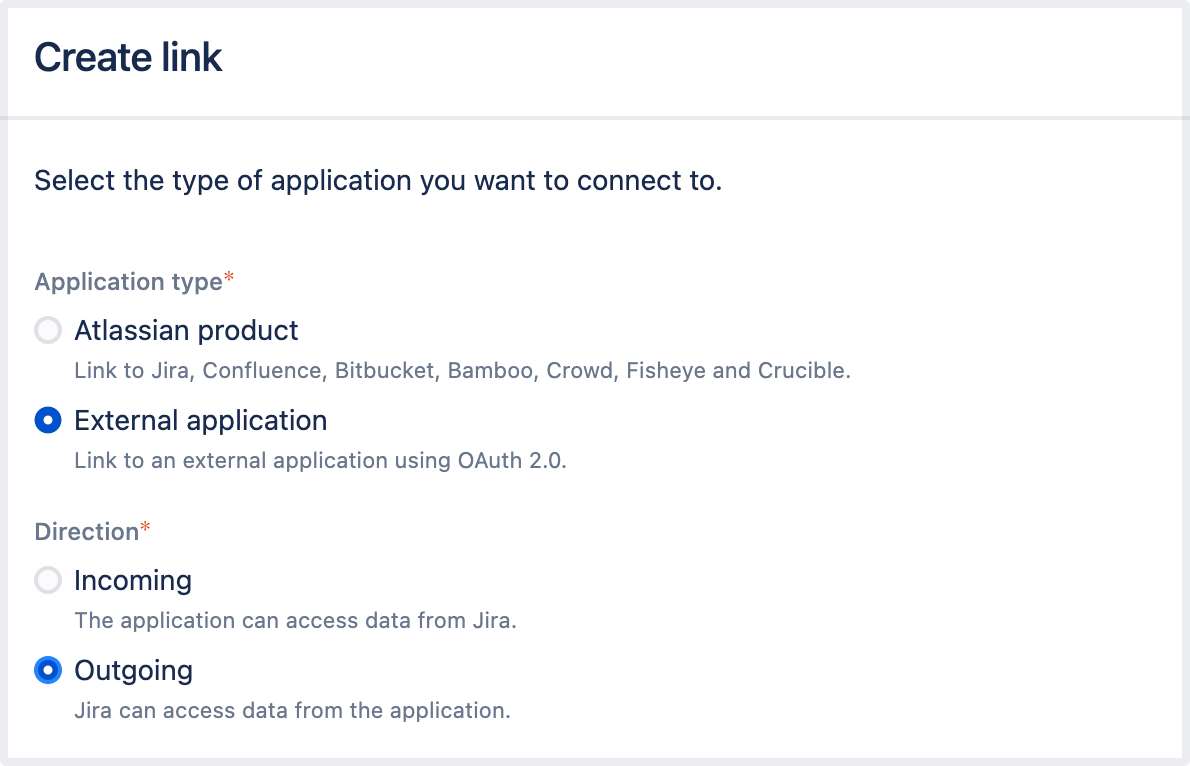
Select Create link.
In a new dialog that opens, select External application, and then choose Outgoing as the direction. Do not get confused by the selection of Outgoing here - Jira acts as a client to the application and hence, the outgoing is selected even for Incoming mail server.
For Jira versions below 8.22.0.
In the upper-right corner of the screen, select Administration ⚙
> System.
Under the OAuth 2.0 (the left-side panel), select Add New Integration.
2. Configure your Integration
For this integration, choose Google as the service provider and some fields will be pre-filled for you. Enter a friendly name for the integration and Click Copy at the Redirect URL field.
3. Register your external application on Gmail.
The content on this page relates to platforms which are not supported. Consequently, Atlassian Support cannot guarantee providing any support for it. Please be aware that this material is provided for your information only and using it is done so at your own risk.
Go to the service provider (Google) to generate the data to enter on Jira site to complete the integration.
Open the API Library in the Google API Console. If prompted, select a project, or create a new one. You can find the selected project at the left side of top panel.
The API Library lists all available APIs, grouped by product family and popularity. If the API you want to enable isn't visible in the list, use search to find it, or click View All in the product family it belongs to.
Find the Gmail API and click Enable
From the main menu, select API & Services > credentials. Click Create credentials > OAuth client ID.If you do not have an app already registered, you will be given a warning 'To create an OAuth client ID, you must first configure your consent screen'. Click Configure Consent Screen, provide necessary details and then click Save and Continue.
Under the Scopes tab, click Add Or Remove Scopes. Search for https://mail.google.com/ under the filter, select the same from results and click Update. If you do not find this scope under the filter, it's generally because Gmail API is not enabled under this project. Go back to the project, enable Gmail API and refresh the scope page to find the API again.
In the next screen, add users who will be using this API - generally it will be the mailbox account you're configuring for Jira.
Save OAuth Consent Screen and go back to Create credentials > OAuth client ID.
Select Web application under "Application type"
Under the "Authorized JavaScript origins", insert Jira baseURL.
Under the "Authorized redirect URIs", insert the redirect URL copied from Jira. Click Create.
Copy the client ID and Client Secret.
4. Provide remaining application details on Jira
Provide the remaining details. Here you can find descriptions for all the fields.
Name | Description |
|---|---|
Client ID | The client ID that's generated by the external application after registering Jira’s Redirect URL (from step #3 above). This is the public identifier of the application. |
Client secret | The client secret that's generated by the external application after registering Jira’s Redirect URL (from step #3 above). This is the shared secret between Jira and the application, which ensures the authorization is secure. |
Scopes | The required OAuth 2.0 scopes (permissions) that control what Jira can do in the external application. You need to specify different scopes for email servers. Learn more about scopes. For Gmail, the scope to add is https://mail.google.com/. When you paste this scope, it asks you on a pop up to create the scope. Click create. |
Authorization endpoint | The HTTPS URL where authorization to use OAuth 2.0 is started (pre-filled). |
Token endpoint | The HTTPS URL where refresh token requests are sent. As OAuth 2.0 tokens have an expiry, Jira will periodically update the token (pre-filled). |
Redirect URL | The Redirect URL that must be registered in the external application to obtain its client ID and client secret. This redirects the authentication flow back to Jira (pre-filled). |
5. Save your Integration
After you save the configuration, it will appear on the application links menu (for Jira above v8.22) or under OAuth 2.0 on Jira administration system menu (for Jira below v8.22).
Click Test connection to make sure the connection works. Once connection is tested successfully, you will be able to select this newly created integration when configuring mail servers or Jira Service Management email channels.
Using your Integration
When configuring "Email Settings" under project settings, you can select newly created OAuth 2.0 under the authentication method.
When configuring "Incoming Mail" under Jira global system administration menu, click "Add Mail Server" and you can select newly created OAuth 2.0 under the authentication method.
When configuring "Outgoing Mail" under Jira global system administration menu, click "Configure new SMTP mail server". Under the "Service Provider" field, select "Google Apps/Mail". At the "Authentication method" field, select the new server newly created OAuth 2.0. If you find SocketTimeOut errors, use "Custom" instead of "Google Apps/Mail" (host name "smtp.gmail.com" & port 587 with the Oauth2.0 authentication method).
⚠️ OAuth 2.0 for SMTP outgoing mail servers is supported only in Jira 9.2 and above.
ℹ️ For troubleshooting OAuth2.0 integration issues with Jira global mail handlers or Jira Service Management mail handlers , please refer to our troubleshooting guide
Was this helpful?