Automate follow-ups in Jira Service Management Cloud
Platform Notice: Cloud Only - This article only applies to Atlassian apps on the cloud platform.
Summary
Learn how to automate reminders for inactive requests in three stages using two approaches.
Solution
Approach 1: Use an Automation schedule trigger
Prerequisites:
First reminder date and Second reminder date are date-type custom fields that need to be created and added to the project's relevant screens
The first reminder flag is a custom field of the type single-select dropdown that needs to be created with two values: Yes and No
Set the default value to No
Select the Trigger: Scheduled
Use the option "Run a JQL search and execute actions for each work item in the query" and select all the requests in a particular status that you want to process for inactivity reminders
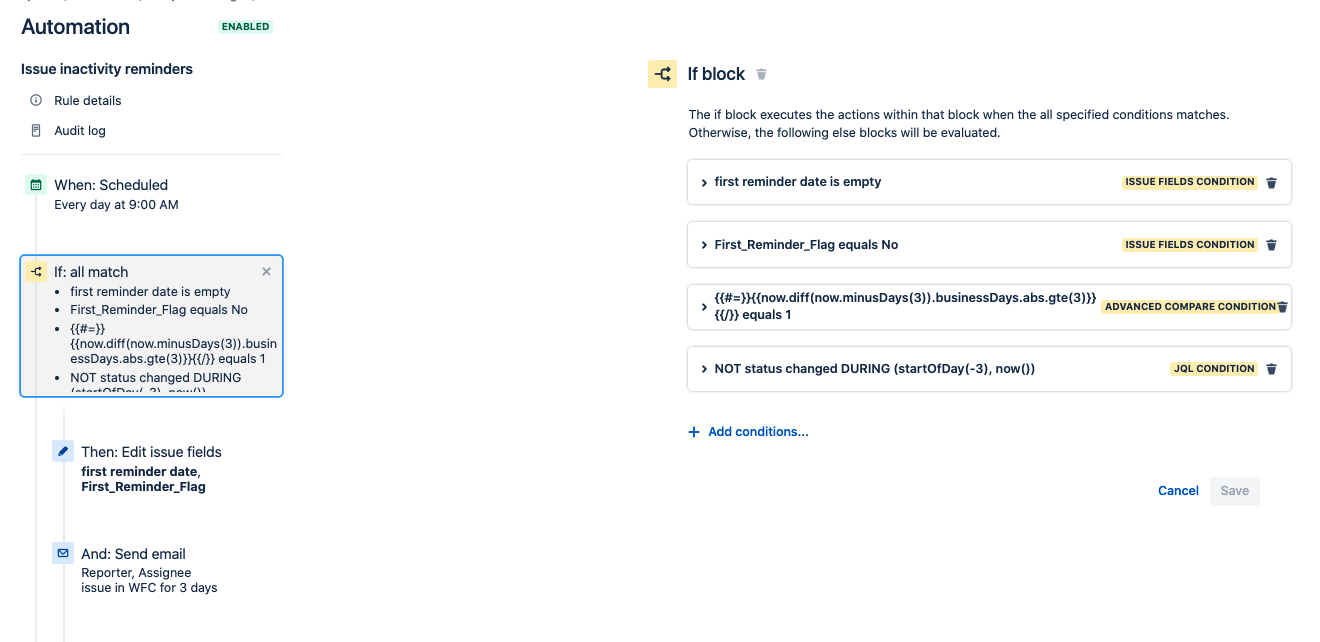
Add a Condition: IF or ELSE
Inside the IF branch:
Select to Run actions if all conditions match
Work item fields condition: "First reminder date" is empty
Work item fields condition: "First reminder flag" equals No
Condition: {{smart values}} condition:
{{#=}}{{now.diff(now.minusDays(3)).businessDays.abs.gte(3)}}{{/}}equals 1This will pick up the requests that are due for the first reminder and have been inactive for three days in that particular status
JQL condition: "NOT status changed DURING (startOfDay(-3), now())"
Action: Edit work item
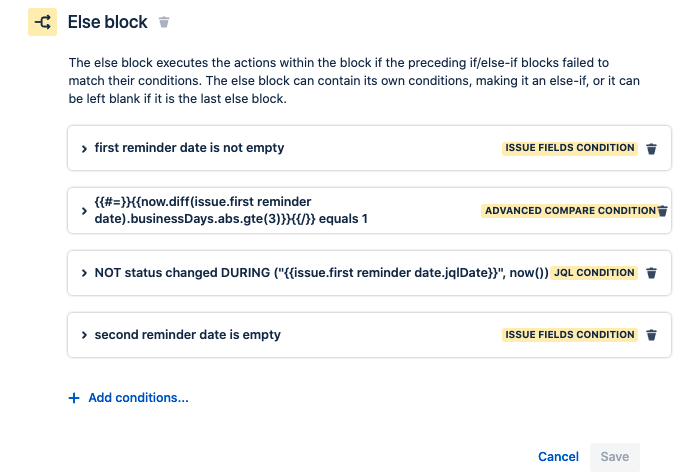
Add a new ELSE-IF block, which will pick up the requests that have been inactive for three days since the first reminder:
Work item fields condition: "First reminder date" is not empty
Advanced compare condition:
{{#=}}{{now.diff(issue.first reminder date).businessDays.abs.gte(3)}}{{/}} equals 1JQL condition: NOT status changed DURING ("{{issue.first reminder date.jqlDate}}, now())
Work item fields condition: "Second reminder date" is empty
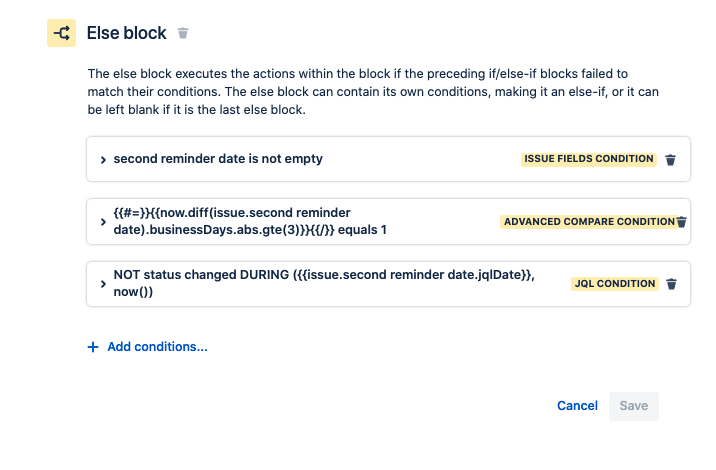
Add a new ELSE-IF block, which will pick up the requests that have been inactive and in the same status for three days after the second reminder
Work item fields condition: "Second reminder date" is not empty
Advanced compare condition:
{{#=}}{{now.diff(issue.second reminder date).businessDays.abs.gte(3)}}{{/}} equals 1JQL condition: NOT status changed DURING {{{issue.second reminder date.jqlDate}},now())
Please see screenshot examples of the three If block conditions as they appear in the automation editor below:
First If block:
Second If block:
Third If block:
Approach 2: Using Automation and Service Level Agreements (SLAs)
You can create SLAs that start when a request is moved to the specified status and breach after the specified number of days when you want to perform the follow-up or auto-closure.
In the below example, we describe how to create an automation rule to auto-close the ticket after three days when the agent/user changes the status to Resolved and doesn't get a reply from the customer.
Step I: Create an SLA that starts when the status is set to Resolved and breaches after three days
Go to Project settings > SLAs
Select Add SLA, and in the field next to the clock icon, enter a new name for the SLA "Waiting for closure"
Scroll down to the Conditions section
Under Start counting time when, choose a condition/statuses on which SLA needs to start: Entered status: Resolved or Resolution: Set
Under Finish counting time when, choose the condition/statuses on which you want to stop the SLA: Entered status: Waiting for support, Closed
Under Time Goal, set the goal as the required amount of time in hours/min when you want the auto-closure to be done; say for three days, specify 72h
Select the Calendar: 24/7 calendar or 9-5 Weekday calendar
Use 24h(3-days) in Time Goal if the 9-5 weekday calendar is selected
Create a custom calendar to pause the SLA on weekends and holidays
Add Work items to display (in JQL) to filter the tickets
Click Save to save the SLA configuration
It will look something like the following screenshot:
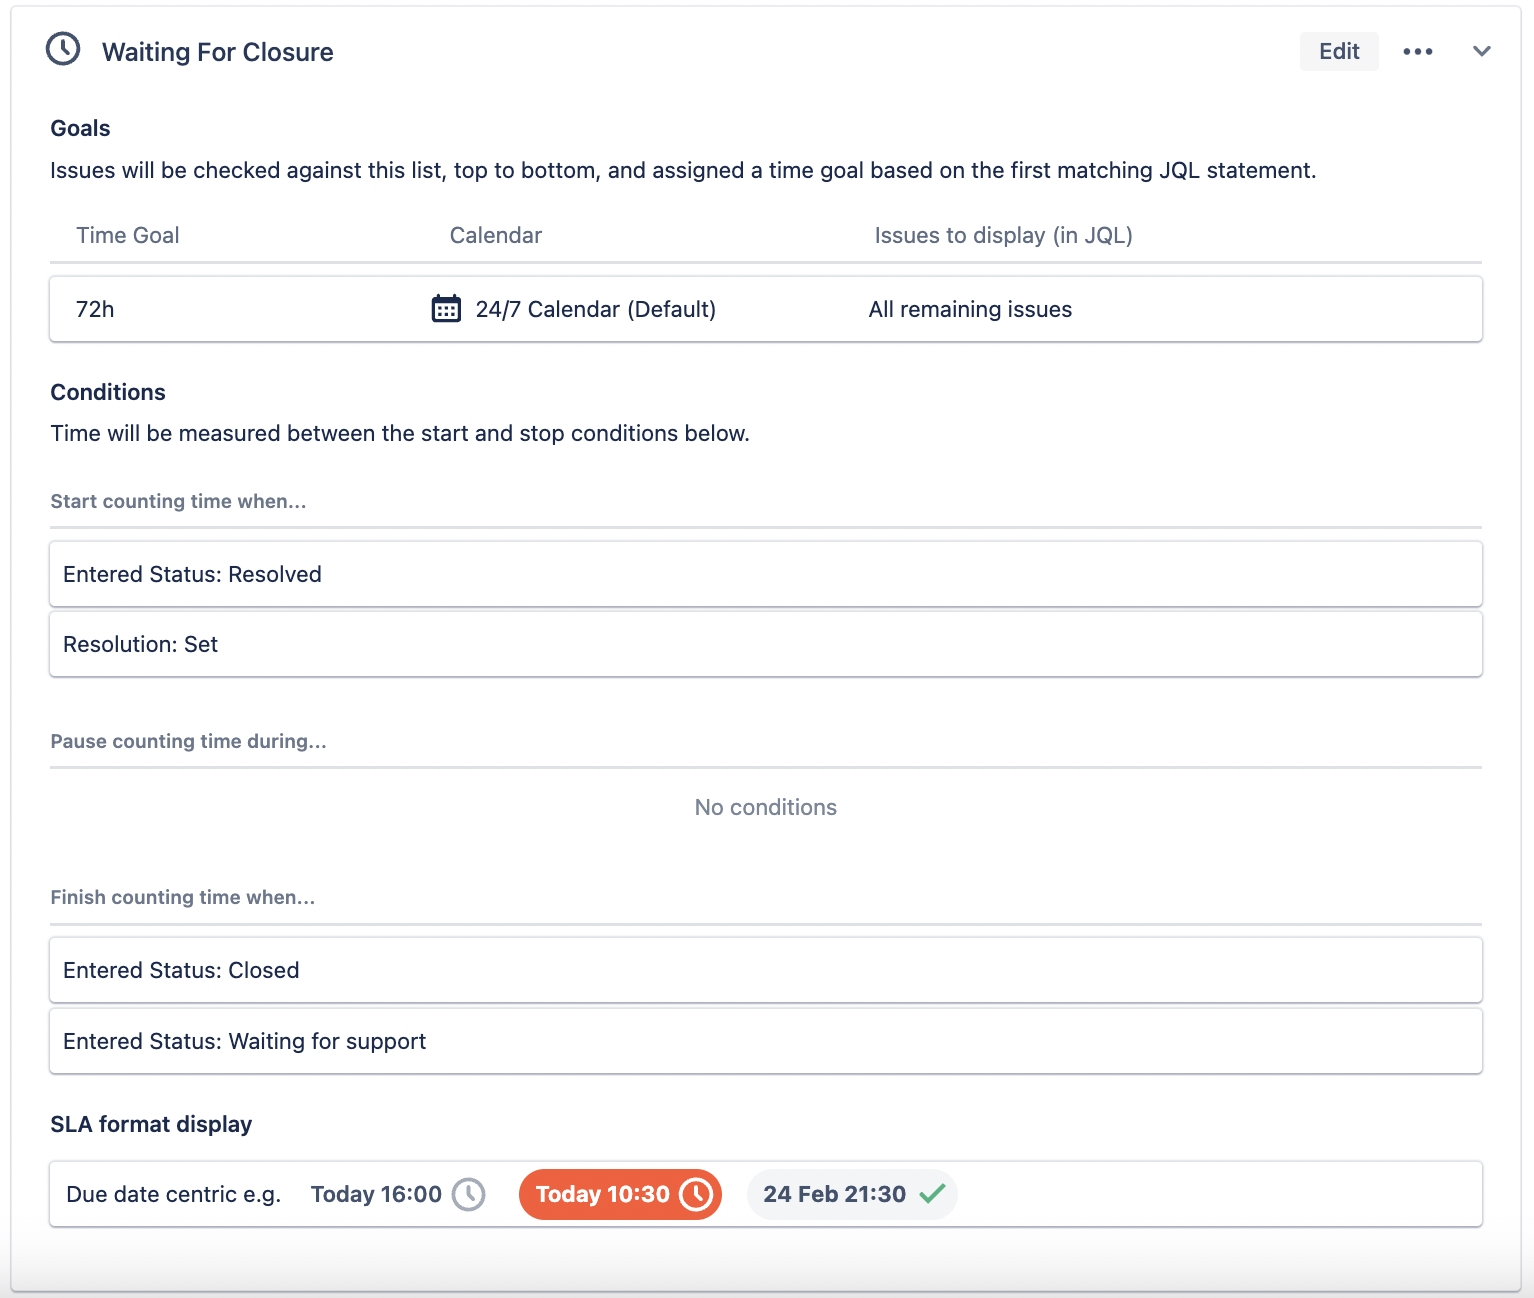
This SLA clock will start when the ticket is moved to the Resolved status.
Step II: Create an Automation rule to auto-close this ticket when the SLA breaches
Go to Project settings > Automation > Create Rule
Select the trigger as "SLA threshold breached" and choose the SLA "Waiting for closure"(created in Step I)
The option breached should be selected by default under "Trigger when SLA has"
Select Action as Comment on work item and change the visibility to Share with customer
You can use smart values to access work item data, such as reporter information, in the comment
Select Action as transition work item to Closed status
Publish the rule
Notes:
If you would like to send reminders before auto-closure, you can create separate SLA and automation rules similar to as described above
Using this approach, you can add Holiday dates in calendar to send notifications only on business days
Was this helpful?