How to trigger the “User Created” automation rule using system webhooks
Platform Notice: Cloud Only - This article only applies to Atlassian apps on the cloud platform.
Summary
Managing user accounts in Jira is an important task, and there are cases where administrators may want to trigger automation rules when a new user is created.
Currently, there is an open feature request to add a “User created” automation trigger: https://jira.atlassian.com/browse/AUTO-1254.
We recommend that you vote for and watch this suggestion to help us prioritize adding a built‑in trigger for this functionality.
Solution
In the interim, you may utilise our System Webhook to initiate a webhook whenever a user account is created. Within the Jira automation, the “Incoming Webhook” trigger will be utilised to capture the details from the System Webhook. The configurations for each setup are provided below for your reference.
Automation for Jira
Setting Up Automation with Incoming Webhook
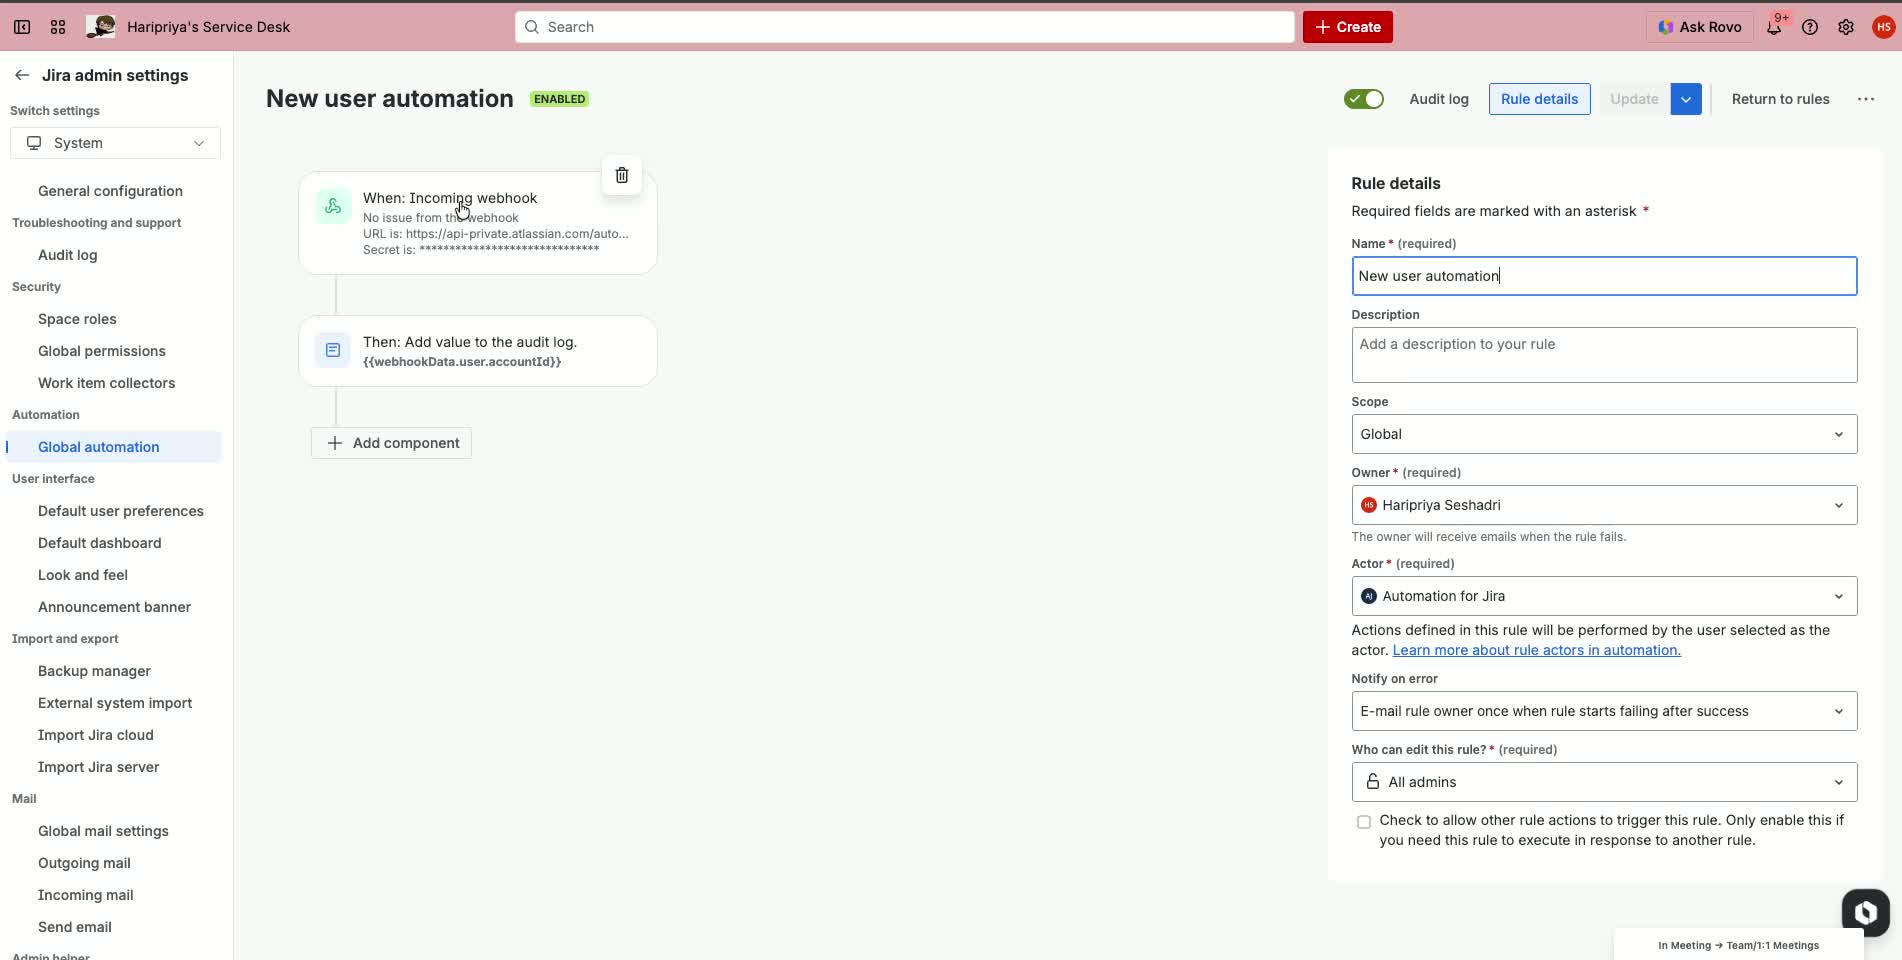
Create an automation rule with an incoming webhook trigger.
Note that data will not be available until the rule is turned on.
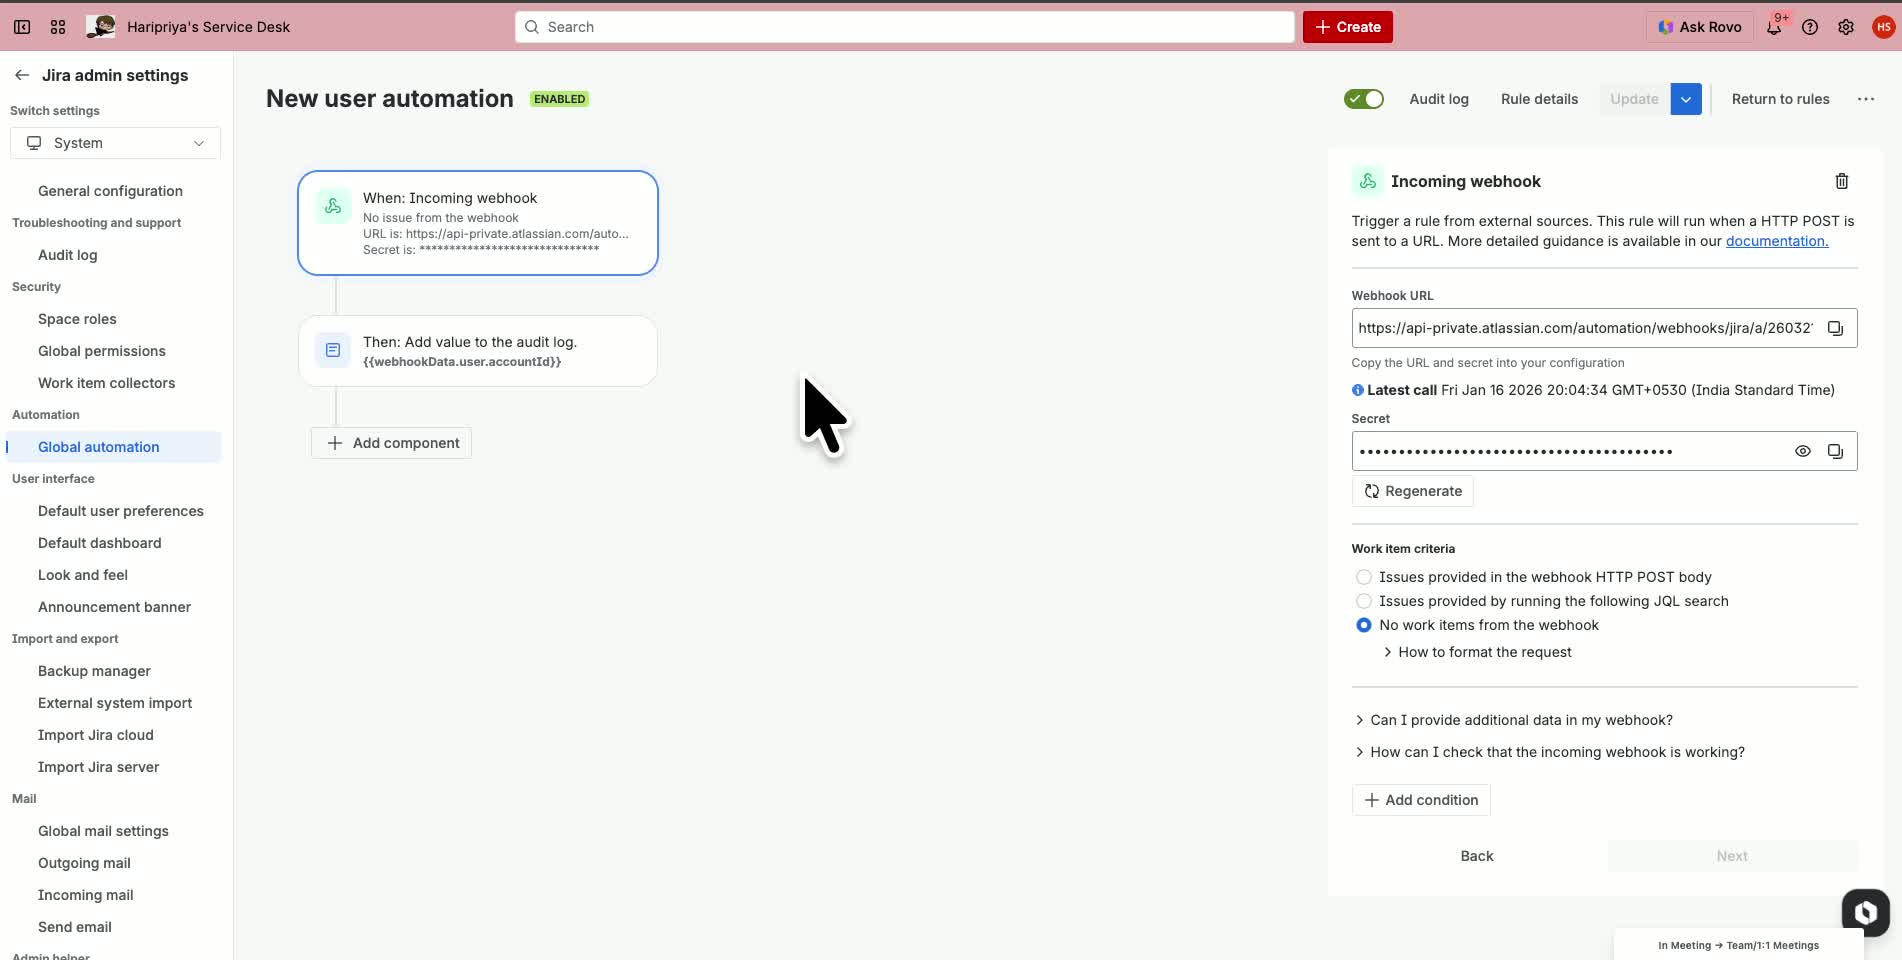
The trigger will contain a Webhook URL and Secret, which is supposed to be used in the System Webhook.
Choose the “Work Item criteria” as “No work items from the webhook” as we are fetching the user details.
System WebHook
Go to the 'System' section.
Locate the 'WebHooks' option under the Advanced section.
Create a new webhook and name it, for example, 'User Created event'.
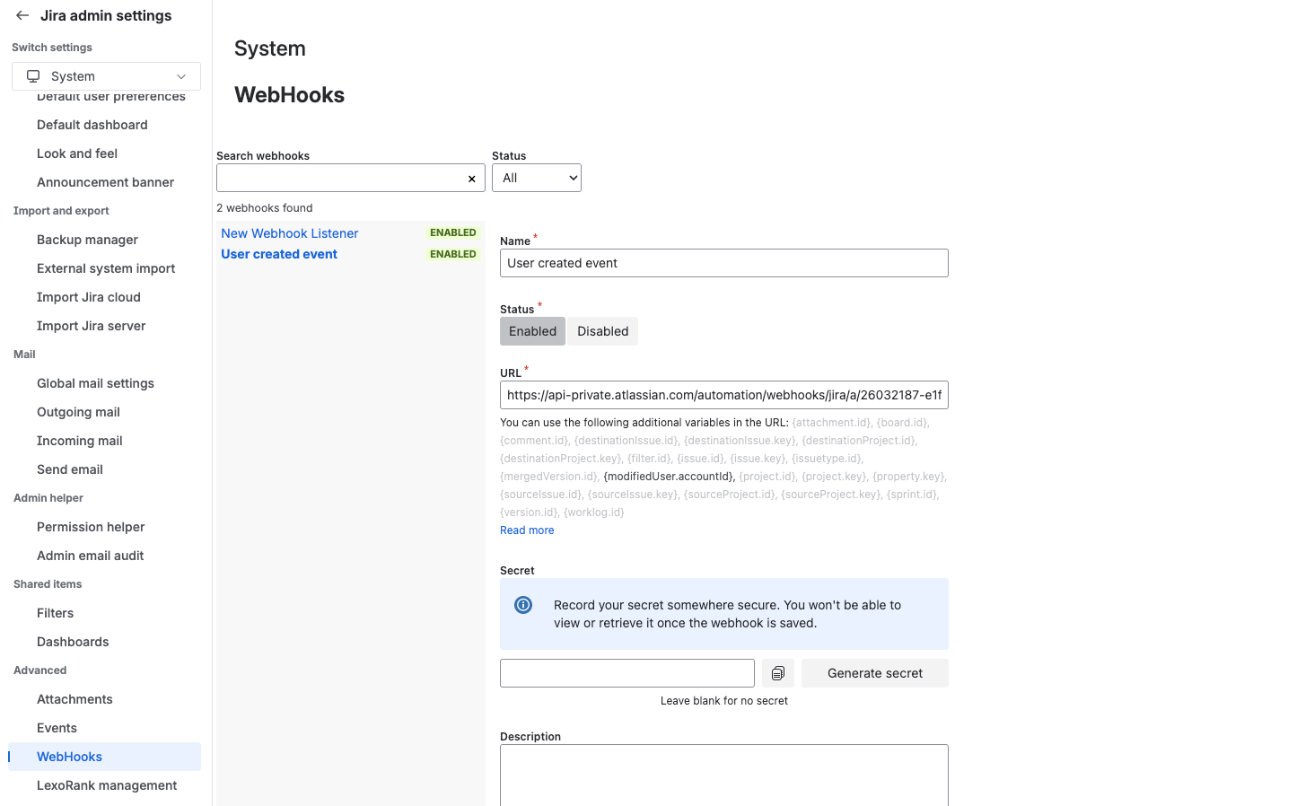
Copy the Incoming Webhook URL from the Automation trigger and paste it in the URL field.
Add the Secret from the Automation to the end of the URL with a / added before the secret.
Example:
Incoming Webhook URL (from Automation):
https://api-private.atlassian.com/automation/webhooks/jira/a/00000000-aaaa-bbbb-cccc-123456789abc/00000000-aaaa-bbbb-cccc-123456789abcSecret (from Automation):
xxxxxxxxxxxxxxxxxxxxxxxxxxxxxxxxxThen the URL in System Webhook would be:
https://api-private.atlassian.com/automation/webhooks/jira/a/00000000-aaaa-bbbb-cccc-123456789abc/00000000-aaaa-bbbb-cccc-123456789abc/xxxxxxxxxxxxxxxxxxxxxxxxxxxxxxxxxLeave the System WebHook Secret empty.
Configure the webhook to send out a JSON webhook whenever a User created event occurs in Jira.
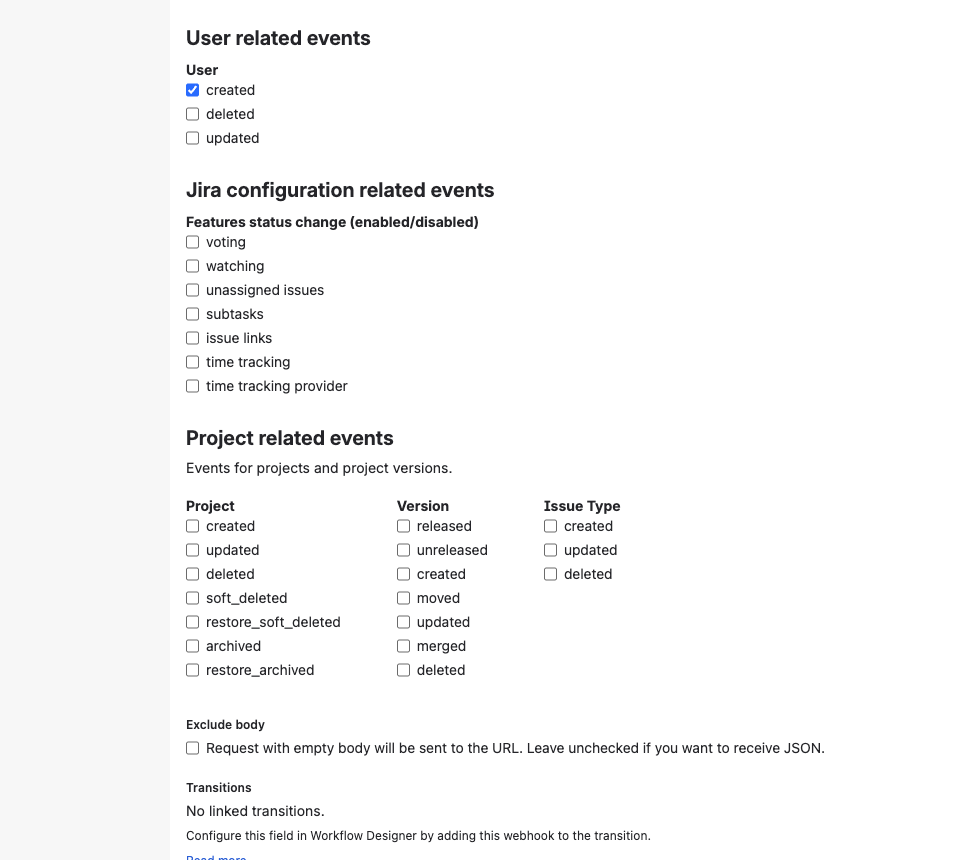
Ensure the option to exclude the body is not checked to receive necessary information.
Save the WebHook and enable it.
The Webhook setup is complete.
Retrieving Data and Using it in Automation
When a user is created in Jira (both Atlassian account users and portal-only customers), the System Webhook will send a webhook in the following format:
{
  "user": {
    "self": "https://<your-site>.atlassian.net/rest/api/2/user?accountId=xxxxxxxx",
    "accountId": "xxxxxxxx",
    "avatarUrls": {
      "48x48": "https://secure.gravatar.com/avatar/xxxxxxxxx.png",
      "24x24": "https://secure.gravatar.com/avatar/xxxxxxxxx.png",
      "16x16": "https://secure.gravatar.com/avatar/xxxxxxxxx.png",
      "32x32": "https://secure.gravatar.com/avatar/xxxxxxxxx.png"
    },
    "displayName": "<display name of the user>",
    "active": true,
    "timeZone": "Asia/Kolkata",
    "accountType": "atlassian"
  },
  "webhookEvent": "user_created",
  "timestamp": 1768573209630
}
This data is stored in the smart value
{{webhookData}}.To fetch the Atlassian Account ID of the user, we need to use the smart value:
{{webhookData.user.accountId}}.This can be either directly used or stored in a variable and used in subsequent components in the automation.
Some common use cases:
When a user is created, we can create a ticket with the user as the reporter.
Link the user account to an Asset user attribute.
Perform user-related actions upon user creation and many more.
In case you have any further queries, please contact Atlassian Support.
Was this helpful?