Passing Custom Headers in Webhook Requests with Jira Data Center
Platform Notice: Data Center Only - This article only applies to Atlassian apps on the Data Center platform.
Note that this KB was created for the Data Center version of the product. Data Center KBs for non-Data-Center-specific features may also work for Server versions of the product, however they have not been tested. Support for Server* products ended on February 15th 2024. If you are running a Server product, you can visit the Atlassian Server end of support announcement to review your migration options.
*Except Fisheye and Crucible
Summary
The purpose of this article is to provide a way to send a Webhook Request from the Jira application using custom headers.
Environment
Jira Data Center 8.0.0 and above, along with Automation for Jira 7.4.0 and above.
Solution
There are two ways to configure webhooks in Jira.
The first option is to use Jira's native webhook feature, which does not allow to use of custom headers
The second option is to configure webhooks using Jira automation rules, which allow to use of custom headers
Steps to add the custom header
You can use the following steps when going for the automation rule option:
Configure a new automation rule by going to ⚙ > System > Automation rules or Project Settings > Automation
Select Create a Rule
Choose a Trigger that fits your requirements
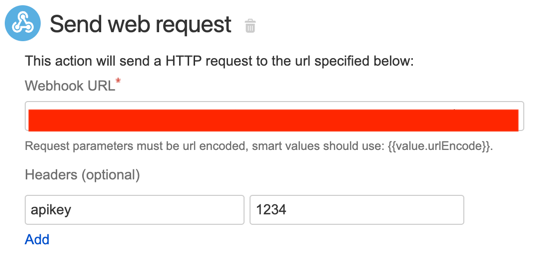
Select the Send Web Request action
Custom headers can be added via the Headers (optional) field
In the example below, "apikey" is the header name and "1234" is the value:
Adjust the automation rule to your needs
Was this helpful?