How to create a Jira project with shared Configuration using REST API
Platform Notice: Data Center Only - This article only applies to Atlassian apps on the Data Center platform.
Note that this KB was created for the Data Center version of the product. Data Center KBs for non-Data-Center-specific features may also work for Server versions of the product, however they have not been tested. Support for Server* products ended on February 15th 2024. If you are running a Server product, you can visit the Atlassian Server end of support announcement to review your migration options.
*Except Fisheye and Crucible
Summary
This knowledge base article provides a solution for creating a new Jira project with shared configuration in Jira using the REST API. It includes the necessary steps and API calls to achieve this.
For documentation on how to do this in the UI see Defining a project
Solution
To create a new project with shared configuration using the REST API, follow the steps below:
Obtain the ID of the project that will serve as the source for the shared configuration. You can retrieve the project ID by following the instructions in this article: How to Get Project ID from the Jira User Interface
Use the following API call to create the new project with shared configuration:
curl -D- -u <user>:<password> -X POST -H "Content-Type: application/json" -d '{"key": "<THE-PROJECT-KEY>", "name": "The name of the new project", "lead": "<LEAD-USERNAME>"}' <JIRA-BASE-URL>/rest/project-templates/1.0/createshared/<PROJECT-ID>Note:
Replace <user> and <password> with the credentials of a Jira administrator user.
Replace <THE-PROJECT-KEY> with the desired key for the new project.
Replace <LEAD-USERNAME> with the login username of the project lead.
Replace <JIRA-BASE-URL> with Jira's Base URL
Replace <PROJECT-ID> with the ID of the project whose configuration will be shared.
ℹ️ Make sure to provide the necessary authentication credentials for the API call.
Example
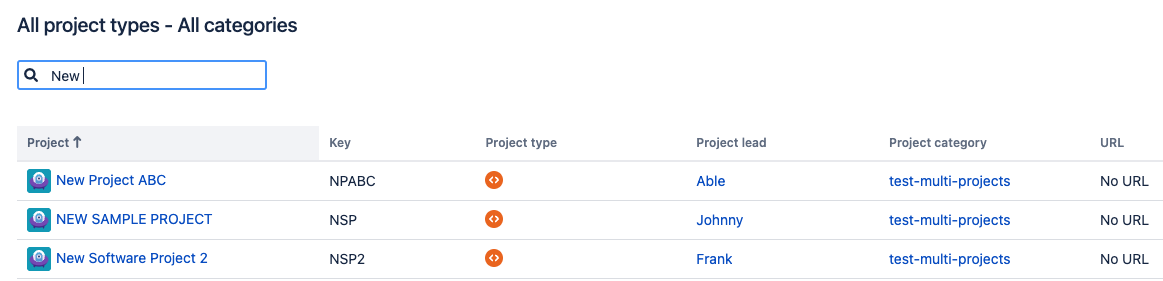
The following will create a new project, "New Project ABC" (key NPABC), based on an existing project NSP (project ID 10200). The lead will be 'Able', which is different than project NSP's lead.
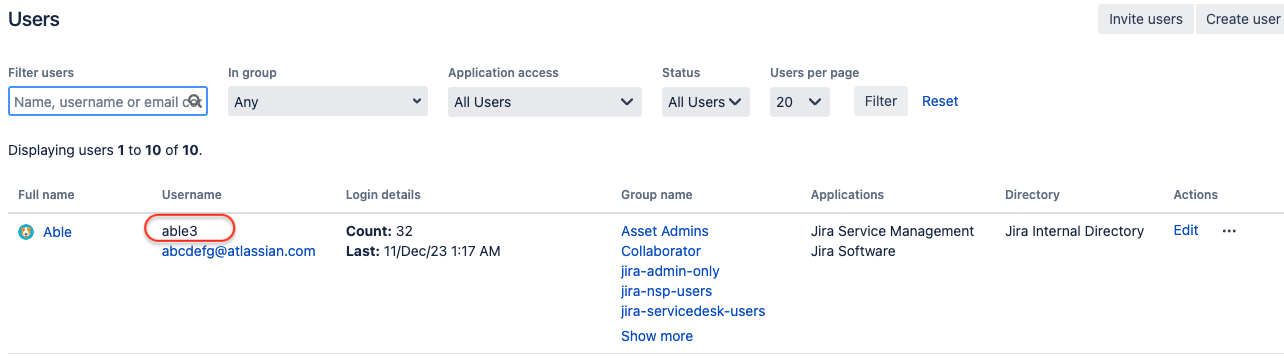
We need to use the Jira username in the 'lead' parameter, in this case it is 'able3':
Execute the REST API using curl:
curl -D- -u admin:xxx -X POST -H "Content-Type: application/json" -d '{"key": "NPABC", "name": "New Project ABC", "lead": "able3"}' http://localhost:42010/j82010/rest/project-templates/1.0/createshared/10200

HTTP/1.1 200
X-AREQUESTID: 87x21343x1
X-ANODEID: node2
Referrer-Policy: strict-origin-when-cross-origin
X-XSS-Protection: 1; mode=block
X-Content-Type-Options: nosniff
X-Frame-Options: SAMEORIGIN
Content-Security-Policy: sandbox
Strict-Transport-Security: max-age=31536000
Set-Cookie: JSESSIONID=XYZABC589A0D18C3957AB35E9A258FEC13; Path=/j82010; HttpOnly
X-Seraph-LoginReason: OK
Set-Cookie: atlassian.xsrf.token=UXYZ-IJKL-EFGH-ABCD_0fc61cece985f161b5fafbc6f40d98b87a67251a_lin; Path=/j82010
X-RateLimit-Limit: 15
X-RateLimit-Remaining: 14
X-RateLimit-FillRate: 15
X-RateLimit-Interval-Seconds: 60
Retry-After: 0
X-ASESSIONID: nbsyh6
X-AUSERNAME: admin
Cache-Control: no-cache, no-store, no-transform
Content-Type: application/json;charset=UTF-8
Content-Length: 124
Date: Fri, 05 Jan 2024 09:27:59 GMT

{"returnUrl":"/browse/NPABC","projectId":12501,"projectKey":"NPABC","projectName":"New Project ABC","remoteProjectLinks":{}}%
The result is project NPABC
Was this helpful?