How to add an attachment to Jira Cloud work items using the REST API
Platform Notice: Cloud Only - This article only applies to Atlassian apps on the cloud platform.
Summary
This article covers adding attachments to a Jira work item via the REST API endpoint.
Solution
Option 1: Using the command line:
curl --location --request POST 'https://your-domain.atlassian.net/rest/api/3/issue/TEST-123/attachments'
 -u 'email@example.com:<api_token>'
 -H 'X-Atlassian-Token: no-check'
 --form 'file=@"myfile.txt"'
Option 2: Using GUI-based tools (Postman)
This can also be achieved using any GUI tools of your preference. Here is an example of how to perform the same operation using the POSTMAN tool.
Ensure to include Content-Type and X-Atlassian-Token under the Headers tab with the shared values.
Content-Type = multipart/form-data
X-Atlassian-Token = no-check
Ensure that you include a key named file and type File to select a file from the system, or Text to access files using absolute path/reference under the Body tab.
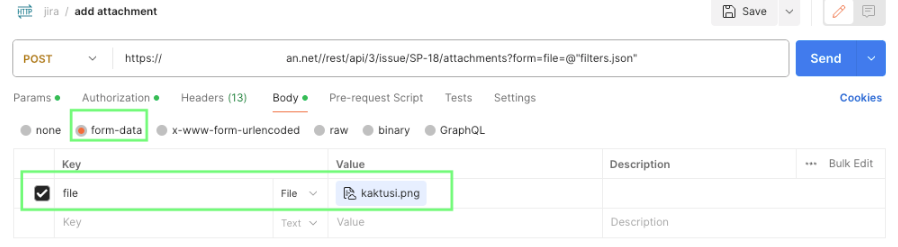
When adding attachments via the REST API endpoint to a Jira work item, if the payload or body isn't formatted well, the following error is thrown: 415 Unsupported Media Type.
Keep in mind the permission limitations that might be associated with the file based on its location on the local machine.
Attachment dates and details
When you add an attachment with the REST API, Jira records the upload time as the attachment's created date. The request only accepts the file, so you can't use this endpoint to set the original created date or author.
If you need to keep the original attachment dates, for example when moving work items from another tool, use the CSV importer instead. It lets you set a timestamp, author, and file name for each attachment. Learn how in Importing attachments into JIRA Cloud applications using CSV files | Jira and Jira Service Management | Atlassian Support.
Was this helpful?