Export report data from a JSM project using work item filters
Platform Notice: Cloud Only - This article only applies to Atlassian apps on the cloud platform.
Summary
Reports allow you to visualize data so that you have a better understanding of what's happening in your service project. Reports are interactive, so you can view high-level trends as well as go in-depth into the tickets contributing to the trends. This also impacts what information is exported from a report.
To export report data:
Navigate to the report that you want to export.
Select ... (More options) > Export CSV.
When exporting report data, the export function will only export data from the current view. Export from the summary table view will export the summarized statistics, whereas exporting from the details view will only export the work item details on that view.
To export more tickets and ticket details, you'll need to construct a filter based on the report data.
Solution
Common report export problems
Users may find that when they export report information, the export is not in the format that they expect. Common problems include:
The exported information is not in the format the user expected
When exporting report information, the export will be in the same format as the current view. This means that when you export a report from the summary table view, the export will show the summary. On the other hand, if you dive in to see the work item details for a specific request type and then export from this view, the export will only show that specific information. For example:
Export of Summary view
Export of request type view

The user wants to customize the columns in the issue details export.
Sometimes users prefer exporting more ticket information than what is provided in the reports. Reports only show the following columns of data:
Key
Request summary
Reporter
Assignee
Request Type
Status
Export custom reports using work item search
To export custom work item details or to export a wider range of tickets, we recommend running a search and exporting the results instead.
Since reports and searches are both based on JQL, you can construct a JQL query to pull the relevant ticket details, by following the steps below:
Go to the top navigation bar in your Jira site Filters > Advanced issue search.
If you're in the basic search, select Switch to JQL to switch to the advanced mode.
If there is any text in the search box, please clear it.
You can start constructing JQL by limiting the search to the appropriate service project (since reports only report on the data in one project).
Type in:
project = "<project name>"
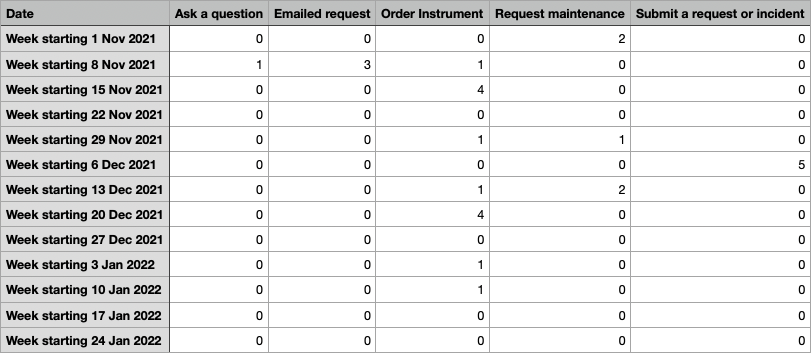
The next step depends on the JQL used in your report's trends. You can check the JQL used by a series in your report by navigating to the appropriate report in your service project > Edit report and selecting edit on the series. The JQL will be in the Filter by section.
In this case, you can use the series to check for specific request types: "Submit a request or incident", "Ask a question" and "Emailed request". You would like to obtain data for all these request types, so you can update your JQL to additionally filter by request type:
project = "Music Band" AND "Request Type" IN ("Submit a request or incident", "Ask a question", "Emailed request")
Finally, add a timeframe within which you want your results. JQL allows for specific and relative dates. In the examples below, we will be using the created date, but this applies to any date/time field.
Specific dates:
Created before 31st January 2022:
created < "2022-01-31"(Dates use the format "yyyy-mm-dd")Created on or before 31st January 2022:
created <= "2022-01-31"Created after 31st January 2022:
created > "2022-01-31"Created on or after 31st January 2022:
created >= "2022-01-31"Created on 31st January 2022:
created = "2022-01-31"
Relative to now:
Created in the last 60 minutes:
created > -60mPlease note the minus symbol, as it indicates that this value is in the past. You use "m" to denote minutes.
Created in the last 24 hours:
created > -24hYou use "h" to denote hours.
Created in the last 7 days:
created > -7dYou use "d" to denote days.
Created in the last 4 weeks:
created > -4wYou use "w" to denote weeks.
In this case, we would like to check tickets that were created in the last 8 weeks, so we'll use
created > -8w.
The JQL now looks like this:
project = "Music Band" AND "Request Type" IN ("Submit a request or incident", "Ask a question", "Emailed request") AND created > -8wRun a report based on the JQL search
Once we've constructed and run the JQL, you can extract the relevant details and export it:
First, switch to the list view.
Next, select Columns and choose the fields that we'd like to export.
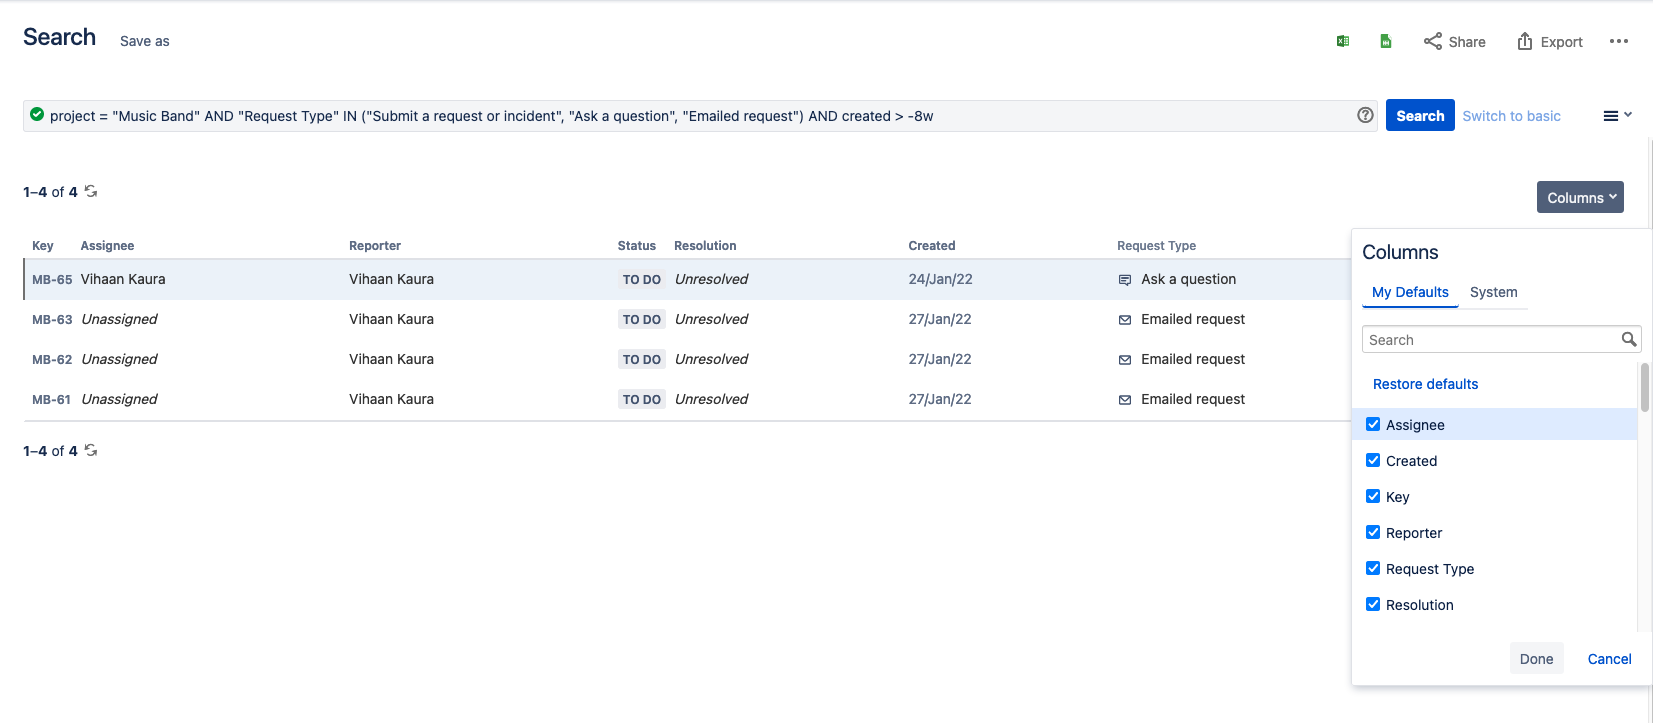
Finally, we can select Export > Export HTML report (current fields) to export the details.
Was this helpful?