Manage Request Participants with Automation in JSM Cloud
Platform Notice: Cloud Only - This article only applies to Atlassian apps on the cloud platform.
Summary
If you are looking for a solution for Jira Data Center, please refer instead to the KB article Automation for Jira - How to update the Request Participants or a multi user picker field from the content of other fields
In Jira Service Management Cloud, we can add Request Participants so they can view and receive notifications about specific tickets.
Note: Request participants must have the JSM (Customer) role assigned under user management to view tickets in the portal. Project roles are not required. On this documentation, you will find alternatives on how to add them using Automation.
Solution
You want to… | Use this method |
|---|---|
Add/remove a known account, or copy from another user-picker field | Edit Work Item action with JSON |
Add participants via the Service Desk REST API | Send web request action |
Add participants from email addresses on a form field | Loop + user-search + Edit Work Item |
Append/Add multiple Request participants using the Edit Work Item action
Once you have configured the Automation rule trigger and defined the conditions under which Request participants should be added, you can choose one of the options below to add participants to the work item.
Choosing a user from the list
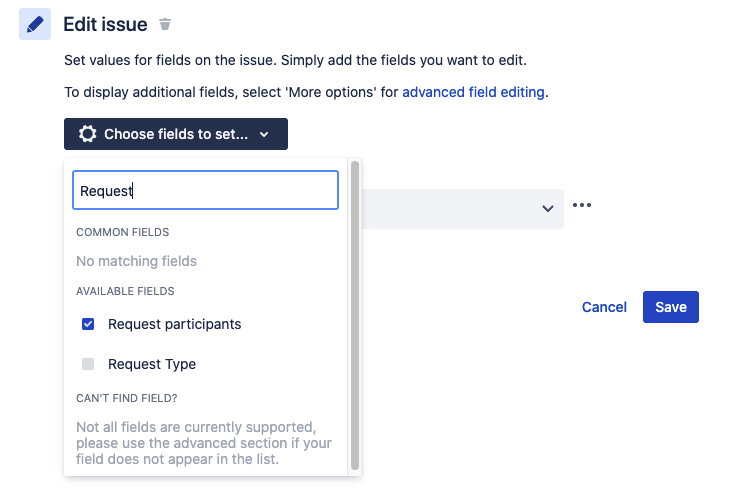
Click on "Choose fields to set..." and type "Request participants".
Enable the checkbox for the "Request participants" field (as in the screenshot below).
Click the "Request participant" field dropdown, then start typing the name to search for users.
To add more users, enter the field and select a new user.
Append to an existing list
To append the new users, select "Copy from work item" from the Request participant dropdown and then select the new list of users.
Copying users from other single-user or multi-user picker fields
"Enable the checkbox for the "Request participants" field.
"Click on the three dots (⋯) near the ""equest participant" field and choose the option "Copy from".
"Then click on "Add Request participants from Current Work Item," nd you will see the options to select the Work Item and the Field from which to copy the values.
Append to an existing list
You can check/uncheck the "Add to existing values" option to keep or remove the current Request participant's value.
Using the JSON advanced field editing
Expand the More Options section below the "Choose field to set".
Also, make sure you have not checked the Request participant field under "Choose fields to set..."
Here are a few JSONs you can insert under Additional fields to update the Request participant as needed. If using the Send Web Request action to retrieve user account IDs, ensure the response is correctly formatted before inserting it into these JSON examples. Common examples include: converting email addresses to account IDs and processing API responses in arrays for multi-user fields.
To add a single account, use the following JSON:
Single account
{"update": {
  "Request participants": [
   {
    "add": {"id":"<accountId>"}
   }
  ]
 }
}
To add multiple accounts, use the following JSON:
Multiple accounts
{"update": {
  "Request participants": [
   {
	"add": {"id":"<accountId>"}
   },
   {
	"add": {"id":"<accountId>"}
   }
  ]
 }
}
⚠️ To remove single or multiple accounts, replace the keyword add with remove in the same JSON shared above.
ℹ️ The <accountId> should be substituted by the accountId of the user you wish to add/remove.
ℹ️ In case you have duplicated Request participants fields you can use "customfield_xxxx" instead of "Request participants" where xxxx is the id of the custom field "Request participants". Here is how-to find custom field ID.
To copy a participant from another field, you can use the following JSON:
Single account
{"update": {
 "Request participants": [
   {
    "add": {"id":"{{issue.Approvers.accountId}}"}
   }
  ]
 }
}
To copy values from another multi-user picker field, use the following JSON:
Multiple accounts
{"update": {
  "Request participants": [
   {{#issue.Approvers}}{"add": {"id":"{{accountId}}"}}{{^last}},{{/}}{{/}}
  ]
 }
}
To copy values from two different multi-user picker fields, use the following JSON:
Copy from multiple fields
{"update": {
  "Request participants": [
   {{#issue.Approvers1}}{"add": {"id":"{{accountId}}"}}{{^last}},{{/}}{{/}},
   {{#issue.Approvers2}}{"add": {"id":"{{accountId}}"}}{{^last}},{{/}}{{/}}
  ]
 }
}
Once all users were added, click the Save button.
For more examples, see the page "Advanced field editing using JSON.
To remove instead of add, replace the keyword add with remove in the same JSON. Substitute <accountId> with the user's account ID. If you have duplicated Request participants fields, use customfield_xxxx instead of "Request participants".
Append/Add multiple Request Participants using the Send web request action
Review the REST API add request participants documentation and a how-to send web request using automation in Jira for additional information.
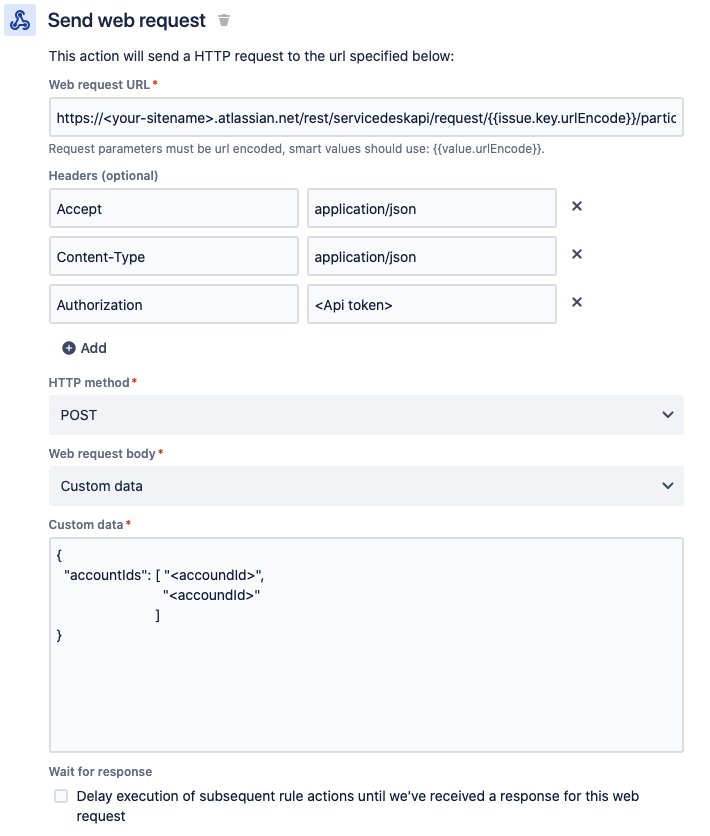
Here are the details for the "Send web request action"
In Web request URL, put the htttps://<your-sitename>/rest/servicedeskapi/request/{{workitem.key.urlEncode}}/participant
Add the following headers:
Accept: application/json
Content-Type: application/json
Authorization: Basic emailaddress: APItoken
⚠️ In the Authorization header, make sure that you add the keyword Basic followed by the base64 of your email addressemailaddress: API token. If you encounter authorization errors (like 401), regenerate a new API token without assigning any scopes. Refer to the Atlassian API token documentation for instructions on regenerating tokens.
So if the base64 of the emailaddress:APItoken is AB12XY45, then to the Authorization header add the value Basic AB12XY45
HTTP method: POST
Web request body: Custom data
Custom data: insert JSON as per recommendations from the Rest API documentation above.
JSON sample:
{"accountIds": [
  "<accoundId>",
  "<accoundId>"
 ]
}
The <accountid> should be substituted with the accountId of the user you wish to add. "Below is a sample of the "Send web request" action:
Click the Save button.
401-troubleshooting verification
In the Authorization header, use Basic followed by the base64 of emailaddress:APItoken.
If you get a 401, regenerate a new API token without assigning any scopes and retry.
Verify success by confirming the participant appears in the issue's Request participants field after the rule runs.
Copy email addresses from a Form Field to Request Participants
You can't write email addresses directly into Request Participants — it's a user-picker field that requires account IDs. That's why the email method loops each address through a user-search call to resolve the account ID first.
Trigger"': Set the trigger to “Work item created” (previously referred to as 'Issue Created').
Create Variable: Create a variable (e.g., storeEmailAddress) to store the value from the custom field containing the email addresses.
Convert to Array: Use the split function
{{issue.customfield_XXX.split(",")}}to convert the variable into an array, so you can process each email address individually.Advanced Branching (Loop): Use advanced branching to loop through each email address in the array.
Send Web Request (Get Account ID): For each email address, use the Jira REST API (The Jira Cloud platform REST API) to retrieve the corresponding account ID.
Note: You can't directly copy email addresses into the Request Participants field, as it is a user picker field and requires account IDs.
Edit Work Item: Use the “Edit issue” action to update the Request Participants field, appending the retrieved account IDs while keeping any existing participants.
Sample Code
{"update": {
 "Request participants": [
   {
    "add": {"id":"{{webResponse.body.accountId}}"}
   }
  ]
 }
}
Was this helpful?