How to generate thread dumps using Visual VM
Platform Notice: Data Center Only - This article only applies to Atlassian apps on the Data Center platform.
Note that this KB was created for the Data Center version of the product. Data Center KBs for non-Data-Center-specific features may also work for Server versions of the product, however they have not been tested. Support for Server* products ended on February 15th 2024. If you are running a Server product, you can visit the Atlassian Server end of support announcement to review your migration options.
*Except Fisheye and Crucible
Summary
There are certain cases where you would need thread dumps to analyze the performance issue of your Confluence instance or to provide to our Support team for further analysis. Below are the steps to extract the thread dumps from Confluence or any other Java application.
This will also allow you to remotely monitor the health of the application using a different machine within the same network.
Solution
Prerequisite : JDK must be installed to use Visual VM.
Step to do this if Confluence running as a service
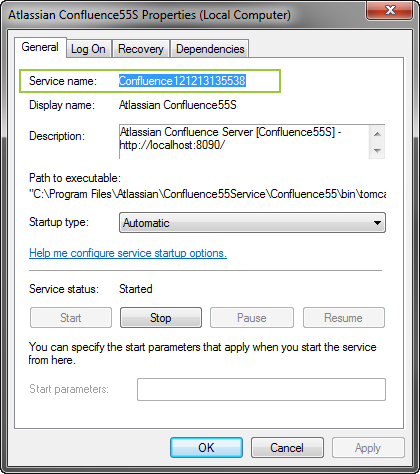
Identify the name of the service that Confluence is installed as in Windows by going to Control Panel > Administrative Tools > Services
Copy the service name like the screenshot below
Run the command prompt and cd to the bin directory of Confluence instance.
Type the following command
tomcat7w//ES//Confluence210814192604Please replace Confluence210814192604 with the service name on step 2
You should be able to see the tomcat UI after that like the screenshot below
You can specify any other port other than 8484 but if 8484 port is open on your end. You can just set it as that.
Shutdown Confluence
Start Confluence again for the changes to take effect
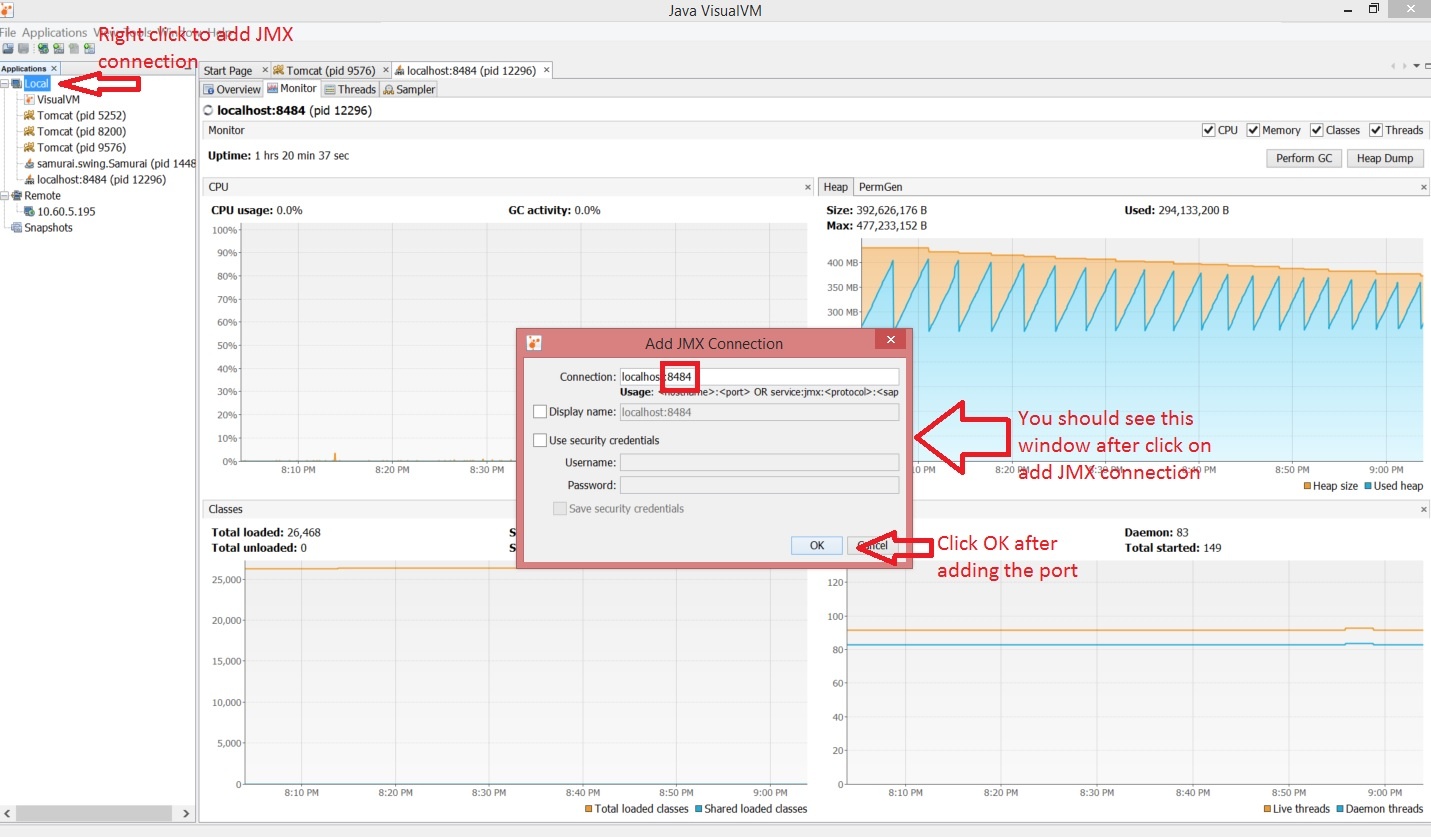
After that add the JMX port into visual vm
To access Visual VM, please go to
jdk_installation_path/bin. The file name is jvisualvm.exeOpen visual vm and right click on Local and click add JMX connection
Specify the port as 8484 as configure on step 5 on the previous step and click ok like the screenshot below
Steps to do this if running Confluence Standalone
Go to
<confluence_installation_folder>/binRight click on setenv.bat in Windows or setenv.sh in Linux and click edit and add the following parameters.
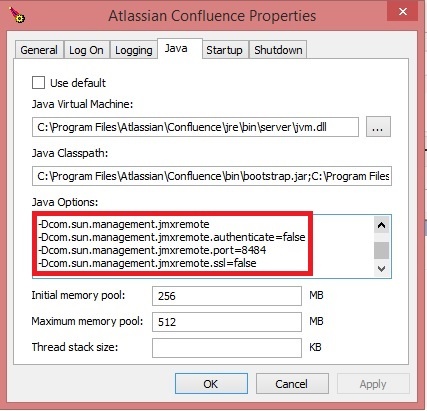
-Dcom.sun.management.jmxremote
-Dcom.sun.management.jmxremote.authenticate=false
-Dcom.sun.management.jmxremote.port=8484
-Dcom.sun.management.jmxremote.ssl=false
Please paste the above all in 1 line with spaces separated like the example below:
Please note that the below is an example, please do not copy and paste the parameters below, only add the parameters needed to JAVA_OPTS
set JAVA_OPTS=%JAVA_OPTS% -Xms256m -Xmx512m -XX:MaxPermSize=256m -verbose:gc -Xloggc:C:\confluence\data552/logs/gc.log -XX:+PrintGCDetails -Dcom.sun.management.jmxremote -Dcom.sun.management.jmxremote.authenticate=false -Dcom.sun.management.jmxremote.port=8484 -Dcom.sun.management.jmxremote.ssl=falseRestart Confluence after adding the parameters described above.
After that add the JMX port into Visual VM
To access Visual VM, please go to jdk_installation_path/bin. The file name is jvisualvm.exe
Open visual vm and right click on Local and click add JMX connection
Specify the port as 8484 as configure on step 5 on the previous step and click ok like the screenshot below

Was this helpful?