Troubleshoot failed Bitbucket Pipelines locally with Docker
Platform Notice: Cloud Only - This article only applies to Atlassian apps on the cloud platform.
Summary
This article provides instructions on debugging the failed Bitbucket Pipeline build using Docker to abstract Bitbucket Pipeline infrastructure and test it in the local environment. These steps will help identify if the issue is with the Bitbucket Pipeline or the build setup.
If the same error is reproducible locally, it can be debugged, fixed, and tested locally. Once the local build is working, update the Bitbucket pipeline with the same changes (an example is provided at the end of this article).
To debug the pipeline locally, Docker must be installed on your machine.
If you haven't already, install Docker on your machine by following the installation guidelines provided by Docker.
To check if you have Docker installed, go to the terminal and run
$ docker version
it, which should return the version details, meaning it's installed correctly.
Solution
Step 1: Clone the repository
Clone the repository locally using the same arguments (--branch and --depth) as the failing pipeline.
git clone --branch="<branch name>" --depth <depth number> git@bitbucket.org:myWorkspace/myRepo.git The clone command can be found by navigating to the affected pipeline in the UI and expanding the Build Setup section of the failing step :
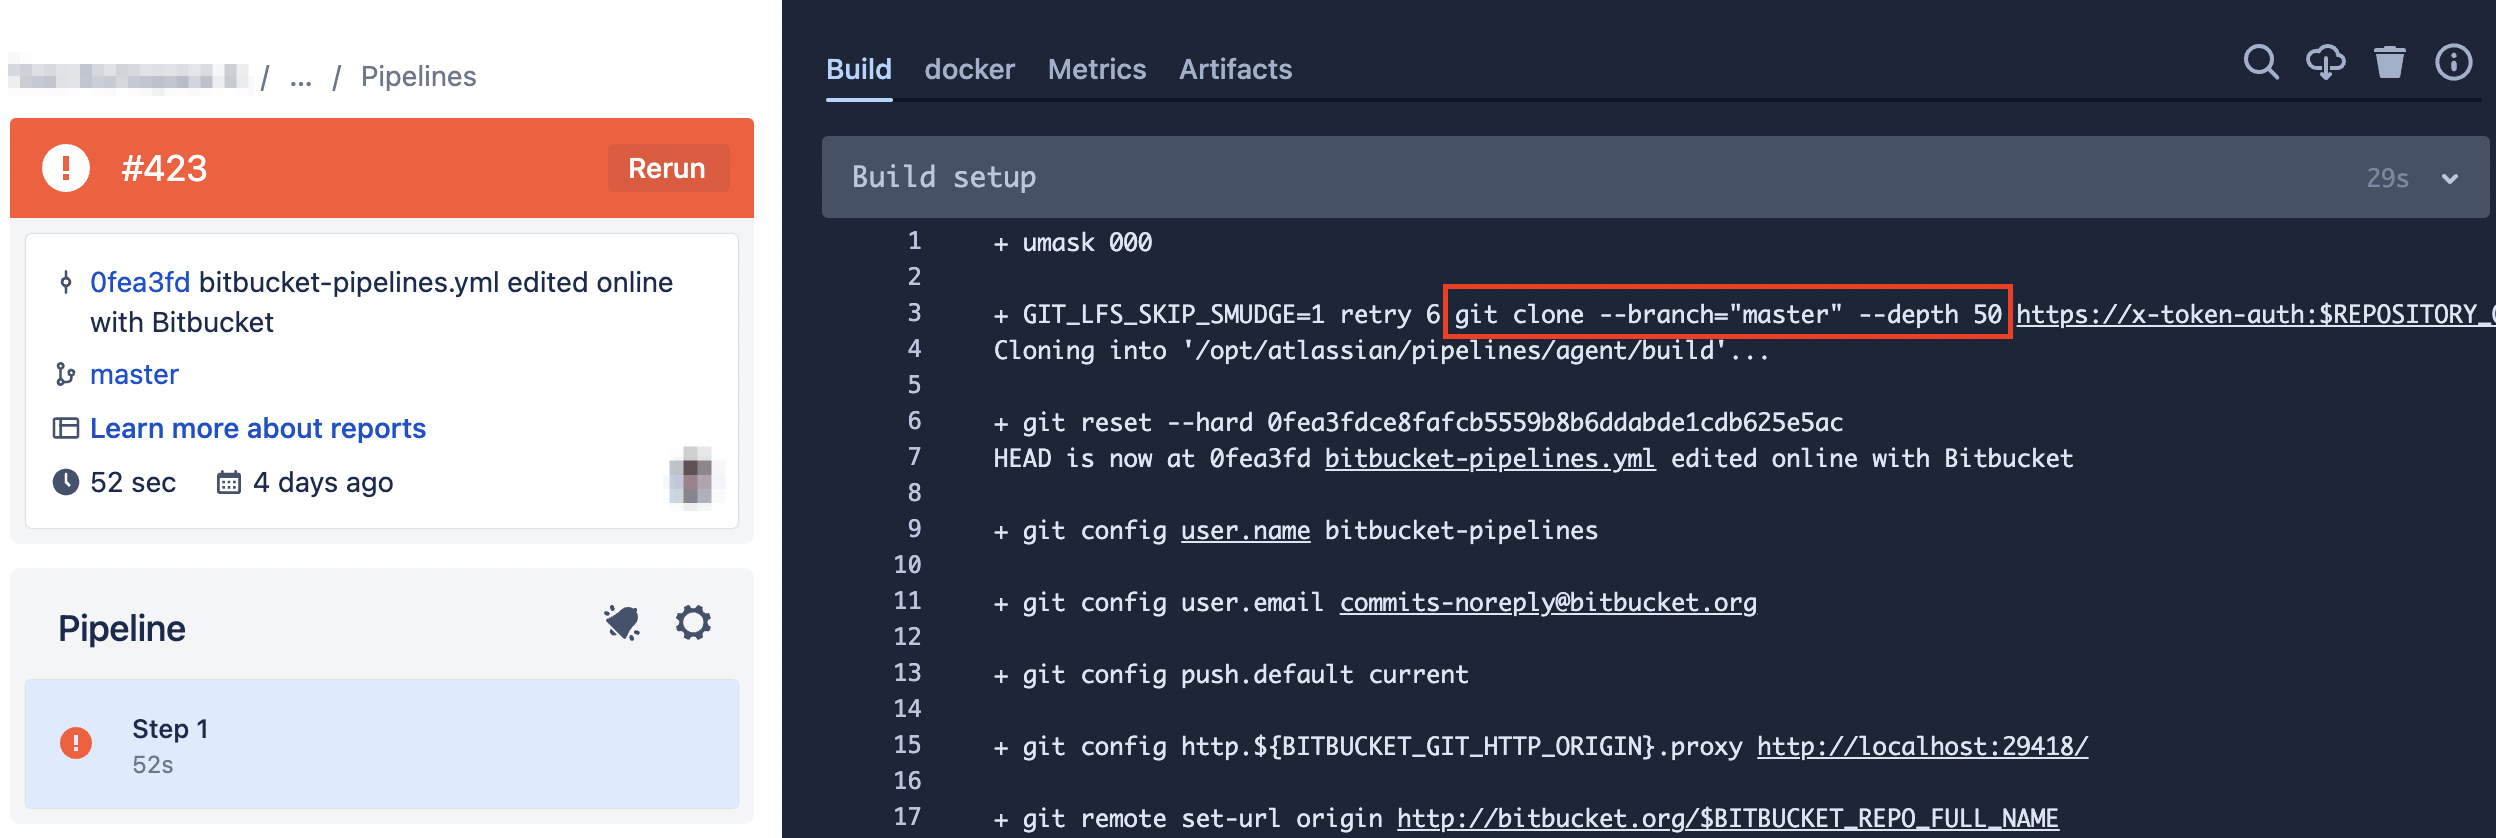
For the example above, the clone command would be :
git clone --branch="master" --depth 50 git@bitbucket.org:myWorkspace/myRepo.git For pull-request pipelines
Pull-request pipelines don't include the --depth argument as they execute a merge during the build setup. If the pipeline build you are troubleshooting is a pull-request pipeline, you can ignore the --depth flag when cloning the repository locally.
Step 2: Reset the local repository to the Pipeline commit hash
This is to make sure your local build is running against the same commit hash as the Pipelines build you are troubleshooting :
git reset --hard <commit hash>The git reset command can also be found in the Build setup section of the failing step :
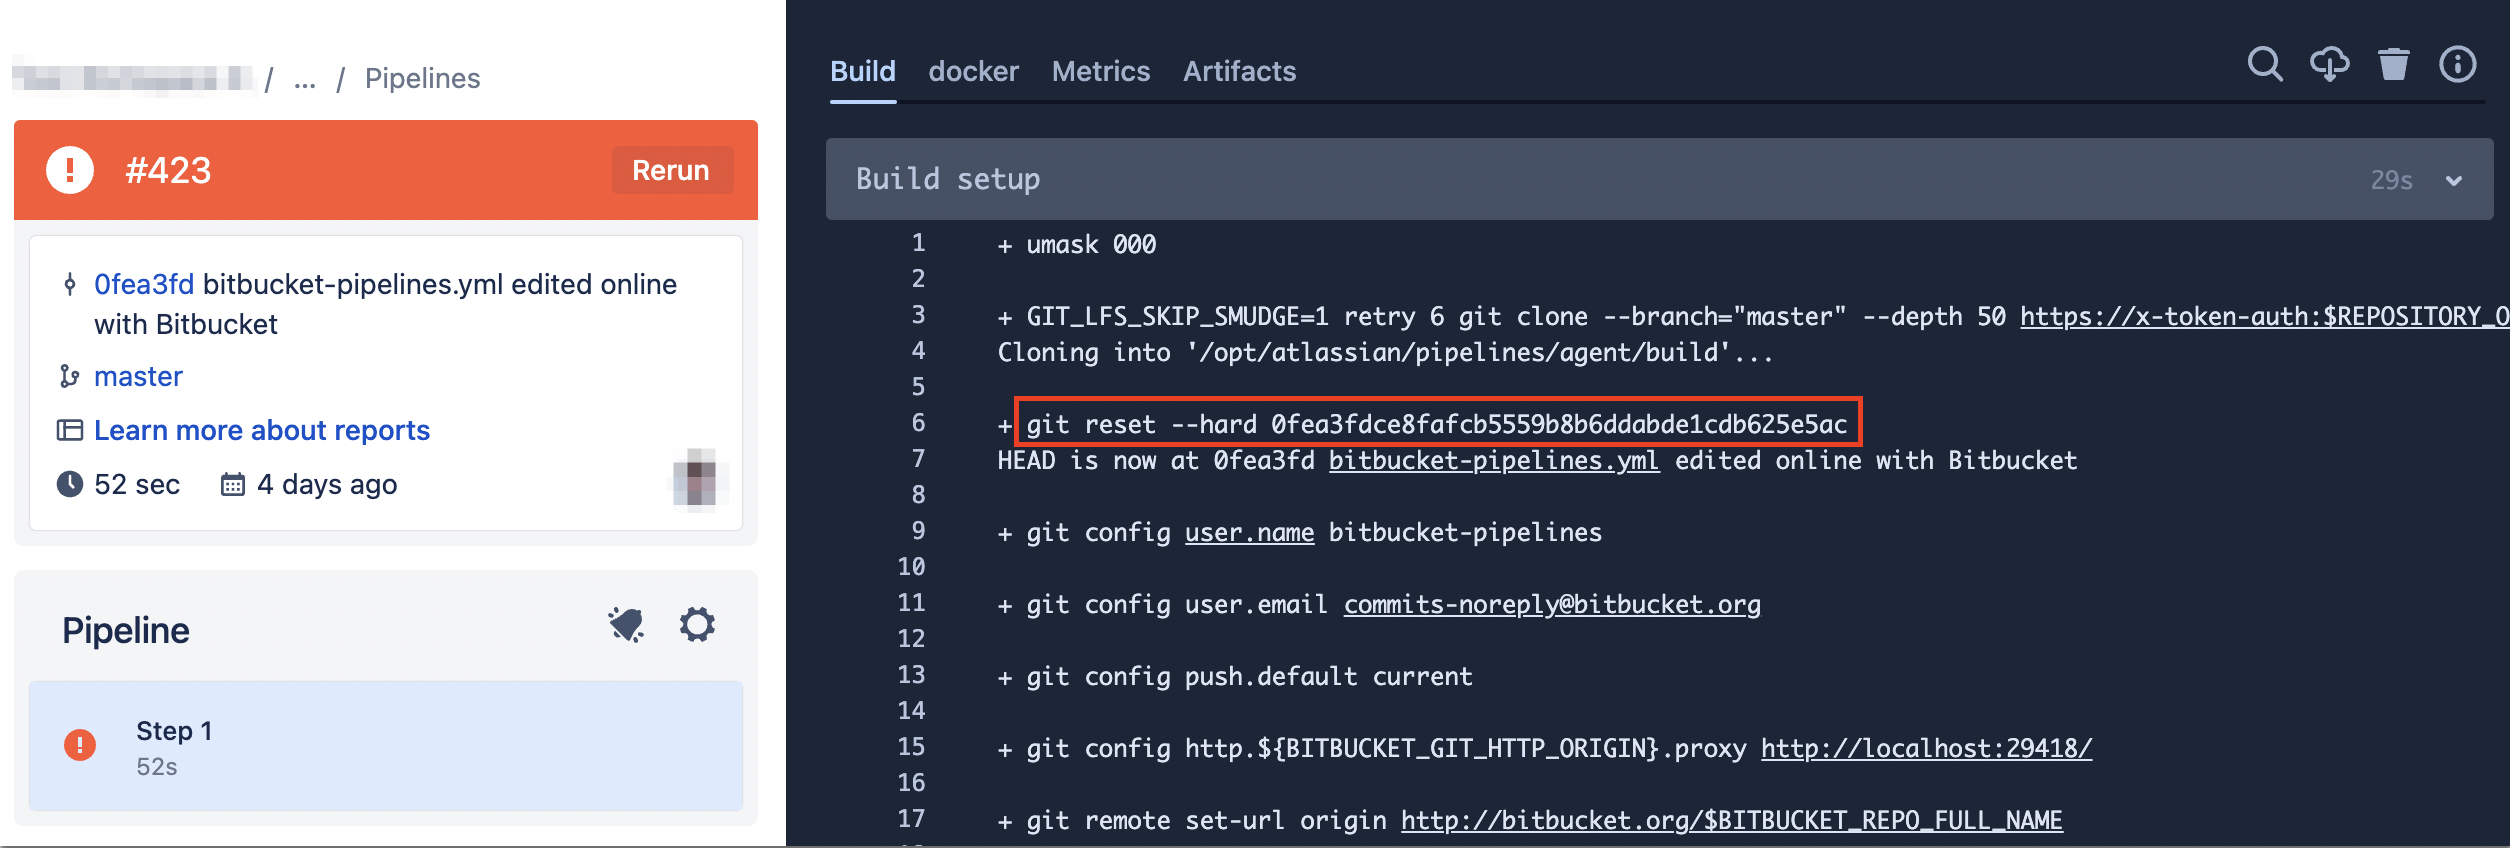
For the example above, the git reset command would be :
git reset --hard 0fea3fdce8fafcb5559b8b6ddabde1cdb625e5acFor pull-request pipeline
If the pipeline build you are troubleshooting is a pull-request pipeline, it will also be necessary to merge the destination branch of the pull request into the source branch using the same merge command found in the Build Step section :
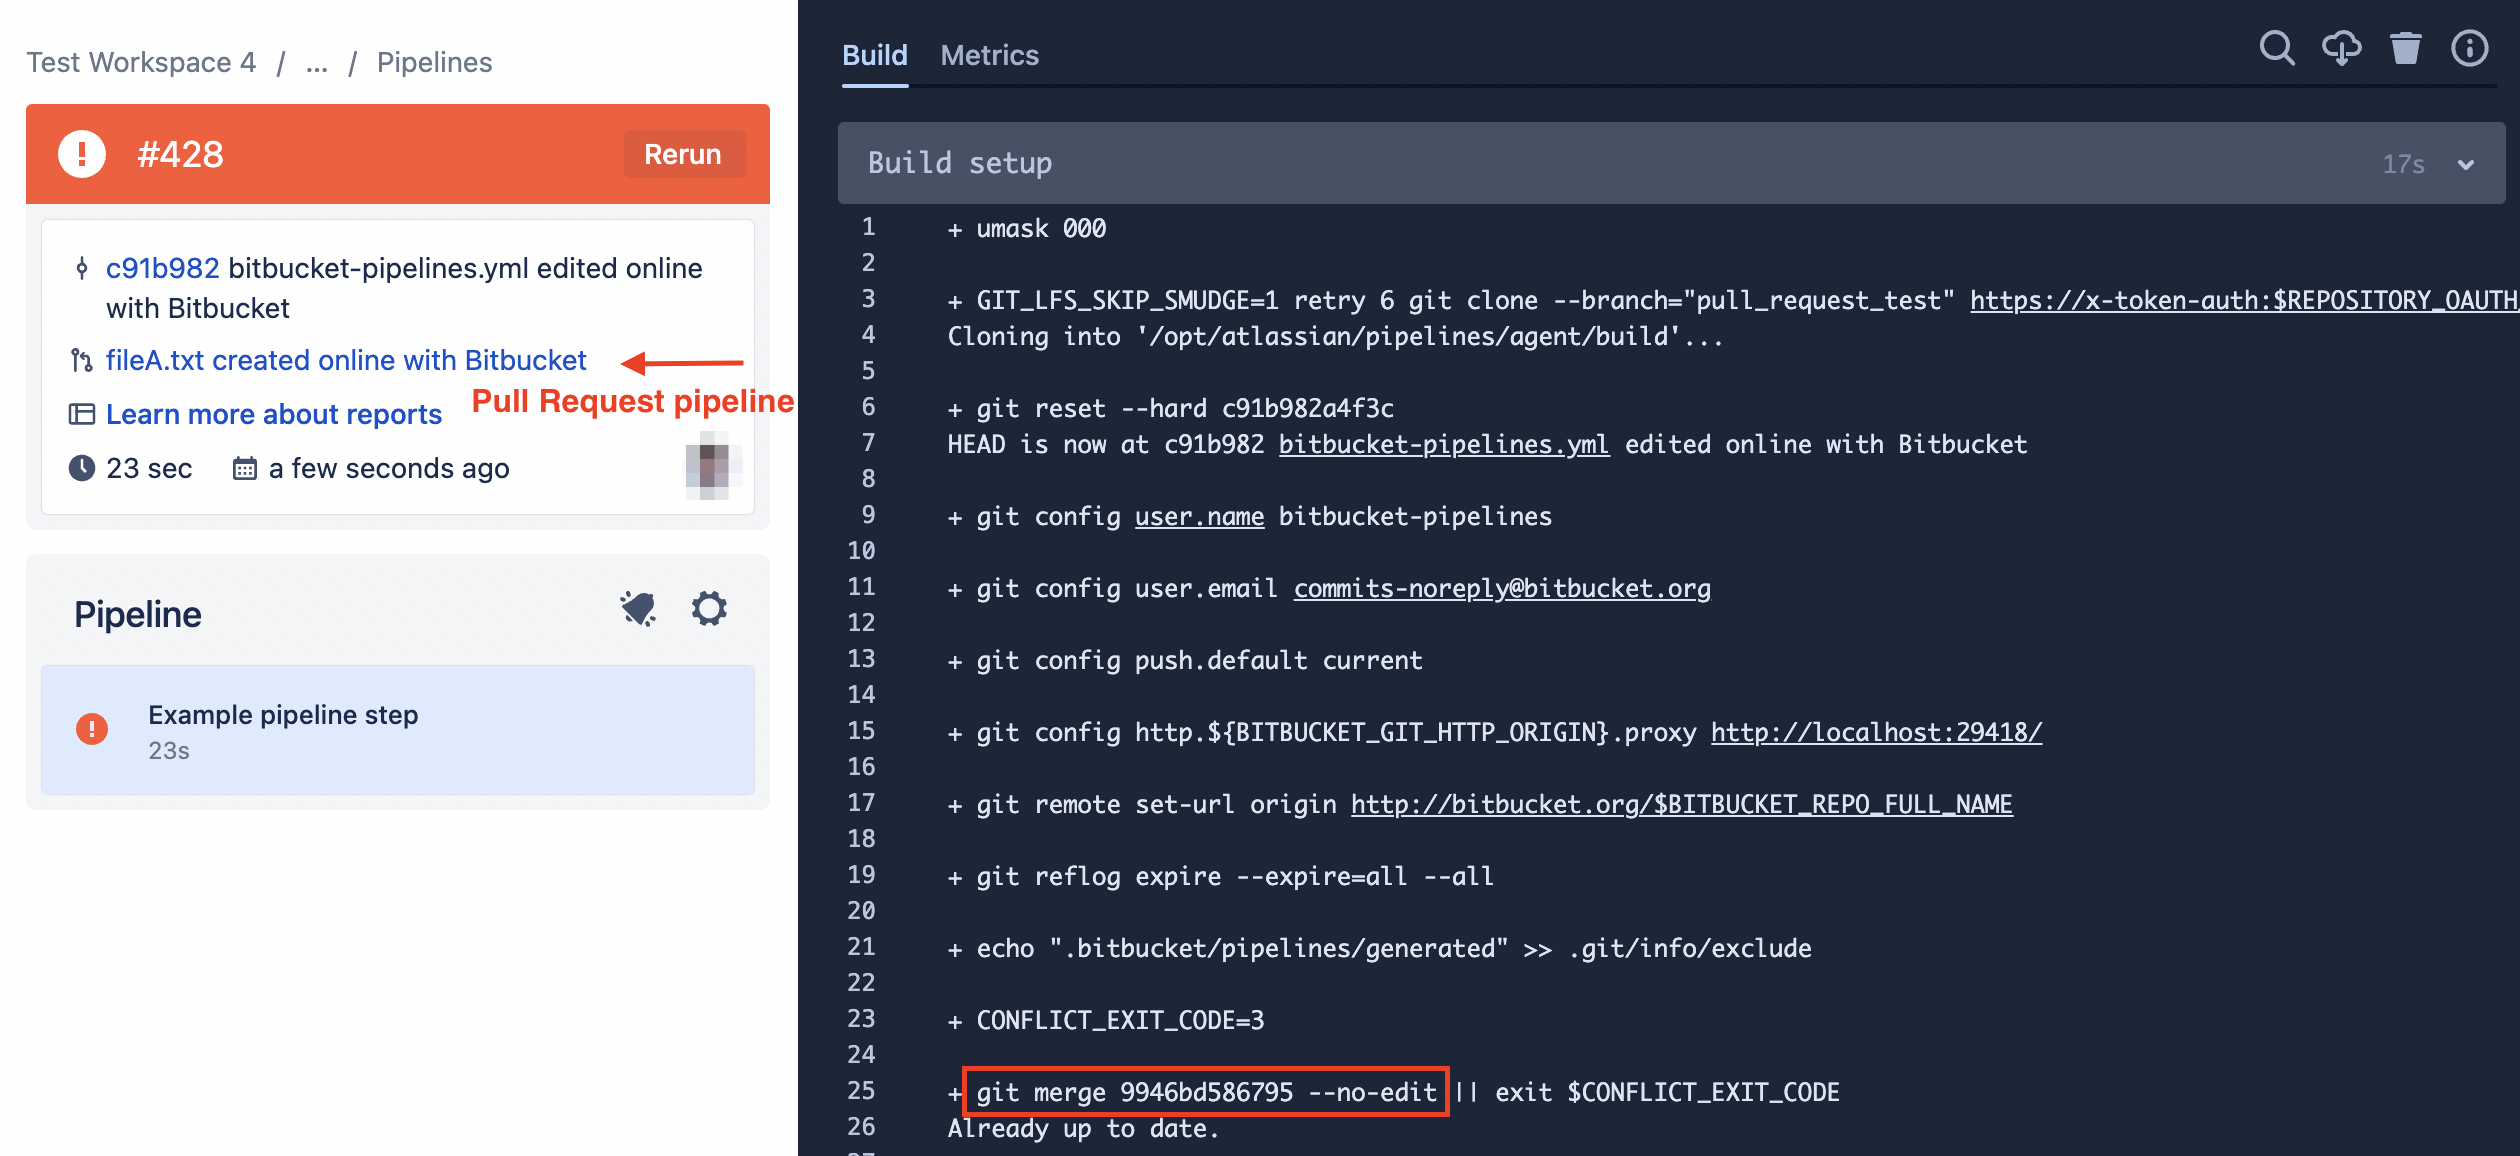
For the example above, the git merge command would be :
git merge 9946bd586795 --no-editStep 3: Build a custom Docker image
For all repository files to be available inside the local docker container where you will debug your build, creating a custom docker image and copying your local repository folder inside the image will be necessary.
If you're within your local repository folder at the moment, you can go back one folder level and create a file (for example, my.dockerfile or any Dockerfile name).
touch my.dockerfileNow, you can setup your Dockerfile by providing the exact same image SHA from the failing pipeline as the base image. The image SHA is required to ensure your local build is running in the same actual environment, as image tags might be updated over time and point to different versions (SHA) of the image.
To find the image SHA, look for the "Images Used: build" part in the Build setup section :
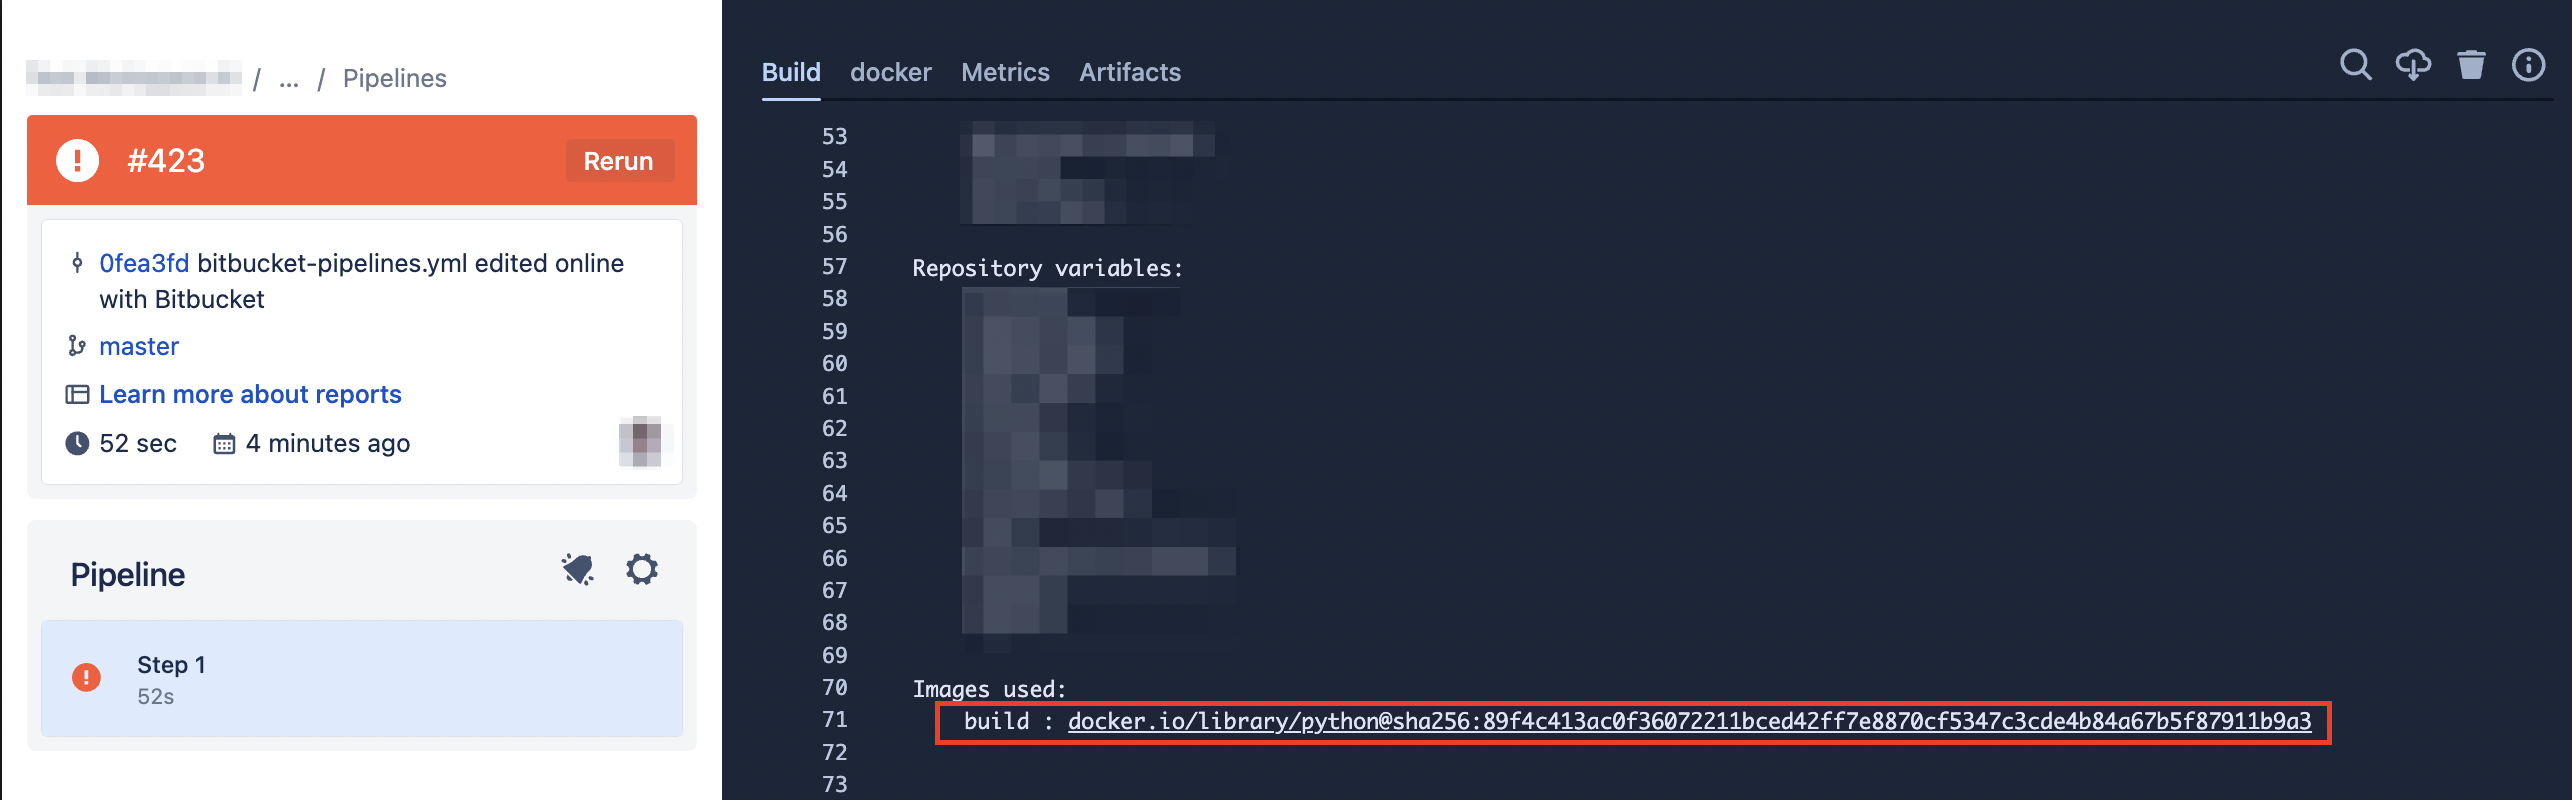
For the example above, the my.dockerfile should have the following content :
FROM docker.io/library/python@sha256:89f4c413ac0f36072211bced42ff7e8870cf5347c3cde4b84a67b5f87911b9a3
WORKDIR /myLocalRepo
COPY ./myLocalRepo /myLocalRepo
Where:
| The Docker image SHA from the failing pipeline. |
| Sets the directory in which you want to start. This is the directory in which you run the commands. By default, it's the root directory of the container. |
| This must be the path to the folder where you locally cloned the repository. Copies files from the host machine to the file system of the container. |
To get more information about Dockerfile, you might find this run-through of creating an image useful or Docker's official Get Started guide. You can also check out this page about Dockerfile reference.
Once done, you can now build your Docker image by running the command below:
docker build --memory=1g --memory-swap=1g -t account/imageName:tag -f my.dockerfile .Where:
| Specifies you wish to build a docker image |
| Builds the container with 1GB of memory and no swap space (swap is calculated by swap value - memory value). This memory amount simulates the memory restrictions in Pipelines for a service container (both flags are needed). When debugging locally, the flags are used to set the memory limit to replicate Pipelines as closely as possible and so discover whether you are hitting Pipelines memory limits. Many issues with failing pipelines that pass locally are due to memory constraints. Read more about memory management in the Docker docs. For macOS (OS X) : Use the You can modify the default memory settings in the status bar ( > Preferences > Advanced). |
| Creates a local image for the account with the name provided, the image name provided, and the tag provided. |
| Specifies the name of the docker file to use when building the image |
| Specifies the directory (currently the current one) to use as the root of the Docker build context |
Step 4: Run the docker container with the built image
Once your custom Docker image containing the repository is built, you can now run a container using that image :
docker run -it --memory=4g --memory-swap=4g --memory-swappiness=0 --cpus=4 --entrypoint=/bin/bash account/imageName:tagWhere:
| Runs a Docker container with a TTY and with STDIN open. It means the container opens in an interactive mode, and you can run commands in it. |
| Runs the container with 4 GB of memory and no swap space. This memory amount simulates the memory restrictions in Pipelines for a regular step (size: 1x) - both flags are needed. If you are debugging a large step (the step has the size attribute configured), provide the memory value based on the size being used. All 3 flags are required. When debugging locally, Set the memory limit to replicate Pipelines as closely as possible and discover whether you are hitting Pipelines memory limits. Many issues with failing pipelines that pass locally are due to memory constraints. Read more about memory management in the Docker docs. For macOS (OS X) : Use the docker stats command to check the actual memory limit of the container. You can modify the default memory settings by opening Docker Desktop and going to Settings (gear icon) > Resources > Advanced. |
| Specify how much of the available CPU resources a container can use. Read more about runtime options in the Docker docs. |
| The Docker image that you want to run. To emulate the pipeline locally, you will provide the custom docker image built in Step 3. |
| Starts a bash prompt when the container starts. |
Environment variables
If you use environment variables in your Pipeline build, you must also pass the environment variables into your local container.
For that, you can use the -e switch, for example, adding -e "VAR1=hello" -e "VAR2=world" to the above command before -it, or use a file --env-file=env-vars.txt. Learn more.
docker run -e "VAR1=hello" -e "VAR2=world" -it --memory=4g --memory-swap=4g --memory-swappiness=0 --cpus=4 --entrypoint=/bin/bash account/imageName:tag
If it's a pipeline-secured variable, make sure to provide the actual value of the variable and hide this information if sharing the logs with support.
Also, ensure the correct variable is being used if you have variables defined at multiple levels in Bitbucket (workspace, repository, deployment, or custom).
The variable precedence is Deployment variable > Repository variable> Workspace variable > Default variable> Custom variable. Learn more about User-defined variables.
Hopefully, now your Docker image is running, and you can see the ID, for example:
root@1af123ef2211:/myLocalRepoThis means you're in your working directory inside the container, and you can start executing the same sequence of commands you have defined in the script section of your pipeline build.
Testing with build services
If your build use services, for example, MySQL, you can use separate containers to test this locally too.
To use services, start the service container before your main container by adding the --network=host option to use the host's networking directly.
For example, with MySQL:
docker run --network=host --name my-mysql-name  \
-e MYSQL_DATABASE='pipelines' \
-e MYSQL_RANDOM_ROOT_PASSWORD='yes' \
-e MYSQL_USER='test_user' \
-e MYSQL_PASSWORD='test_user_password' \
-d mysql:<tag>
Then, when you are running your main container, make sure to add the --network=host option to link it to the service container as well.
The example command in Step 4 to run the main container would become:
docker run -it --network=host --memory=4g --memory-swap=4g --memory-swappiness=0 --cpus=4 --entrypoint=/bin/bash account/imageName:tagStep 5: Test your script inside the local container
After getting your container built and running, you can run the commands you've listed in your pipelines script.
If you find any problems, you can debug them locally, and once you've got them working well, update your bitbucket-pipelines.yml to match.
If your build is failing in pipelines but succeeding when you execute it locally following the instructions of this article, please make sure to check if your pipeline is using caches, and if yes, try manually clearing the cache and rerunning your pipeline.
Previously generated caches might contain old dependencies that can cause your pipeline build to fail. Learn more about how caching works?
Example of debugging a failed pipeline locally
In this example, we'll be following the instructions detailed in the previous step to troubleshoot a pipeline build that is failing with the "zip: command not found "error :
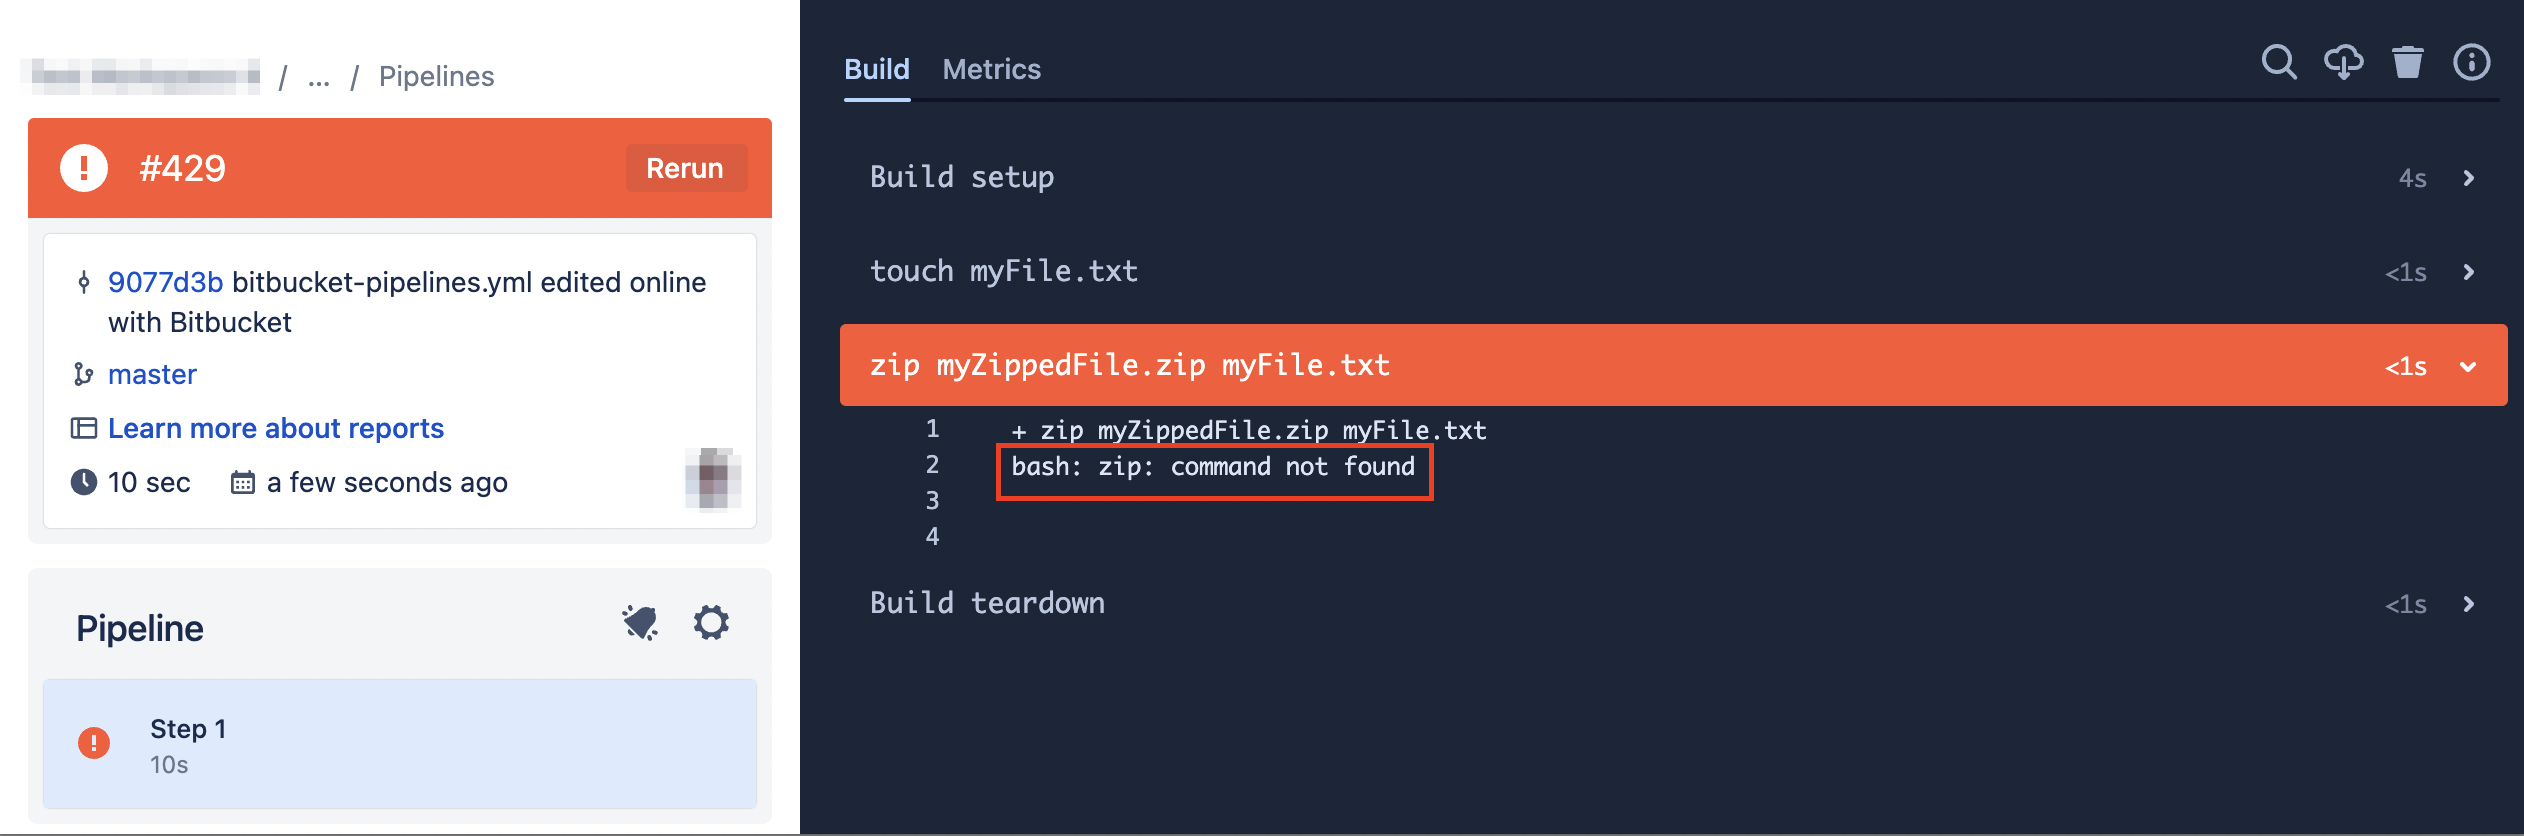
The bitbucket-pipelines.yml of this build has the following content :
pipelines:
  default:
    - step:
        script:
          - touch myFile.txt
          - zip myZippedFile.zip myFile.txt
Expanding the Build Setup, we can find the key information to debug the Pipeline build locally:
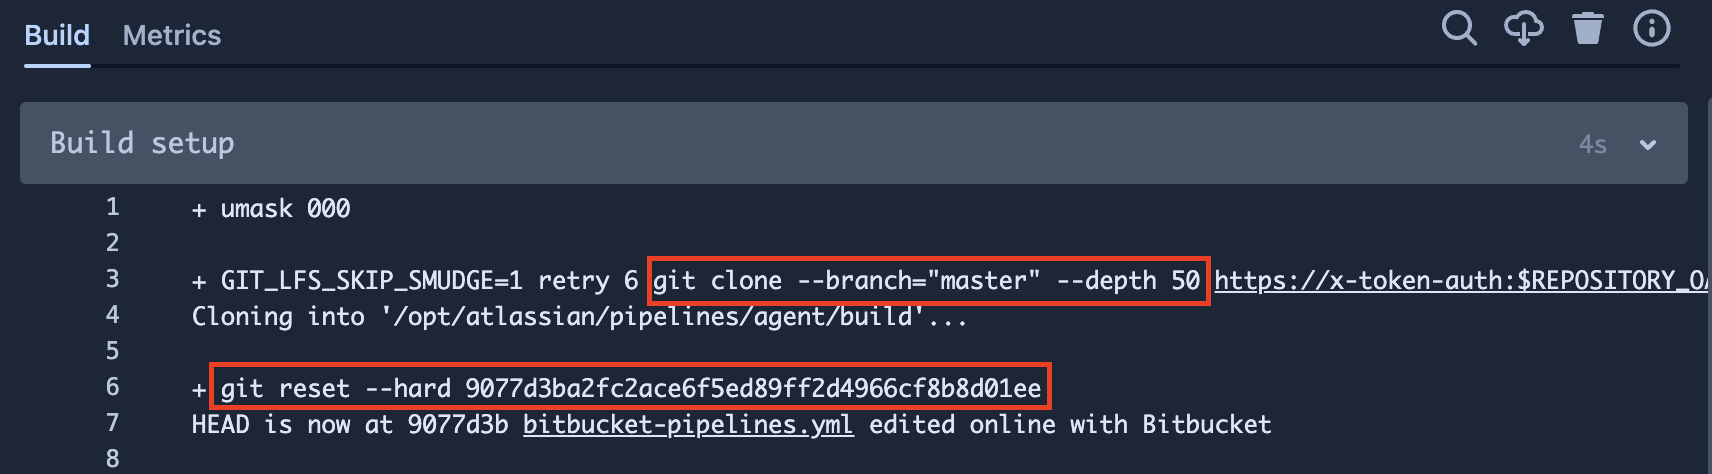

Clone the repository
git clone --branch="master" --depth 50 git@bitbucket.org:myWorkspace/myRepo.gitFor this example, assume the working directory is
/user/localDebug. The repository will be cloned into/user/localDebug/myRepoChange the working directory to the local cloned directory
cd myRepoReset the local repo to the pipeline commit hash.
git reset --hard 9077d3ba2fc2ace6f5ed89ff2d4966cf8b8d01eeBuild a custom Docker image
Create the
my.dockerfilein the parent directory of the local repocd ../ touch my.dockerfileAdd the following content to the
my.dockerfile, based on the image found in Build SetupFROM docker.io/library/python@sha256:31ceea009f42df76371a8fb94fa191f988a25847a228dbeac35b6f8d2518a6ef WORKDIR /myrepo COPY ./myRepo /myrepoThe first argument of COPY (
./myrepo) considers you will execute the build from the parent folder of the repo.Build the image
docker build --memory=1g --memory-swap=1g -t myaccount/mypythontest:latest -f my.dockerfile .
Run the docker container with the Built image.
docker run -it --memory=4g --memory-swap=4g --memory-swappiness=0 --cpus=4 --entrypoint=/bin/bash myaccount/mypythontest:latest
At this stage, we have a python@sha256:31ceea009f42df76371a8fb94fa191f988a25847a228dbeac35b6f8d251
8a6ef container open and we're inside the repository directory.
From here, we can:
run individual commands from the
bitbucket-pipelines.ymlto test themconfigure tools inside the container and test changes
Let's execute the commands inside the container in the same order we have in the script section of the pipeline:
$ touch myFile.txt # succeeds
$ zip myZippedFile.zip myFile.txt  #error out
The output throws an error:
bash: zip: command not foundThis is the same error that was reported in the Pipeline UI. Since we managed to reproduce the same error locally, we can conclude the error that is making the pipeline fail is not related to Bitbucket Pipelines environment and has something related to the Build setup.
At this point, we can troubleshoot the error locally for a possible solution. Searching for the error "command not found "on the internet we can quickly find that this is caused when the executable file of the command you are trying to execute is not found by bash. In a container, this usually means the executable is not yet installed.
For this example, the zip command does not come installed with the image used python@sha256:31ceea009f42df76371a8fb94fa191f988a25847a228dbeac35b6f8d251
8a6ef. To fix this, you can either install the zip command as part of the build or use a different image that already contains the zip installed. Since the Python image is based on Debian, we can test installing the zip program inside our local container using the command below :
$ apt-get update && apt-get install zipNow that zip is installed, the previous zip command should succeed :
$ zip myZippedFile.zip myFile.txtOutput :
$ zip myZippedFile.zip myFile.txt
adding: myFile.txt (stored 0%)
As this runs well, we validated that the fix worked in our local container, so we can now add the exact change to our bitbucket-pipelines.yml file and push it to the repository, confident that the pipeline will run error-free :
pipelines:
  default:
    - step:
        script:
          - touch myFile.txt
          - apt-get update && apt-get install zip # this command was added to install the zip program
- zip myZippedFile.zip myFile.txtWas this helpful?