Bitbucket Cloud: Troubleshooting pipelines build not executing commands
Platform Notice: Cloud Only - This article only applies to Atlassian apps on the cloud platform.
Summary
In Pipelines, you can configure your build to use a Docker image based on your needs, by using the "image: " tag, on your bitbucket-pipelines.yml file, as explained in the documentation below:
When running Pipelines builds using a custom Docker image, you might come across a build that looks has not run any of the commands configured on your bitbucket-pipelines.yml file, only running its build setup and build teardown, like in the example below:

This article explains why this would happen, and how to fix it.
Solution
Environment
Bitbucket Pipelines, both using Runners or not.
Before proceeding with the diagnostic steps below, please make sure that you have installed the latest version of Docker on your machine, and that the Docker engine is running.
Case 1 - /tmp directory is not present on the image that was used for the build
Bitbucket Pipelines depends on the /tmp directory being configured to display the build logs. If the /tmp directory is not present on your Docker build image, Pipelines will be unable to display any build logs, causing the behavior described in this page's summary to occur.
Diagnostic:
On your local machine run the following command to run a local Docker container using the same image as configured in your bitbucket-pipelines.yml file for the affected step:
docker run --entrypoint=/bin/bash -it <imageName>:<tag/sha>If you are not specifying the image tag or SHA in your bitbucket-pipelines.yml file, you will need to check what was the SHA for your build image on the last build that was affected by this issue. You can follow the steps below to get that information:
Open the build on Pipelines;
Click on the "Build Setup" logs. You should see something like the below logged:
Images used:
    build : docker.io/atlassian/default-image@sha256:689e2c63e20a48e0a4d31156adcf32b4474dc32b50ab05abe3682b39fb9767a8
You can use this output to configure your Docker run command. In this example, it would be:
docker run -it atlassian/default-image@sha256:689e2c63e20a48e0a4d31156adcf32b4474dc32b50ab05abe3682b39fb9767a8
Once the command completes, run the following command to check if the /tmp directory exists:
ls /tmpIf you see an output like the one below, it means that you do not have a /tmp directory, and this is likely the root cause of your problem.
ls: cannot access /tmp: No such file or directory
Next Steps
If you do not have a /tmp directory on your Docker image, you have a couple of options:
Create your own custom Docker image that includes a /tmp directory on it.
Use a different Docker image that includes the /tmp directory. You can use the previous steps again to confirm the image you are trying to use has the /tmp directory.
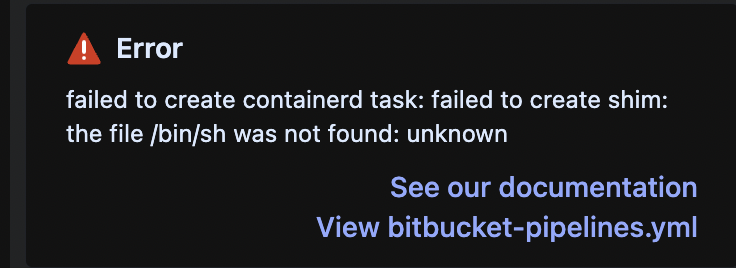
Case 2 - /bin/sh not present on the build image
Bitbucket Pipelines uses bin/sh as its entrypoint for command executions. If /bin/sh is not present on your Docker image, you will see two symptoms:
Like case 1, the build will show only the build setup and build teardown steps on the build logs, nothing else will be logged in Pipelines.
You should also see an error message being thrown by Pipelines like the one below:
Diagnostic:
Besides the error message demonstrated on the steps above, you can also follow the steps below to figure out if the image you are using for your builds does not have /bin/bash available to it:
On your local machine run the following command to run a local Docker container using the same image as configured in your bitbucket-pipelines.yml file for the affected step:
docker run --entrypoint=/bin/bash -it <imageName>:<tag/sha>If you are not specifying the image tag or SHA in your bitbucket-pipelines.yml file, you will need to check what was the SHA for your build image on the last build that was affected by this issue. You can follow the steps below to get that information:
Open the build on Pipelines;
Click on the "Build Setup" logs. You should see something like the below logged:
Images used:
    build : docker.io/atlassian/default-image@sha256:689e2c63e20a48e0a4d31156adcf32b4474dc32b50ab05abe3682b39fb9767a8
You can use this output to configure your Docker run command. In this example, it would be:
docker run -it atlassian/default-image@sha256:689e2c63e20a48e0a4d31156adcf32b4474dc32b50ab05abe3682b39fb9767a8
Once the command completes, run the following command to check if /bin/sh exists:
ls /bin/shIf you see an output like the one below, it means that you do not have a /tmp directory, and this is likely the root cause of your problem.
ls: cannot access /bin/sh: No such file or directory
Next Steps
If you do not have /bin/sh available on your Docker image, there are a couple of options to fix the problem:
Create your own custom Docker image that includes the /bin/sh binary on it.
Use a different Docker image that includes the /bin/sh binary. You can use the previous steps again to confirm the image you are trying to use has the /bin/sh binary.
Case 3 - For Linux Docker runners, the local volume path for /var/lib/docker/containers:ro is likely incorrect
While running the default Docker command provided in the creation of new Linux Docker runners, the default volume is:
-v /var/lib/docker/containers:/var/lib/docker/containers:roHowever, if you use a different path locally for your Docker installation, that's where you won't get any build logs because of the incorrect path.
Diagnostic:
To know your local Docker root directory, you can run the command: docker system info
The result will show you the "Docker Root Dir" where you can replace the default volume for your Docker container run command.
For example:
Docker Root Dir: /home/dockerNext Steps
Once you know your correct Docker root directory, replace your Docker container run command with the correct path.
From the example above, your volume path will be:
-v /home/docker/containers:/var/lib/docker/containers:roCase 4 - The default docker container user is a "nobody" user, which is often used for running processes with minimal privileges.
Check the default user of the Docker image container by following these steps:
Run a Temporary Container: Initiate a temporary container from the image and access its shell. You can utilize the
-itflags to operate the container interactively.docker run -it image_name_or_id shCheck User Information: Once inside the container's shell, utilize the
idcommand to determine the current user.idIf the
idcommand yields a default user such as example "uid=65534(nobody) gid=65534(nobody)", The "nobody" user could lead to problems because it lacks sufficient permissions for executing script commands. The solution is to run the image with a user that possesses adequate permissions.Eg: using the root user (UID 0) is acceptable.
Pipeline YAML
image:
  name: <registry>/<image>:tag
  run-as-user: 0 #root user
Dockerfile
FROM <registry>/<image>:taguser 0 #root userHowever, if you're looking for an alternative non-root user for security reasons, you might consider using other users with sufficient permissions. Eg: In the case of web servers and other services to run with limited privileges, one might consider using the "www-data" user with UID 82.
Pipeline YAML
image:
  name: <registry>/<image>:tag
  run-as-user: 0 #"www-data" user
Dockefile
FROM <registry>/<image>:tag

user 82 #"www-data" user
This comprehensive guide covers potential causes and diagnostic steps to address Bitbucket Pipelines build issues not executing commands. Choose the case that matches your situation and follow the outlined diagnostic and resolution steps.
Was this helpful?