Keep work parent-child relationships during CSV import to Jira Cloud
プラットフォームの注記: Cloud のみ - This article only applies to Atlassian apps on the クラウド プラットフォーム上のアトラシアン製品にのみ適用されます。
要約
When a CSV import is performed in Jira, we usually lose Parent-child relationships between imported work items, but the links can be maintained.
この記事の前のバージョンでは、"エピック リンク" フィールドを参照していました。このナレッジ ベースは、エピック リンク フィールドとエピック名フィールドの廃止に関する変更を反映して、2024 年 4 月に更新されました。今後、Jira Cloud ではエピック リンクの代わりに親フィールドを使用する必要があります。
ソリューション
Confirm proper format in the CSV file
Work item relationships are usually lost because of work item order in the CSV file and/or improper mapping of the parent and child during the import process.
まず、親子マッピングのために、エクスポートした CSV ファイルに少なくとも次の列が含まれていることを確認します。
Issue type, Issue key, Issue ID, Summary, ParentNext, confirm the file has all work items listed in order of their hierarchy.
That is, the topmost rows of the CSV must list all the Highest hierarchy work, with subsequent rows including the Standard work, and finally the Sub-task types.
Here's an example of what a properly ordered CSV file will look like:
<TOP OF FILE>
Initiatives and other higher levels
...
Epics
...
Standard work item types (Story, Bug, task, etc.)
...
Sub-tasks
...
</BOTTOM OF FILE>
CSV ファイルの parent フィールドを使用して課題 ID をマッピングする
For the parent→child relationship to work, copy the Issue ID of the parent work item and paste it in the Parent column of the the Child work item.
After making the above changes, the relationships should look as per the below sample table.
注: 使用されている ID はプレースホルダーの番号です。任意の番号を使用できますが、課題ごとに一意の ID が必要です。
作業タイプ | 作業項目キー | status | summary | issueid | parent |
テーマ | test-123 | 作業前 | Example theme summary | 1 | |
initiative | test-124 | 作業前 | Example initiative summary | 2 | 1 |
エピック | test-125 | 作業前 | Epic with parent and no child story but 1 sub-task and parent Initiative | 3 | 2 |
エピック | test-126 | 作業前 | This is an epic with 1 story and 1 bug as child issues mapped | 4 | |
ストーリー | test-127 | 作業前 | Example story 1 Summary no child issue mapped | 5 | |
ストーリー | test-128 | 作業前 | Example story with 1 child sub-task mapped, and a parent epic is mapped | 6 | 4 |
バグ | test-129 | 作業前 | bug with 1 child sub-task | 106589 | 4 |
サブタスク | test-130 | 作業前 | subtask 1 | 7 | 6 |
サブタスク | test-131 | 作業前 | subtask 2 | 8 | 106589 |
サブタスク | test-132 | 作業前 | Subtask 3 | 9 | 3 |
CSV 形式の生のテキストは次のとおりです。
issue type,issue key,status,summary,issue id,parent
Theme,test-123,To Do,Example theme summary,1,
initiative,test-124,To Do,Example initiative summary,2,1
Epic,test-125,To Do,Epic with parent and no child story but 1 sub-task and parent Inititive,3,2
Epic,test-126,To Do,This is an epic with 1 story and 1 bug as child issues mapped,4,
Story,test-127,To Do,Example story 1 Summary no child issue mapped,5,
Story,test-128,To Do,"Example story with 1 child sub-task mapped, and a parent epic is mapped",6,4
Bug,test-129,To Do,bug with 1 child sub-task ,106589,4
sub-task,test-130,To Do,subtask 1,7,6
sub-task,test-131,To Do,subtask 2,8,106589
sub-task,test-132,To Do,Subtask 3,9,3
In the above table, we have used the "Work item Key" column only for a better visual understanding of the table. When the work is imported into the destination project, each item will be assigned a new number (based on the work counter on the destination project) and the destination project key. For example, if we import the above work to a destination project which has the project key "CSV", and no pre-existing work items, then these newly imported work items will have the keys CSV-1, CSV-2, etc.
これで、CSV ファイルをインポートする準備ができました。
CSV ファイルを Jira にインポートする
[設定] (歯車アイコン) > [システム] を選択する
[インポートとエクスポート] 見出しの下にある [外部システム インポート] に移動する
[旧エクスペリエンスに切り替える] を選択する
[CSV] を選択する
[ファイルを選択] を選択して、マシンのファイル エクスプローラーで該当のファイルに移動する
アップロードされたら、[次へ] を選択する
Select the destination project where you want the work to be imported from the CSV file
追加の日時フィールドやメール アドレス フィールドにカスタム変更を加えていない場合、形式は [既定] のままにしておく
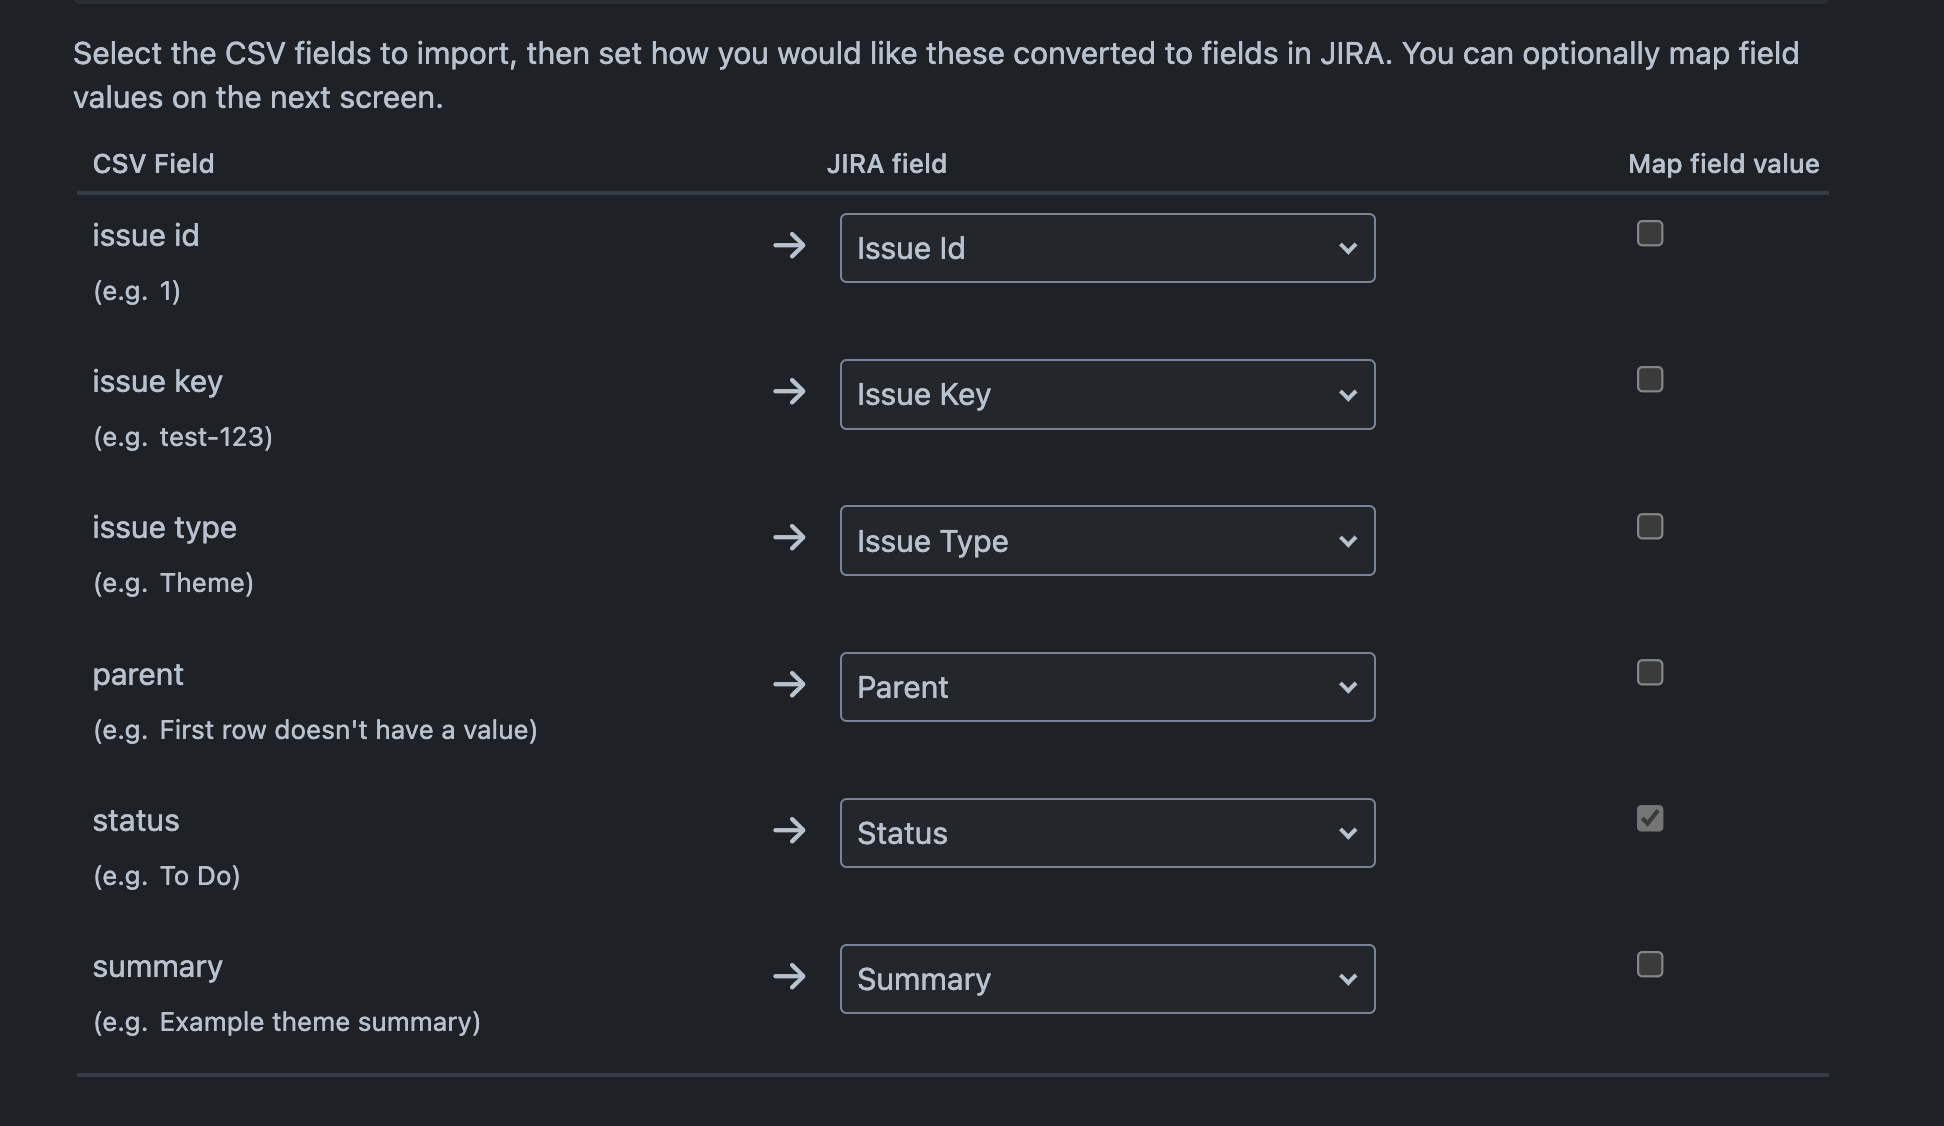
[CSV フィールド] とそれに対応する [Jira フィールド] を次のようにマッピングする
issue id → 課題 ID
issue key → 課題キー
issue type → 課題タイプ
parent → 親
status → ステータス
summary → 要約
You can also reference below sample screenshot:
[次へ] を選択する
ステータスの値が Jira の適切なステータスにマッピングされていることを確認する
たとえば、"To Do" ステータスが目的のプロジェクトの関連するステータスにマッピングされていることを確認する
[インポートを開始] を選択する
CSV をインポートする際に、その他の必要なカスタム フィールドを CSV ファイルに含めて、正しい親子マッピングとともにインポートすることもできます。
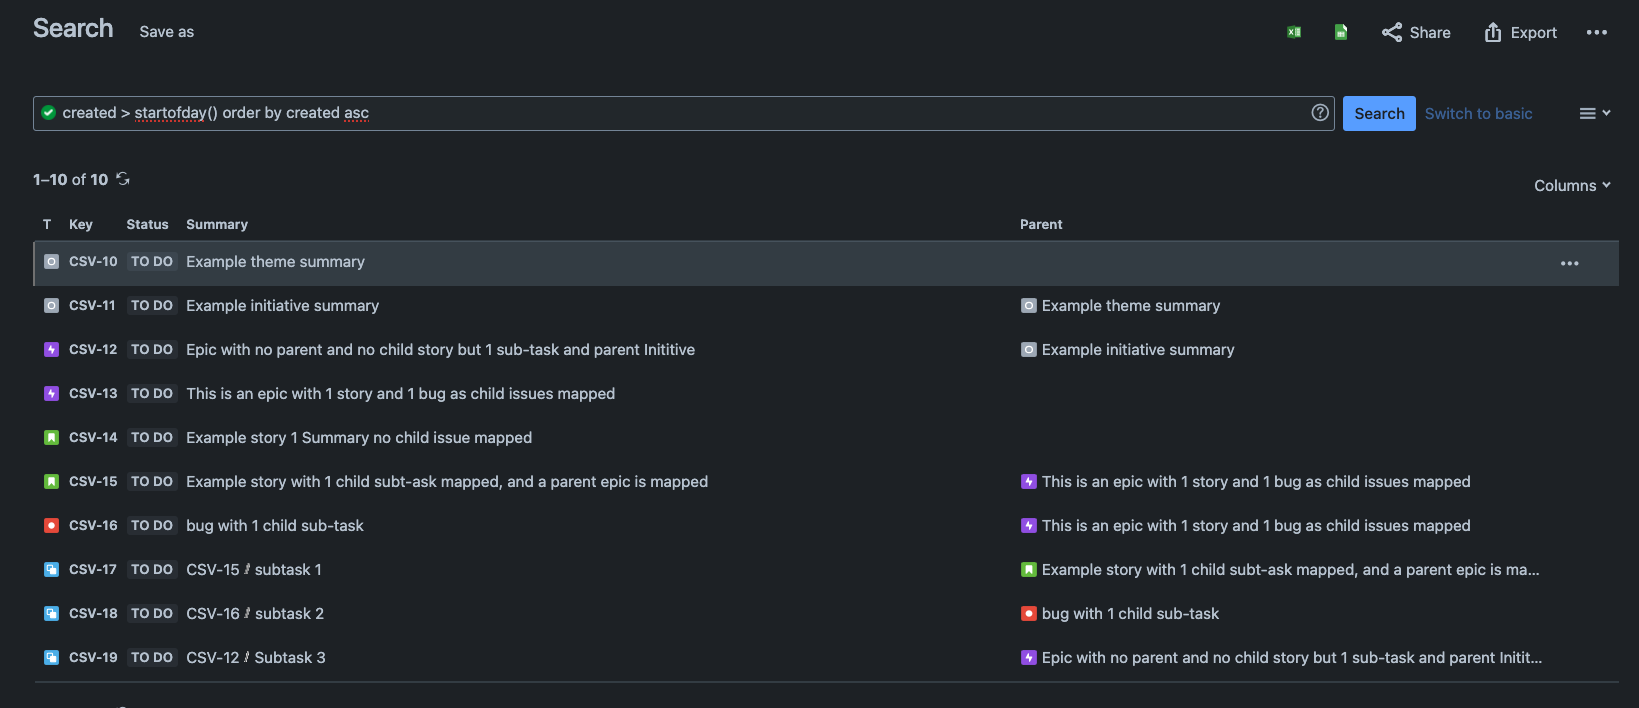
インポート後の結果のデモンストレーション
上記の課題の例をインポートした場合、最終結果は以下のスクリーンショットのようになります。
Parent field not available during import
In some cases, the "Parent" field won't be available for you to map during a CSV import. This is caused by one of two common factors:
Sub-tasks aren't enabled
Enable the sub-tasks option by navigating to the System> Settings > Work items > Sub-Tasks, or visit https://[yoursite].atlassian.net/secure/admin/subtasks/ManageSubTasks.jspa directly.
You should be able to map the Parent field successfully after sub-tasks are enabled.
Linked work items field is missing from screens in the project
If the Issue ID or Parent fields are unavailable during mapping, ensure the Linked Issues field is included on all screens to resolve this issue.
この内容はお役に立ちましたか?