Confluence で Amazon Web Service Application Load Balancer を構成する方法
プラットフォームについて: Data Center のみ。 - This article only applies to Atlassian apps on the Data Center プラットフォーム。
この KB は Data Center バージョンの製品用に作成されています。Data Center 固有ではない機能の Data Center KB は、製品のサーバー バージョンでも動作する可能性はありますが、テストは行われていません。 Server* 製品のサポートは 2024 年 2 月 15 日に終了しました。Server 製品を実行している場合は、 アトラシアン Server サポート終了 のお知らせにアクセスして、移行オプションを確認してください。
*Fisheye および Crucible は除く
要約
このページの内容はサポート対象外のプラットフォームに関連しています。したがって、アトラシアン サポートではこのページの記載内容のサポートの提供は保証されません。この資料は情報提供のみを目的として提供されています。内容はお客様自身の責任でご利用ください。
Confluence 6.0 introduces collaborative editing, which requires WebSockets. Additional configuration is required to ensure this new feature works with Amazon Web Services (AWS) Elastic Load balancing (ELB).
既存のセットアップをお持ちの場合、現在の設定に合わせて以降の手順を調整する必要がある場合があります。このページの手順では、新しい Elastic Load Balancer を作成します。
環境
Confluence Data Center 6.0+
ソリューション
はじめる前に
Confluence のベース URL をロード バランサの最終アドレスに更新済みであることを確認します。
Ensure your
server.xmlfile contains theproxyNameandproxyPortparameters, andschemeif you're using HTTPS.
For example, if you were configuring an Elastic Load Balancer to listen at https://confluence.example.com/ you'd configure your HTTP connector as follows:
<Connector port="8090" connectionTimeout="20000" redirectPort="8443"
    maxThreads="48" minSpareThreads="10"
    enableLookups="false" acceptCount="10" debug="0" URIEncoding="UTF-8"
    protocol="org.apache.coyote.http11.Http11NioProtocol"
    proxyName="confluence.example.com" proxyPort="443" scheme="https" />
ターゲットの作成
ターゲットは、最初は特定の Virtual Private Cloud (VPC) 用に作成される必要があります。その後、ロード バランサでそれらのターゲットに対応します。
From the EC2 Console, choose Target Groups under Load Balancing.
以降の推奨設定を使い、Confluence 用に 1 つ、Synchrony 用に 1 つの、2 つの新しいターゲットを作ります。
Once the targets have been created, click the Targets tab, and choose an instance to register the targets to. Both targets must be registered to the same instance of Confluence. If you are running Data Center, make sure to add all instances on both targets.
推奨設定
Confluence の場合 | Synchrony 用 | |
|---|---|---|
名前 | Confluence | Synchrony |
プロトコル | HTTP1 | HTTP1 |
ポート | 80902 | 80913 |
Health check protocol | http | http |
Health check path | /status | /synchrony/heartbeat |
Stickiness | オン | オフ |
注意
プロトコルは、ユーザーが利用するプロトコルではなく、ロード バランサと Tomcat の間のプロトコルを指します。Confluence ターゲットについて、SSL を Tomcat で終了させている場合を除き、HTTP を利用します。Synchrony では HTTP リクエストのみが許可されます。
The default port for Confluence is 8090. Check your
server.xmlto see what port Confluence is listening on.The default port for Synchrony is 8091. The port is configured with the JVM parameter
-Dsynchrony.port. See Recognized System Properties for more information.Make sure that the port used by Synchrony (8091 or a custom one) is open on the security group configuration in order to allow connections to the JVM.
ロード バランサの作成
ターゲットを作成してインスタンスに登録したら、Synchrony へのコネクションをプロキシするためのロード バランサを作成する必要があります。
新しいアプリ ロード バランサーを作成します。
注: Classic Load Balancer はサポートされておらず、この手順のスコープ外です。
ロード バランサが処理するリスナーを選択します (少なくとも HTTP または HTTPS)。
VPC とアベイラビリティ ゾーン (サブネット) を指定します。
[次へ] をクリックします。
SSL 証明書をお持ちの場合はこの画面でインストールし、[Next] をクリックします。SSL を使用していない場合はこの手順をスキップしてかまいません。
Choose an existing (or create a new) Security Group then click Next.
Choose the Confluence target you created earlier then click Next.
設定を確認して [Next] をクリックします。
作成をクリックします。
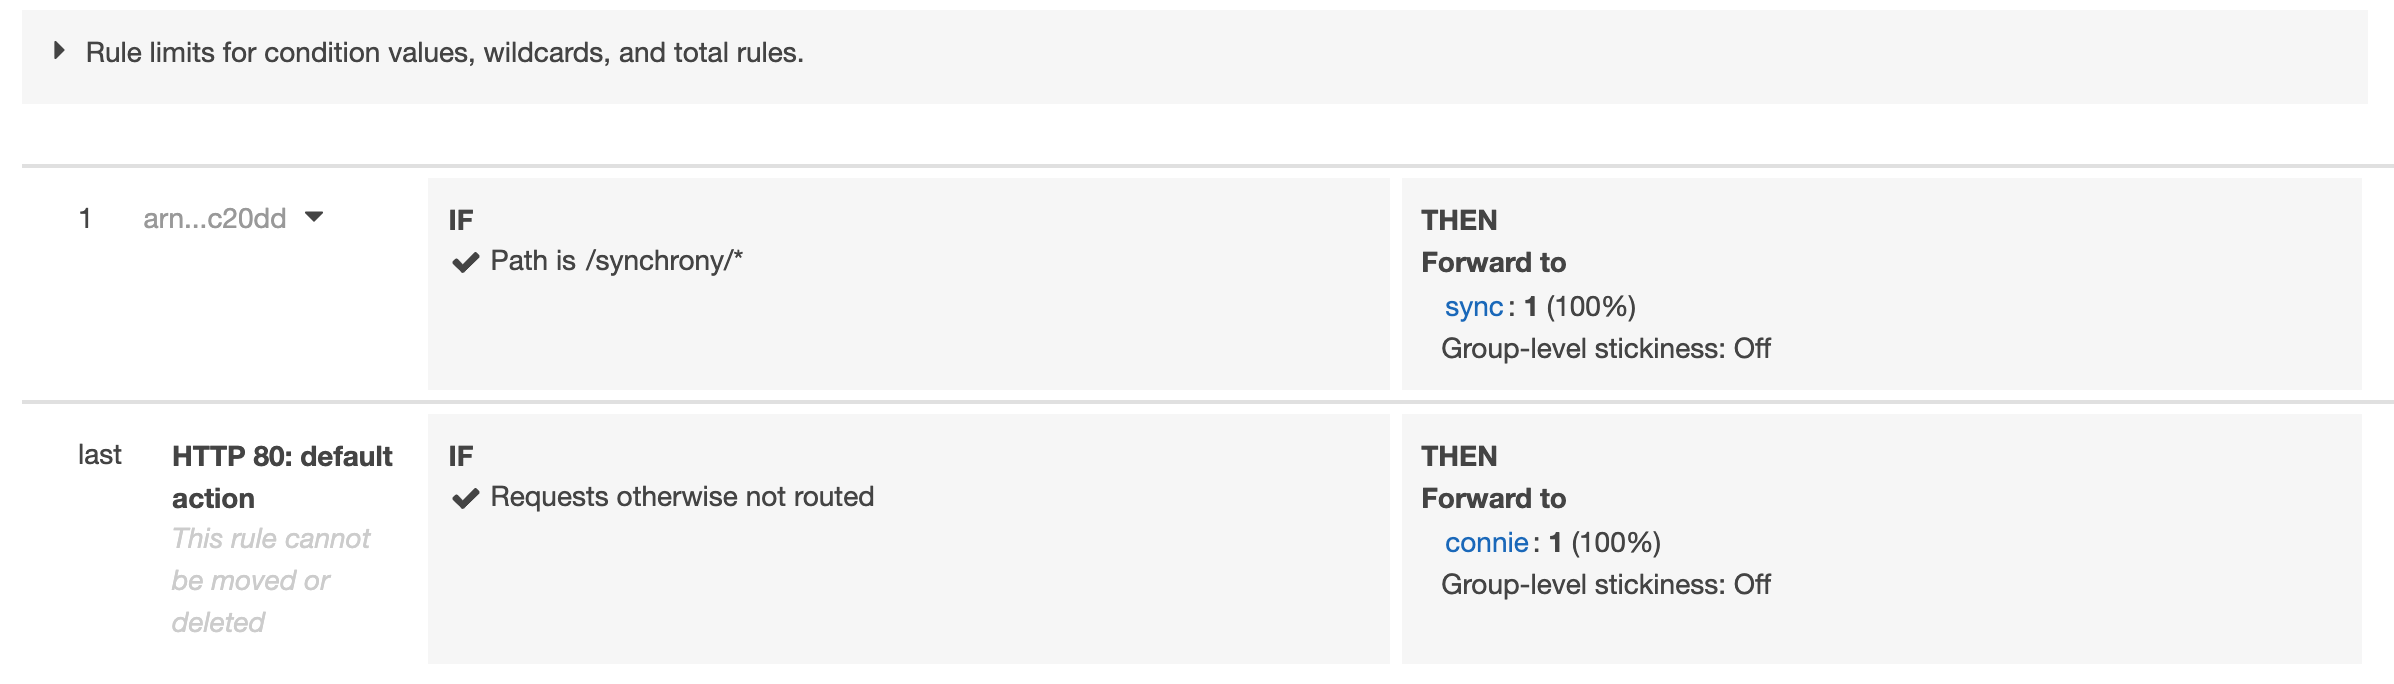
ロード バランサが作成されたら、Synchrony のトラフィックを Synchrony サービスに送信するための追加のルールを作成する必要があります。
On the Elastic Load Balancer page, Click the Listeners tab.
対象のリスナーを展開し、[View/Edit Rules] をクリックします。
Click the + button and select insert rule.
条件を追加し、ドロップダウンからパスを選択します。
In the Path is Value field, add
/synchrony/*作成済みの Synchrony ターゲットを選択します。
[Save] をクリックします。
適切に構成すると、ルール ページは次のようになります。
ルール
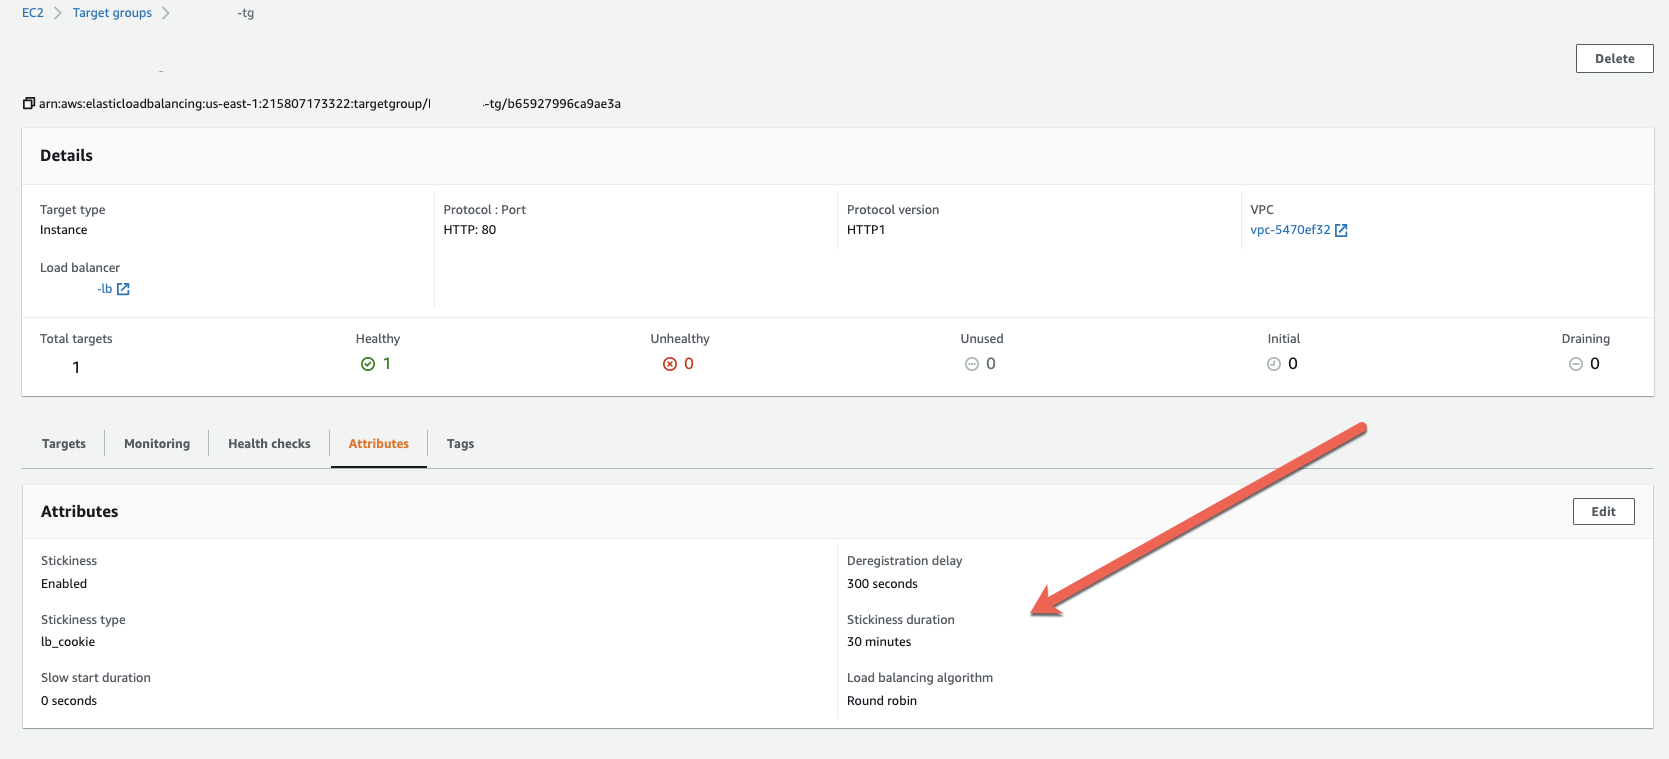
ターゲット グループ
テスト
設定が完了したら、期待どおりに動作するのを確認するためにいくつかのテストを行えます。
Go to Target Groups > Target Name > Targets and ensure the instances are listed as Healthy in the Status column
これは、ターゲット グループが適切に構成されていて、対象のポートでインスタンスに到達可能であることを示しています
ブラウザで https://<ドメイン>/synchrony/heartbeat にアクセスして Synchrony のルールをテストします
[OK] が返される場合、ロード バランサのルールとターゲット グループの設定が適切に行われています。
HTTP から HTTPS へのリダイレクト
The steps above can result in a single HTTP listener or single HTTPS listener based on the choices you made. To have the ALB redirect HTTP to HTTPS you will need 2 listeners, one for port 80 and one for port 443. The HTTP listener's only function will be to redirect traffic to the HTTPS listener and the HTTPS listener will be configured to pass traffic to the target groups as described in the "Creating the load balancer" section above (including the additional rule to route Synchrony traffic).
For more information on these steps please see AWS's article: アプリ ロード バランサーを使用して HTTP リクエストを HTTPS にリダイレクトする方法
この内容はお役に立ちましたか?